Jump to content

Diary Complete New grower - first grow - Auto fem - full DIY


afternoon blazer
 Share

Recommended Posts

Howzit guys

I started this adventure trying to find the cheapest and simplest way to grow some good bud.

Unfortunatly from my personal experience. There isint really a cheap way.

If you dont want to be frustrated and and have issues all the time and have a successfull grow to be proud of.

U need to spend a decent amount of cash.

Enjoy. . . 


Germination

So i germinated 1 banana monkey seed from biltong and budz.

Thursday night(9-07-2020) 13 hours in a shot glass. Then moved to a paper towel. And a plastic bag and left in darkness near my modem for warmth.(10-07-2020) .Until a taproot was visible.

GROW setup


Big shoutout to the forum for helping me get this grow box right.

@CreX @Prom @Fridgedoor @StickyD420 @Bakstein420 @TheUltimateNoob @Ill_Evan @oldsandals @Totemic @ORGANinc.

Full DIY vegbox 500x700 x 1000 high (double wall cardboard)

2 x side intake vents cutout with net coverings.

1 x 150w acdc cool white floodlight (Highly reccomended by @Crex.

1 x high power pc extractor fan. 2 x air circulation pc desk fans inside.

1 x chinese air humidifier

2 x white box stands to raise the pots to the light.

Inside of the box was covered in foil. And then sprayed matt white for even light distribution.


Grow medium and nutez.

Freedom farms classic(green bag) Biobizz - gro- bloom-topmax            Seagro

2 galon fabric pots


Grow monitoring

Hygrometer for temp and himidity

Ph pen(ordered from wish)

Tds pen(ordered from wish)

No timer used.

Temperature range Night low 17 degrees Day high 26 degrees.


This grow box is solely for veging and providing the dark cycle for the plants. When flowering starts. Plants will be moved outside at specific times and back to dark at specific times.

I will start of with 24/0 And then with the advise advise of the forum change my cycle. Will probably use the veg light to extend the daylight hours just a little bit.


COSTING BREAKDOWN.

5 Seeds with delivery- R430

Nutrients biobizz nd seagro- R800

Syringe and jiffy starters- R20

Soil -R200

Fabric pot and sauser-R75

Pc extractor fan- free

Double wall Cardboard box-R140

Foil- free

Matt spray paint -R70

2 x circulation fans and cables-R120

Humidifier- R100

Hygrometer-R100

Veg light -R380

Extension cable and multiplug-R100

Ph pen+shipping -R150

Tds pen+ shipping - R140

Microscope+ shipping- R70

420 FORUM advise - FREE FREE FREE

Total = R2895

More to follow. . . 

CollageMaker_20200710_084407602.jpg

CollageMaker_20200710_085727166.jpg

CollageMaker_20200710_084655893.jpg

Edited by afternoon blazer
  • Like 11
Link to comment
Share on other sites

Again, it's only a pleasure to help.

Which Lux app is that, looks like you can change some variables or Kelvin and such?

On Migro YouTube channel, he takes a Apogee PAR meter and actually tests it side by side a different app from the store, he has the link to it and tests it at different Kelvin too for reference, and lays it on a graph, to get slightly closer to the actual PAR of your light.

Might help...

So far excellent write up brother and await the next to come🤜🤛

Added: 


Edited by StickyD420
Video
  • Like 2
Link to comment
Share on other sites

3 minutes ago, StickyD420 said:

Again, it's only a pleasure to help.

Which Lux app is that, looks like you can change some variables or Kelvin and such?

On Migro YouTube channel, he takes a Apogee PAR meter and actually tests it side by side a different app from the store, he has the link to it and tests it at different Kelvin too for reference, and lays it on a graph, to get slightly closer to the actual PAR of your light.

Might help...

So far excellent write up brother and await the next to come🤜🤛

Thanks bro.


Yeah i came accross the migro video with converting lux to par. Thats how i ended up with the lux picture and the par picture.


So the top pic. Is a playstore app measuring the lux intensity at different heights from the light. ( LIGHT METER -Trajkovski labs) not adjustable


The bottom pic. Is the conversion from a website . From lux to par. At those same distances. 

  • Thanks 1
Link to comment
Share on other sites

Howzit guys I started this adventure trying to find the cheapest and simplest way to grow some good bud.

Unfortunatly from my personal experience. There isint really a cheap way.

If you dont want to be frustrated and and have issues all the time and have a successfull grow to be proud of.

U need to spend a decent amount of cash.

Enjoy. . . 


Germination

So i germinated 1 banana monkey seed from biltong and budz.

Thursday night(9-07-2020) 13 hours in a shot glass. Then moved to a paper towel. And a plastic bag and left in darkness near my modem for warmth.(10-07-2020) .Until a taproot was visible.

GROW setup


Big shoutout to the forum for helping me get this grow box right.

@CreX @Prom @Fridgedoor @StickyD420 @Bakstein420 @TheUltimateNoob @Ill_Evan @oldsandals @Totemic @ORGANinc.

Full DIY vegbox 500x700 x 1000 high (double wall cardboard)

2 x side intake vents cutout with net coverings.

1 x 150w acdc cool white floodlight (Highly reccomended by@CreX.

1 x high power pc extractor fan. 2 x air circulation pc desk fans inside.

1 x chinese air humidifier

2 x white box stands to raise the pots to the light.

Inside of the box was covered in foil. And then sprayed matt white for even light distribution.


Grow medium and nutez.

Freedom farms classic(green bag) Biobizz - gro- bloom-topmax            Seagro

2 galon fabric pots


Grow monitoring

Hygrometer for temp and himidity

Ph pen(ordered from wish)

Tds pen(ordered from wish)

No timer used.

Temperature range Night low 17 degrees Day high 26 degrees.


This grow box is solely for veging and providing the dark cycle for the plants. When flowering starts. Plants will be moved outside at specific times and back to dark at specific times.

I will start of with 24/0 And then with the advise advise of the forum change my cycle. Will probably use the veg light to extend the daylight hours just a little bit.


COSTING BREAKDOWN.

5 Seeds with delivery- R430

Nutrients biobizz nd seagro- R800

Syringe and jiffy starters- R20

Soil -R200

Fabric pot and sauser-R75

Pc extractor fan- free

Double wall Cardboard box-R140

Foil- free

Matt spray paint -R70

2 x circulation fans and cables-R120

Humidifier- R100

Hygrometer-R100

Veg light -R380

Extension cable and multiplug-R100

Ph pen+shipping -R150

Tds pen+ shipping - R140

Microscope+ shipping- R70

420 FORUM advise - FREE FREE FREE

Total = R2895

More to follow. . . 

CollageMaker_20200710_084407602.thumb.jpg.9a5340cd98aae26caf18969e28f214cc.jpg

CollageMaker_20200710_085727166.thumb.jpg.db550f86208c5264c9fc86c2f49fa6e2.jpg

CollageMaker_20200710_084655893.thumb.jpg.db364f170d74aa14e519566491670ff1.jpg


Aweee, nice one bro... Nice writeup as well. I feel honoured, lol. 


DIY stuff is awesome... And yeah, no one here wanted you to have a shitty first grow so what you had to spend to get up and running is kinda the minimum if you're starting from scratch. 

I spent a similar amount when I built my first box that had a bunch of cfls in it. Wish I thought of the LED flood lights though. 

Can't wait to see what comes of this. 

Happy Growing! 


  • Thanks 1
Link to comment
Share on other sites

17 hours ago, Ozzi said:

Small edit here bud: 420 FORUM advise - PRICELESS!

As a first time grower as well I've really been enjoying the journey of @zolrooker and @afternoon blazer. You guys have basically been asking all the question for me. Really learnt a lot in the last few weeks.

All the best and good luck!

Best of luck to you too buddy 👍👌lots still to learn from my side as well

  • Like 2
Link to comment
Share on other sites

19 hours ago, Ozzi said:

Small edit here bud: 420 FORUM advise - PRICELESS!

As a first time grower as well I've really been enjoying the journey of @zolrooker and @afternoon blazer. You guys have basically been asking all the question for me. Really learnt a lot in the last few weeks.

All the best and good luck!

Glad to be of any help bro.

@Ozzi

Post some shit

 Lets get a peak of what u working with.

  • Like 2
Link to comment
Share on other sites

What up 420 Fam.


Just a small update to keep the Diary going.


So the Banana Monkey i germinated got potted on Sunday Morning(12-07-20). With the seed cracked open. Into the root plug and final pot.

Sadly still nothing has broken through the soil. So just gona let it chill out for a while.


During the week. I was feeling abit irratated. So i germed another auto. SWEET TOOTH. Tuesday (14-07-20)

Seed felt better for some reason. 

Anyway. Same story shot glass. This time i did 24 hours.

Then paper towel and plastic bag for 18 hours. Temps about 28/29 degrees.

Awsome 15mm taproot shown this morning and she got potted. 


Put on a humidity dome. And popped her into the grow box. 


Lets hope its smooth sailing for now.

20200717_103722.jpg

  • Like 5
Link to comment
Share on other sites

What up lovely people.

So firstly. The did some investigating with seed 1 (banana monkey). Nothing was happening with the seed at all. Disapointing. But on we go.


And then there was 1. My second girl broke through the surface a little while ago. 🥳

Removed the humidity dome. And just gona let her chill tonight.

F#$% i waited a while for this shit.

We at the party now. Lets get it onnn.

IMG_20200718_200412.jpg

IMG_20200718_200416.jpg

  • Like 1
Link to comment
Share on other sites

What up Fam.

Hope everyone is doing good.


Just a small update.


Week 1- Day 3 since breaking through surface.

Shes looking good so far.

So gona keep it in the veg box for about 2 weeks. Get her abit stronger for the outdoors.


Currently raised the plants to the light.

Roughly about 300mm away now.

Helps with temp aswell.

Humidity is abit low. But i may turn on the hunidifier for some assistance.

I do have my extraction fan running currently. (Keep things abit cooler and fresher)


Been watering about once a day. Roughly 100ml per feeding. Plain tap water for first 2 weeks. (Tap water sits overnight)


Peace homies ✌

IMG_20200721_091647.jpg

  • Like 1
Link to comment
Share on other sites

7 minutes ago, zolrooker said:

Hey bro, please can you share where you got the PH pen, TDS and and microscope from?

Howzit bro.


Ordered it from "Wish"

But it takes a long ass wait. Like 2 months or so.


Was dirt cheap. But not sure how much quality to expect.


I did buy canvas pictures from them though. N was dam impressed. Lol.(1.5m x 900cm)(just the pictures. I had to made the frames)

So gave them a run again.


Also they have specials every 2nd/3rd day. 50 percent off ur order and shit. (Which is already F#$%ing cheap).


The world is weired sometimes.

Screenshot_20200722-142433_Wish.jpg

20200215_090634.jpg

  • Like 1
Link to comment
Share on other sites

What up Growmigos.

Update time.

Week 2 - day 8


Little girl goes out every morning into direct sunlight from 7:30am to 4:30pm.

Thereafter i move her into the grow box to supplement light for 24 hours on.

The veg light is about 350mm from top of plant. Temperatures are about 24 - 26 degrees inside.

She stands at around 50mm tall.


Have been watering every second/third day. With about 60-100ml of plain tap water. Left to stand overnight.

Gona be using the biobizz range. Grow. Bloom.topmax.

Should i start nutes this week. Or wait abit longer?

20200726_093929.jpg

20200726_093915.jpg

  • Like 3
Link to comment
Share on other sites

1 minute ago, Jimmy-z said:

Far too soon for nutes. Wait till node 4 or 5 and then only 1/4 strength or even weaker.

Sent from my SM-N950F using Tapatalk
 

I'm not sure about node 4 or 5, but when you see those first hard leaf ears start to fade and turn light green, or worse, yellowing, then it's time, normally 3 or 4 weeks maybe 5.

  • Thanks 1
Link to comment
Share on other sites

What up Fam.

Small unrelated update.

So got lekker and excited and pumped on Saturday - 01-08-20

I had my last auto out of 3.

So i germd the sucker.

Hoping for a mid week potting.


Unfortunatly 4 days later and it aint growing a tap root. The shell has cracked open. But no root. 

(It was a very tiny seed to begin with)

Gelato samba - bulk seed bank

From biltong and budz.


Germd it exact same way as all seeds i have germd.

Shot glass. Sink. Paper towel. Baggie. Some heat.

Feel really disapointed that 2 of the 3 autos i bought didnt germ.


Also @Naughty.Psychonaut has the gelato samba from the same place. And his is looking fire currently.

Could be tons of reasons

From luck to genetics to size maybe n so on.


Sucks coz they were some banger seeds and the 1/3 autos is growing amazingly. As seen on this grow log.


Anyway. We cant be dwelling on the past it is what it is. Come too far to be discouraged right now.

So after some chatting to @CreX and @TheUltimateNoob and @ORGANinc. and @Fridgedoor on the weekend. i needed to get me some seeds for the next grow. Which needs to be germd to start getting a monthly harvest.

Purple purple purple. Dont get more gorgeous then that.

Shopped around. And wanted to try a different supplier to start getting a good feel for genetics and shit. Ordered on Sunday.


And they came knocking today. 😎😎


Side note. Welldone on the packing .

20200805_175143.jpg

20200805_184253.jpg

Edited by afternoon blazer
Forgot to add the seed pic
  • Like 4
Link to comment
Share on other sites

2 hours ago, Fridgedoor said:

Sorry to hear you had some bad luck with the seeds bro. But you're right it is what it is. Hope the new beans will germinate and the Gelato will make up for the loss! Are those from a local breeder?

This is the gelato. 3 days no taproot. Will give it a few days more. And then see.


Seeds from biltong and budz

Link to comment
Share on other sites

18 hours ago, afternoon blazer said:

Also @Naughty.Psychonaut has the gelato samba from the same place. And his is looking fire currently.

What's up, bud! 

You must have me confused with another forum member, I am not growing a gelato at the moment, although I wish I was! 

Hope all the best with your new seed, excited to see how things unfold!

Link to comment
Share on other sites

Join the conversation

You can post now and register later. If you have an account, sign in now to post with your account.

Guest
Reply to this topic...

×   Pasted as rich text.   Restore formatting

  Only 75 emoji are allowed.

×   Your link has been automatically embedded.   Display as a link instead

×   Your previous content has been restored.   Clear editor

×   You cannot paste images directly. Upload or insert images from URL.

 Share

  • Similar Content

    • By Gjack
      Hi! I'm new here. Please help me to feel more comfortable at this place. Recently i owned a little farm. As I was tending to the vegetables in the garden, I got the idea to plant some marijuana for my own use. The biggest problem is that I live in a country where it is illegal. So I'm open to talking about this topic, share your experience. It will be very interesting for me. Thank you in advance.
    • By Johnsmithled
      This is how I built an overpowered light worth $2500+ on the market for only $850. All currency is CAD.

      *BEFORE STARTING*
      Watch the 6 part growmau5 series to learn the wiring:
       
      For the grounding plug:
       
      Technical:

      4x Hlg 185H 700ma in series drivers (i suggest you buy the newer 240H model) $250

      40x 5000K $350

      7x 3000K $25
      (You can use less I used way too many)

      All are bridgelux Gen 3/ C3 (Make sure theyre all plug in only dont mess around with the solder ones unless you have 100+hours experience in soldering)
      The 3000k ones I used were soulder onlys. Lost a couple due to human error

      Total Cost (TC): $575

      Frame:
      (Choose a better material for frame, I used wood composite because I was lazy) (I would think aluminum would be the best material but all have their pros and cons)

      Wood composite 2x2ft v

      Matching plastic 2x2ft (painting frame) $50?

      Thermal tape (sized to the width of the led bars) $20

      TC: $70-100

      Electric:

      100’ length 20guage solid core wire $60

      50 pack 2 wire wagos 221 $25

      4x plastic junction boxes 4inch x 4inch x 3inch (make sure it comes with something to plug up the holes and hold the wire)$40

      500 assorted pack heatshrink tubing $20 (good to help fit in junction box)

      4x Leviton 515PV 15Amp 125Volt grounding plug $20

      25’ 16guage wire (for the grounding plug) $20

      TC:$165-Everything is super flexible here just make sure your amps and volt calculations are solid.
      -Dedicated extra fans (required): With 2 medium fans running on the light, and another 2 small fans running on the drivers everything is 20C-25C.

      SETTING UP THE DIMMERS

      (Very easy if you do it like i did in these pictures)

      All you need is:
      •100k potentiometers (maybe an ohm meter if you want to make sure ur dimmers go all the way to 100, most dont they go to like 92 or 97)

      •20 guage wire (same as the led strips)

      •Plastic junction box (make sure its got rubber wire holders that you cut a hole through with scissors and put the wire/ potentiometer through)

      •211 Wago wire connector

      •soldering machine (temperature is dependant on what kind of solder you use) $25

      • silver solder (find a lower temp soldering machine ~360f for silver) $20
      (This light is truly 800w if you use the exact parts, if you use more or less drivers and led strips or different brands then the wattage can vary from 600-1000, materials are very flexible just try to make sure volt/amp calculations are correct) (Always be cautious with electricity, build this whole thing without being plugged in to any wall outlet/power source⚠️⚡️)


    • By AfrikaansePotkop
      Hi everyone, 
      I am currently looking to purchase an indoor setup for myself. Nothing fancy or big. Just enough to be a new hobby. I am always willing to invest in more stuff later, just dont have the money right now.
      So basically my budget is Around R5k. I am willing to go over, but anything lower is always preferred.
      I got a quote form MarijuanaSA and want a few opinions on it, or just a whole new quote for those that are willing to make one.

      It seems to have all the important items in it. I can buy a few items that do the same at lower prices, like on takealot. I am looking at 0.8x0.8 or a 1x1 tents. What would be better? I want to grow around 2 to 3 plants at a time.
      Then, I would really like a cheaper light to use but just cant seem to find a good option that is less than 1k...
       
      So basically, I am asking for assistance in selecting all the basic items for my first ever indoor grow. Whatever saves me the most money and gives me enough items to get away for at least 2 harvests before investing more.
      I already have soil and pots from my outdoor plants.
      Any help will really be appreciated as I barely know what I am buying with indoor growing equipment.
       
      I have a small list of just a few items that I am putting together to use as a purchasing guide. Here it is for a general idea of what im currently looking at:
       
    • By Martin7318
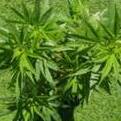
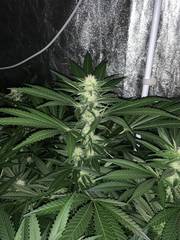
      Started with a few seeds around 2 weeks ago, 4 of them. All bag seed.
      Along with a bunch of equipment, I received 3 fresh seedlings of In-House genetics "Deluxe Sugarcane".
      All 7 seedlings currently under 1 x QB-75 from GrowOpz (32cm above tallest plant), 18/6 cycle in the tent.
      Soil being used is called "420 Mix" by 3Sixty.
      Only feeding I have done was for the soil - Biodyne Environoc 1ml/L given for the first time with last watering. Pots seem to be holding water for 2/3 days at a time.
       
      I'll post the back log of photo's here, the 3 bigger girls in the middle are the Deluxe seeds, the other 4 are mystery seeds.
       
      Please comment, good, bad, happy, sad, all welcome. I'm a fast learner and eager to learn, I look forward to it!
       

      (Picture taken Yesterday 10/08)
    • By Budwizer
      These are my DIY QB lights
      I can run them full power with no issues. Quite expensive to build, but I like the reliability of passive cooling.


×
×
  • Create New...