
-
Similar Content
-
 By TrexTech_Extracts
I've been struggling to find a local and RELATIVE resource for another growing technique that's been around before my forefathers and theirs. I understand the hempy growing style to be passive hydroponics. Basically growing in a single unit containing soilless media with a raised overflow hole. Think of a single DWC bucket, but now NO motor NO air pump NO irrigation other than a hole a few centimeters from the base. (look further https://www.growweedeasy.com/what-is-a-hempy-bucket-and-is-it-good-for-growing-weed). You never run the risk of overwatering your plant because of this carefully placed overflow; every watering/feed is replenishing the old water in the res GRANTED you measure how much liquid it has taken to fill up in the first place. The internet suggests you fill the entire bucket with some hydro media and feed/water until you get atleast 30% overflow, but filling up one bucket top to bottom classifies to me as those Dutch/Bato buckets. However my adaptation still follows the principle of hempy style, but utilizes a second bucket acting as a larger (media-free) res. Bare in mind the top attached bucket has to have drainage/holes to allow water to flood the bottom few CM.
Now here's the catch! My adaptation only works if the bottom res bucket's overflow/drainage hole is HIGHER than the base of the top pot holding media and root mass. For a more detailed (and pedantic) look, feel free to check out my live grow report where I employ a modified hempy bucket for a Fast Buds Gelato auto: https://www.420sa.co.za/grow-reports/outdoor-grow-reports/gelato-auto-perlite-hempy-bucket-r33/
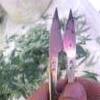
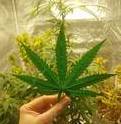
In this post I will be focusing on two gifted Apple Cups (AC), where I'll be doing a head-to-head in organic soil (FF Classic) vs this hempy bucket story. Please note while in a mini greenhouse these plants are growing outdoors and are only kept in the plastic structure during rain, torrential wind or to raise the humidity when my cheap hygrometer lies and says it's under 35%
AC#1 Hempy is first image in green pot, AC#2 organic in grey pot (perlite layer added and initially too much)
Stay tuned!
-
 By Georgi
12 x 240W LED Grow lights, as new, for sale.
6 are with wooden frame and 6 are with aluminum frame.
Wooden frame is more expensive but if you buy the lot then price will be the same for all.
-
By Georgi
12 x 240W LED Grow lights, as new, for sale.
6 are with wooden frame and 6 are with aluminum frame.
Wooden frame is more expensive but if you buy the lot then price will be the same for all.
-
 By AK-47 Gold Arabesque
First time growing photoperiods, quite excited.
Genetics
Hiroshima by Renegade Seed Co. 6 Pack
High THC, and according to the product description should deliver "high yields of dense, rock-solid buds." Hoping to achieve that.
Want to make one a mother and start learning to clone. The description says "These highly stable genetics produce two phenotypes at most." Should be easy to choose a winner to reveg.
They advise topping, which I am also looking forward to learning. Want to also try "FIM" a plant or two to experiment.
Grow Setup
Same as before. Here
~
Lets go
9 November
Seeds arrived. Also received a Promotional 2 Pack of G-Fawke.
10 November
Seeds into a glass of spring water. Onto a heating mat and into a dark cupboard to soak for 18 hours.
11 November
Seeds started showing roots. All 6 seeds popped, gently took them and placed them root facing down in Jiffy Preforma Plugs.
Covered the holes slightly and into the ROOTiT Small Propagator they go. Heating mat underneath, and gently misted with spring water. Also threaded the hygrometer reader through a ventilation hole, to see the environment reading.
I think this reading is fine for germination. Any and all feedback welcome.
Hoping for them all to push out effectively over the coming days. In hindsight I should have maybe done the paper towel method to get the roots longer, before putting them into the plugs. I've also previously had a failed germination where I watered a bit much, so just gently misting this time as to not drown/stunt the seeds.
-
 By High_grade.420
150w Grow The Jungle LED Grow Light , The Light is full Spectrum. Samsung LEDs and Osram Driver , They're hands down one of the best lights iv used out of the many that I have used over the years,
Lights Aren't available to order in the country , Imported from spain ,
more than 1 available , price is Negotiable.
If you want to know more feel free to Dm me
-

Recommended Posts
Join the conversation
You can post now and register later. If you have an account, sign in now to post with your account.