Leaderboard


Popular Content
Showing content with the highest reputation on 08/20/2019 in all areas
-
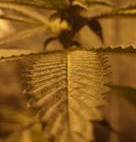
Starkiller OG at day 32 Flower Full shot with the rest. The stretch is well underway with the Scott's OG's and ASD's. Pretty much neck and neck with the different soils at the moment. Will try get a shot not under the HPS next week Just a word on the environment. Just running 2 x 400W HPS side by side in a 150 x 150 tent. Currently using a makeshift plastic sheet catchment tray as my mate miraculously lost it somehow. Still can't fathom that... Two days prior to this photo they all received a dose of liquid humic. Next up SST3 points
-
Yes. My ventilation works in a loop. Active intake into my flower tent with a 6" inline. The flower tent is then "linked" to my veg tent with 8" ducting which is the ducting you see in the bottom right of the pic below. In the veg tent there's an 8" inline pulling air back outside.2 points
-
ya they went back down almost immediately, defs not on the plants. they only came up because I completely saturated the pot with water2 points
-
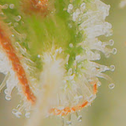
@Kgrows those are arthropods, most likely springtails, they are too cool, love the white one. They are beneficial buggos that live in the soil helping to break down the matter in there, if you wanted to be living soil, thats the right stuff. I would not disturb them. There are loads of different kinds (There are about 3,600 different species), always in the compost. You can read more about em here https://en.wikipedia.org/wiki/Springtail2 points
-
Organic vs autopots. Looks like I stuffed up the autopots, even though there is one bigger autopot plant. Two phenotypes. Purple and green. Lowered my light yesterday to see how they respond. Also stuffed up the light cycle in this tent so hopefully the photo period plants would not reveg. I did however keep the dark cycle to 12 hours every time. Sent from my VTR-L09 using Tapatalk2 points
-
So my cloner is pretty much the same except for the stems in the water... I keep the stems suspended a few mm above the water surface and let the bubbles pop and spit onto the stems... This keeps them moist, but not soaking.. Like this I can see roots in as little as 3 days from cutting it off the plant.. Check out PsyCLowns bubbler cloner... It's the same everything as mine... And he just got roots in under a week with no rooting hormone at all @PsyCLown2 points
-
GorillaZ at a couple weeks flowering2 points
-
Wake and bake snake2 points
-
It took a bit longer than expected, probably because of the low ambient temperature despite the fish tank heater in the water. But good results, 100% of the 14 clones grew. I've given away a few and trashed a couple who's mothers were actually fathers. Below is a pic of what the roots look like, I'm potting the remaining ones today2 points
-
My previous attempt to build a cloner was ok-ish but it was a bit of a pain to work with. I've just thrown together a different and very DIY one and I'm pretty happy with the results The biggest issue I had was the polystyrene holders for the clones. This time I used a foam knee pad as the base. I cut circles in it by using the bottom of a silicone tube, even the hole making is DIY... I drilled a hole in each foam disk, and cut from the centre to one edge. This make a perfect holder for the stems and is easy to put back in the hole. The final result looks like this The bottom container is filled with water Fish tank heater Air pump and two large air stones - the bubbler part The foam pad rests on the water, so the stems are submerged Clear container of the same size used as the humidity dome Low wattage CFL light, resting on the block of wood to keep the heat of of the box I've just planted cloned a few of the plants, so I'm hoping I'll be seeing roots in about a week.1 point
-
I leave it. Humidity is very low here in the winter (10-30%) and sits at about 50-60% during summer so it gets evaporated very quickly1 point
-
Sup peeps! while flushing to correct ph, a few things came out of my medium. these pots have a layer of compost in them, which i'm guessing is where they came from, good or bad sign? good or bad insect? if bad, could they have spread to my other plants & how do i get rid of them if i need to?1 point
-
Not really. Was just thinking. I stuffed up my light cycle with adding another light in my tent. Kept the 12 hour dark cycle so now my light schedule is different than before. But it is all good again now. Sent from my VTR-L09 using Tapatalk1 point
-
From what I have read, as long as you have regular dark schedules and not jumbled it should be fine, so an 18/12 for flowering should work. Lights will be on more often so you can expect a jump in electricity. From what I have read... You can get a 15-30% increase in yeilds. At the cost of adjusting to a 30 hour light cycle to do maintenance and things you need to do. Are you thinking about trying?1 point
-
@Dank shot bru! I thought it may have been a part of the web, was more concerned that they were root aphids or something similar.1 point
-
ya that makes more sense. I haven't tried that tbh, my main issue would be having dark period during the day. Having to manually adjust your timer every day will be a pain in the ass1 point
-
What I mean is 30 hour cycle, 18/12 for instance. Sent from my VTR-L09 using Tapatalk1 point
-
@SkunkPharm you cant really give more than 24hrs of light, 24hrs means its on all the time1 point
-
When I made the first version I looked around and could not find any solid advice on in vs out of the water. I ended up going with in the water because I was not getting enough bubbles to keep the stems wet. It has worked really well actually, so far I'd guess about 19/20 clones succeeded. I've got three more that I've just put into coco so hopefully that is another three successfully cloned. The did take really long to start rooting this time though, I'm assuming because its winter. I'd say about 7-10 days for the root nubs to start and then another 5 before there was enough of a root to justify planting them out. I do have a fishtank heater in the water, but that can only do so much. I think next time I clone a few I'll see if keeping the lid open sooner helps the growth get started. What are your timelines / process like?1 point
-
Not even gonna date this, but two of the plants (bag seed & CBD Critical Mass) are starting to get a little frosty. I have now set the LED's to 380W as the plants seem to be enjoying it. They bounce back soo quickly after moving them around and messing with them. I feel 380W is excessive for the small area I have... But I am able to do so, so let's see.1 point
-
Well thats embarrassing, last update was more than a month ago... Things have progressed allot, all ladies now in final stages of flower. I must say, this grow was a good example of how a small mistake in the vegging stage of a auto can negatively influence the yield, if it happened with a photoperiod grow one could have easily rectified the issue before switching over to flower. I personally do not stress to much about how much grams I pull per plant, growing for personal use Picture of the ladies sunbathing outside and posing for a photo: From left to right we have the Daiquiri Lime, Fastberry and then the CBD Crack. Close up of the Daiquiri Lime, I must admit she does look the best out of the 3, keeping in mind I did not do much or any training: Next is the Fastberry, amazing colours and super frosty: Close up of the Fastberry: And lastly the CBD Crack, was hoping for a bit more stretch, but it is what it is, lesson learned: Hoping to harvest in the next 2 to 3 weeks.1 point
-
Day 68 / Day 16 of flower Did a watering and a shuffled (rotated in their spot) the plants to try optimize bud sites getting light. I also increased power going to my LED's mostly to test the heatsinks and their cooling and so far all good. Will increase again sometime soon and monitor. I'll then bring it down again as I do not feel so much power is needed in such as mall space and the efficiency of the LED's end up diminishing fairly quickly. Sent from my Redmi Note 7 Pro using Tapatalk1 point
-
Fermented Plant Juices yes. Look into Korean Natural Farming, a lot of home organic growers are heading in that direction. It basically relieves you of any need to buy commercial bottled nutes and inoculants. Everything can me be made with what you have at home or from the supermarket. That comes down to getting your amendment ratios right in your soil. Couple that with a soil that has cooked well and the plants will use what they need when they need to. That being said, I start my clones/seeds off in a very simple mix - 1 part EWC, 1 part peat moss and 1 part perlite (I dont even feed this mix) and this mix hosts them comfortably till 1 week prior to flipping, when I'll transplant them into their final pots with the super soil.1 point
-
Flower update post water.1 point
-
. My pic of the week Sent from my SM-N960F using Tapatalk1 point
-
Thought I'd give an update on what's happening my side grow wise 3 different strains running in my tent at the moment, soon to be 4. Back left - Rare Dankness scotts OG in the Organics matter living soil Back right - Humboldt seeds Amherst Sour Diesel. Also in the OM soil Middle row left - Rare Dankness scotts OG in my own soil Middle row right - Humboldt Seeds Amhest Sour Diesel in my own soil Front - Rare Dankness Starkiller OG in my own soil Delicious Seeds Sugar Black Rose soon to enter in some more OM soil. The Scotts OG's are now 2 and a half weeks through flower. They are clones of the same plant. They were transplanted into their respective soils a week before flip. They came from a regular seed The Sour Diesels are 2 weeks through flower. Also transplanted a week prior to flip. I'm pretty sure I put them in the flower tent too soon but that's no major issue. The Starkiller OG has been in flower for 4 weeks and 4 days now. She came from a regular seed. Only bought 2 regular seeds of this strain, thank fuck the gamble paid off. The first seed I germed and grew out turned out male. So i germed this seed with a clenched nort till she showed sex! As you can tell I'm running the same strains in my soil and the organics matter soil. This wasn't initially intended but I've essentially got a comparison going here. They are clones of the same plants and were very similar in size before being transplanted into their respective soils. Game on! Will do my best to keep you guys updated The Starkiller OG1 point
-
Day 61 / Day 9 of Flower So I reinforced my tent a bit, not fully done but its something for now. It's helping with the negative pressure and the sides getting sucked into the plants. I did another heavy lollipop / defoliation on the plants, will leave them for now to recover and continue their journey, I should have taken a pic before. I only have a pic I took on the 8th unfortunately. On 8 August: Today: Sent from my Redmi Note 7 Pro using Tapatalk1 point
-
yeah dont call it too soon, it will be very obvious if its a male in due time, then just carefully take that plant out and let the ladies be lesbian yeah dont call it too soon, it will be very obvious if its a male in due time, then just carefully take that plant out and let the ladies be lesbian1 point
-
Here we go, cobs in place, but still needs to be mounted. Had to dismantle my first prototype, using the COBs on this newly made cooler. Wattage upped to 750w with the addition of 220v 50w cob. Breakdown as folkows: 4 x 100w 220v 5 x 50w 12v 2 x 50w 220v Ive left enough space between the back fins to add more if needed, but hopefully the current fins will be enough. That's it for the morning, will probably finish it off this evening. Sent from my CLT-L29 using Tapatalk1 point
-
Oh ok. Does look a lot better. That tip burn situation is usually low ph or salt buildup but doesn't seem thats the issue here. Try measuring your runoff ec. If its higher than whats going in there may be an issue. Paul1 point
-
I have never sent weed via post, I do not think it is a great idea either especially considering I am not sure how legal it is. If you really have to, I'd consider the following to try be on the safe side. Last thing you want is a seized package and police rocking up at your place. 1. Vacuum pack it, then vacuum pack it again - do this as close to shipping as possible as the smell will start to permeate the packaging and will get worse with time. 2. Purchase some coffee beans and put the vacuum packed bud inside there - my thinking being to try and help mask the scent from any of the courier employees as once it has left your hands you have no control over the parcel. 3. Take the fastest shipping available, same day or overnight. The less time it spends with the couriers the safer IMO, also the smell will continue to permeate the vacuum packaging as time goes by. That is my 2c, it may be overkill and unnecessary though. If you really have a lot of excess, consider doing some extracts for him as well. Some dab for example.1 point
-
PAXI at Pep is pretty cost effective1 point
-
Just to add, its definitely not an iron deficiency. The most common cause of iron deficiency is poor drainage and waterlogged roots. (EHG Micro has plenty of iron, that's where the brown colour comes from.) Because iron is not a mobile nutrient in the plant you'll notice it first in the new growth and not the leaf tips. Also, I am assuming your coco was well washed before you used it? In my experience MOST coco is very salty regardless of what the manufacturers say and that is particularly true of the 5kg blocks. Your runoff ec will give a clue as to whether that's the problem. Paul1 point
-
Hi. Not registered on this forum but was referred to your post. I see you are using our nutrients. That being the case you don't have a nutrient based deficiency meaning the nutes are not the basis for the problem. Other factors can manifest as a deficiency because the plant's uptake is being hindered by something. At your ecs it's probably not an overfeeding issue. Unfortunately these problems can be difficult to diagnose but looking at your leaf tips it may be a potassium deficiency which is often caused by ph being too low. Try watering with ph neutral water and measure your runoff ph. Measure your runoff ec as well but as I said that's unlikely. Coco is a good medium but can be prone to low ph issues. Runoff values are a valuable indication of what's happening in your medium. If you're using a ph meter has it been calibrated? Will try and register on this forum but sometimes get irritated with these things. Can also be contacted via the ehg website info email. Paul EHG1 point
-
I brought in about 8 ladybugs into my tent just over a month ago to control a spider mite issue I've been battling for a while now. Thought it was a complete fail seeing as I havent seen them since. Was surprised to see this little guy/girl pop up last night1 point
-
Are these male preflowers? Im not 100% sure1 point
-
Have been testing Organics Matter's newly released living soil on this HSO Amherst Sour Diesel. She was transplanted into the soil just before flower. I'm genuinely impressed with this soil. Have not used a single drop of bottled nute on her. Gave her one watering with coconut water. Otherwise humic, fulvic and EM. She's 7 weeks through flower now Gonna be testing a few other strains in the same mix as well. Including a Royal Queen Seeds Chocolate Haze and a Delicious seeds Sugar Black Rose. Will keep you guys updated!1 point
-
How goes folks I harvested the A.S.D, Blue Kush and P.O #1 on the 23rd of November. 11 weeks into flower.(77 days). The P.O #2 and P.O #3 were harvested a few days later on day 81. Im assuming that this harvest was delayed by the intense heat we experience here over October and November. To be honest none of them looked 100% ready to harvest but the trich's told a different story so I worked according to that. The blue kush was a flop of note. Extremely airy bud but it actually tastes good and I could very well make BHO with it. I still managed to yield 68g's from it. The A.S.D and P.O #1 are now jarred. The A.S.D produced a total of 88g and the P.O #1 produced 77g which I'm really happy with for my 2nd organic grow. (zero feeding). The P.O #2 and #3 are still hanging up and will be jarred on the weekend. I think the P.O #3 (hydro) will yield more than the organic #1 but of course that doesn't conclude anything as they are not from the same seed, she does look decent though. The P.O #2 was a bit underwhelming and as you'll see in the pic, still looked largely unfinished. Here's some pics on the day of harvest. I had some better pics on my phone but unfortunately that got stolen... Dried bud pics to come! Amherst Sour Diesel Purple Orange CBD #1 - Organic. She actually to started push through some of her purple regardless of the sub 40 degree heat Purple Orange #2 Organic Purple Orange CBD #3 - hydro1 point
-
Depends on how many amps the 400w draws and what voltage you have at your place ( Magnetic pull more than digital) . You need those to figures to work out accurately what it pulls. Standard in sa is 220v but it doesn't mean you have 220 at your place , I have 240v for example. Once you have amps and voltage it's easy to work you the kw/h it draws , 1 unit of power is 1 kw/h of electricity Cheers Glo Ps . Didn't see 420sa post , basicly the same idea and really easy to calculate1 point
-
Having an oscillating fan keeps the air circulating nicely allowing Co2 to be taken up by the plants more efficiently. In really small places that might not be such an issue though but I would still have a fan in there of some sort just to move the air around. A fan also ensures stronger stems and branches as the plant adapts to endure the 'winds'1 point
-
Hello folks As many organic growers will know, weed or veggies, Worm castings(worm poop) otherwise known as vermicompost is an essential ingredient in your soil mix. Reason being it has a very rich and vast nutrient content. To produce worm castings you need a worm farm and the beauty is that you can get your own worm farm going at home very quickly with minimal effort and not too much damage on the wallet. After doing a lot research on DIY worm bins I've gone with the pretty standard stackable setup consisting of 3 bins stacked upon each other. I've made some tweaks of my own. All the equipment cost me about R430-00 including the worms and I will never need to spend another cent as all you need to do is feed them your kitchen scraps and paper. This is what you'll need to get, or use if you're lucky enough to have some items already at home: 3 stackable containers. Tote containers are commonly used . I use the 45L one's. It is possible to start with 2 for the first month or two. You must also have at least 1 lid. R240-00 Screw In Tap R25-00 A Drill Drill Bits Shade Netting. Enough to cover the base of one container and for use as vents About R40-00 A Glue Gun. Glue will do fine otherwise Newspaper for bedding Handful of potting soil Earthworms(Red Wrigglers) - 400 or more - I get 600 for R150-00 Some left over veggie scraps. Or buy some chopped butternut Ok let's get started! First we'll start off with the bottom container. This container will be used to collect all the liquid run off from the upper containers. This liquid is known as Worm Tea(lid wont be needed for this container) Drill a hole in the side of the container at the bottom to fit the Screw In Tap Screw in the Tap and make sure the fit is nice and tight Use some silicon sealant to seal off the tap and prevent any leakage And that's your bottom container sorted!! Now onto the 2nd Container. For now this will house the worms, their bedding and their food which they will be composting Drill holes into the bottom of the container. I used a 2mm drill bit and drilled roughly 25 holes. You could actually drill more. edit: After experience I realised theses holes were too small and so I drilled new 8mm holes Cut a piece of shade netting to size that will cover the base of the inside of the container. This to prevent the worms from getting through the bottom holes and into the bottom container Glue the shade netting to the base with a glue gun The end result looking something like this... The shade netting ensures the worms don't crawl through the bottom holes falling into the worm tea below. Now cut a hole in both long sides of the container to use as vents. Cut shade netting to size and glue over the holes you cut Drill holes into the lid. I used a 4mm bit for these holes Fill the 2nd container with moist but not soaking shredded newspaper. Shred the newspaper, soak in water, wring it and then place into the the container. Filling it up to just below half way with newspaper, chuck in the handful of soil and throw in your kitchen scraps and mix it up. Don't put too much food for now. Some shredded butternut is a great kickstarter for the worms apparently. Place your worms in the bedding, covering them up a bit. Slip the 2nd container into the bottom container, stick on the lid and there you go, your worm farm is up and running!! The idea is for the worms to eat up the food as well as the newspaper bedding which they in turn covert into compost which remains in the bins for you to collect. Keep monitoring your bin and feed the worms when you notice the food being eaten up. Worms double their population every 3 months so the feeding rate will most certainly go up. Also keep stocking up with moist scrap paper and newspaper. Once the worms have consumed the majority of the food and bedding in the 2nd container, a 3rd container with relatively large holes drilled in the bottom will be placed on top of the 2nd container, directly on top of the bedding. More food and bedding will be placed inside the 3rd container and as the worms will run out food in the 2nd container, they will migrate upwards to the 3rd container leaving worm castings in the 2nd container which you can then harvest. After the castings have been harvested from the 2nd container, the worms and bedding in the 3rd container will be transferred back into the 2nd container for the process to repeat. Be sure to make use of the worm tea that collects in the bottom container as it makes for a great soluble fertiliser. I will be making amendments as time goes by however I'm no expert on this matter and welcome input from members who have more experience with worm farming. Good luck with your wormy farming!1 point
-
So I've been busy this weekend, and since I'd like to run this cab in day light hours if necessary, and with the summer month's still ahead of us, I decided to convert my wing reflector into a cooled hood. Took me about 6 solid hours of work, and about R400 in parts. So far, I'm really happy.1 point


This leaderboard is set to Johannesburg/GMT+02:00