

.jpg.4de00bec5fea24a7a3a2c7086e10734b.jpg)
Naughty.Psychonaut
-
Posts
1,750 -
Joined
-
Last visited
-
Days Won
106
Content Type
Profiles
Forums
Calendar
Gallery
Articles
420 Directory
Classifieds
Posts posted by Naughty.Psychonaut
-
-
15 hours ago, Naughty.Psychonaut said:
So the space is 70x70x100.
One thing I forgot to mention is the L-brackets I put in every corner where the wood frame meets. It's quite sturdy, before I put the panels on I was able to sit on top of the frame and I weigh around 70kg. So there's wood glue, long ass screws at wood on wood sites plus brackets with screws to keep the whole frame stable. I think the wood poles would snap in half before the corners come loose, but even for that to happen it would have to be carrying some real heavy weight for real long time or experience one hell of an impact.
I believe this thing is much stronger than a normal tent, I also only have the one flood light which weighs like 2kg hanging from the wood.
My concern rather lies with the hooks that screw into the wood where the light hangs from. I'm sure if anything was gona give in it would probably be those hooks. I just grabbed the ones I thought would work, but they're real small so I might replace them.
-
 2
2
-
-
AACT
in DIY Central
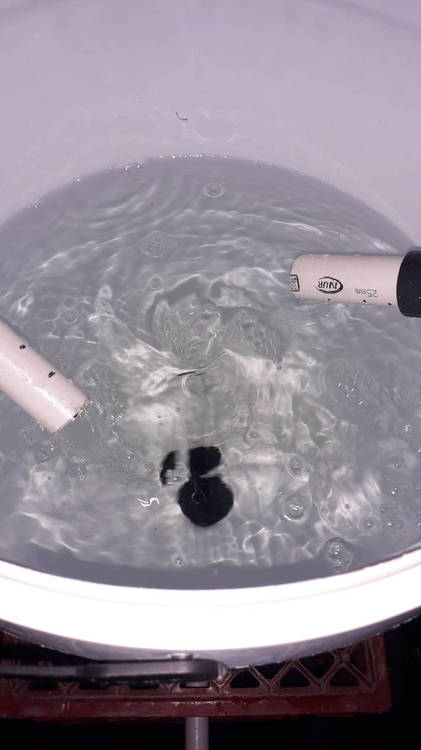
Well, I got her sealed all around and no more leaks. Bought a tub of "stag" from Agrimark. We use it on metal to metal water pipe connections for them to not get leaky over long time. It's like the "if all else fails" solution.
She made her first brew and got poured off today, will feed the plants tonight.
Didn't wana do anything too fancy since I'm still learning and only had few ingredients. I used ff premium classic mixed with some local soil from the earth, 1tbsp of trichcoderma, 100ml liquid vermipure and 30ml molasses.
It really smells nice, must be the molasses. Got some bacterial build up inside the bucket, poured it off into another bucket and cleaned the vortex bucket and pipes and all.
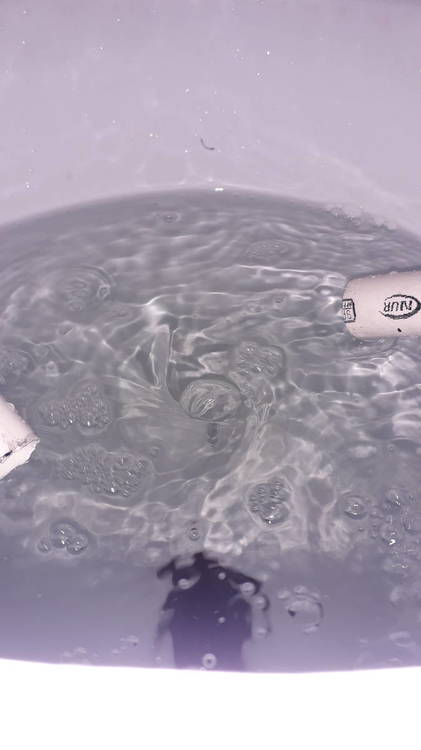
One problem, I noticed when I put the tea bag with all the goodies inside it breaks the vortex stream. So it just kinda moves around, but no vortex.
I think I'm gona do a rebuild, using just one stream instead of two, hoping to increase the flow. I'm not sure if it will work, but I'll see.

-
2
-
-
Hope everyones doing great!
I have a few things on my plate right now and too many things keeping me from reaching that desired budget to buy everything I want. Taking things slow, step by step and trying not to do anything by force, will get where I wana be sooner or later! For the time being, since my first DIY grow cupboard, I've always been collecting all sorts of parts and materials to use for a grow, as they happen upon my way. Just for in case, you know?
I took cuttings from the plants I'm running in the tent at the moment, had them sitting in some jiffies in a humidity dome on a heat mat under a CFL. Did manage to get some roots within 15 days!!! Was quite happy about it, but the fucking heat of the CFLs burnt the leaves crispy brown. My mind and money is set on my DIY 300w QB with some samsung strips, then gona use the Apollo 8 blurple I have now for veg only.
Didn't wana spend much, or anything really, but the CFLs had to go!!! Just to replace them I got one of those flood lights I'm reading about on the forum, checked out all the places around me that sells any kinda light, best I could find was a 50w, 3200Lumens, 6500Kelvin. For R530 with a 2 year warrenty and it's literally built for outdoors so can hose them down if I ever felt like it.
I was lucky enough to happen upon a huge lump of reflective material. a Few pallet loads of chemicals that needed to be kept cool was shipped wrapped in diamond mylar. Literally feels the same as the material of the mars tents with the little square patterns. Thick, almost stays in the shape you bend it. I even have a hard time cutting it as it seems to have a bit of wire in it too, to make the square pattern. I obviously took all of it, because it was free and was going to get recycled anyway.
On the farm we have quite a few "scrap materials" laying around. I asked boss man if I could have 2 x 5m wooden battons that are 2cmx2cm square. They cost like R60 a pole I think, but I got them free.
I bought softwood cupboard panels, you get the one that's smooth matte white one side and rough wood brown on the other side then there's a smooth wood and rough wood sided ones. I already had my reflective material I went with the both sides wooden, because it was a little cheaper, but I'm sure you could use the white ones and skip on the reflective material and get the same results. I payed R155 for a 2m x 3m "sheet".
Picked up the bigger version of the Hydor bathroom extractor for R400 quite a while ago.
Had a small desk fan laying around, also a thermometer and hygrometer so didn't have to buy those.
Odds - roll of ducktape, wood glue, pack of screws, 1 x ladies stockings, 2 of the smallest door hinges, pack of smallest screw-in hooks, 3mm x 2m chain, 5m wire and plug for light.
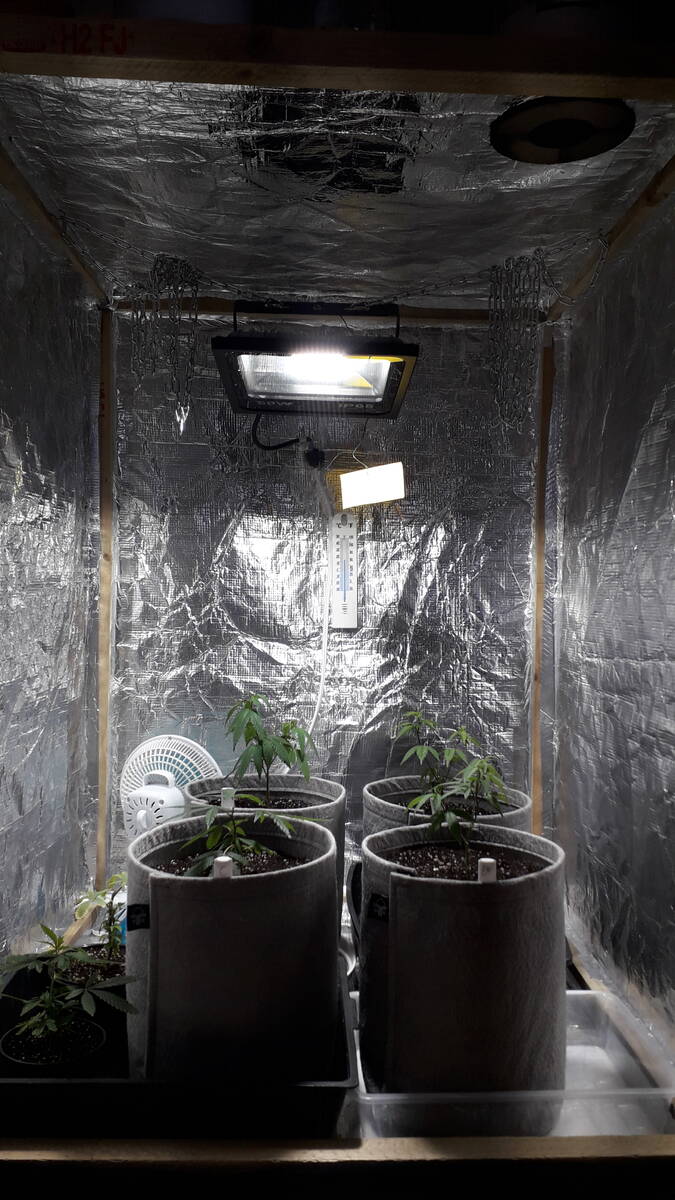
Started with the 10m wood, cut 8 x 70cm pieces and 4 x 100cm pieces. Using my handy dandy wood glue and screws, I made 2 x 70cm squares with the 8 pieces and used the 4 x 100cm to mount the squares onto. So the space is 70x70x100. Quite alright for veg. Using the ductape I covered the softwood board with the reflective and stuck them to the wood frame, again using the glue then some screws. (The glue alsp helps fill gaps for light leaks)
I used the blade from a metal saw with the fine teeth to cut squares in the bottom of the wood pannel for passive air intakes and I made a circle where the extractor fan is fitted. Extractor aswell as the passive intakes are covered with the ladies stockings, again using the ductape. Inside the passive intakes I cut an extra piece of mylar just to hang over the stockings to help with light leaking in there during lights off.
I screwed 2 of the hooks in the top wood beams, hooked the chain from side to side, hung the light and plugged the whole bitch up!
Basically a glorified propagation box. Here she is:
Top right corner black circle is the stockings covered mouth of the extractor fitted with a ducting that links into the ducting from my other tent, this box thing stands next to my tent.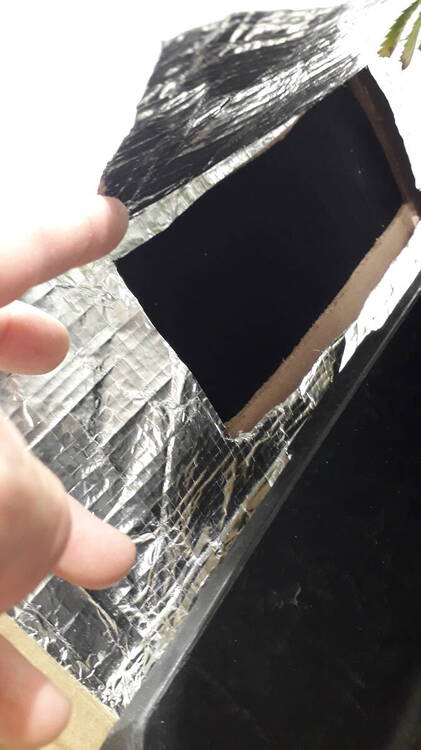
Here is one of the passive intakes, to understand "the flap" a bit better. Also a close up of the reflective material.
I planted the best 4 cuttings into their first pots. This is their home now untill flower time.
I believe once I do get another tent I'll still keep this bad boy for further seed pops and maybe build a nice bubble cloner to fit.
Happy growing!
-
9
-
-
Definitly a valid point, if you're anything like me you'll still keep growing bag seed even after you got proper gear and all that shit hahah!
Cannabis plants also make great compost too, just make sure you don't put a plant with seeds in your compost!! When freshly cut they add tons of nitrogen to the compost and when dried they're good source of carbon.
-
Lets see,
They got day one of flip was Monday, 22nd. They got a lime top dressing also some more DE, Trichoderma and mycoroot. Gave them a tea, first tea I brewed myself in my new DIY vortex brewer! In the tea there was FF premium mix as a base and a hand full of indiginous soil from under the healthy bush here, some molasses, some liquid vermipure and also a scoop of trichoderma. Didn't wana do anything crazy just yet. They have also had 2 good MKP feeds at the recommended 7 weeks dosage. Been getting bi-weekly Bioneem and Phyta treatments which will now stop, because we have pistils!!!!!! Let's boogy!


-
2
-
-
Hi bud,
Just something qto concider when growing out a bag seed, don't hold your breath for the best results here. I grow plenty of bag seed and don't even go as far as to get proper soil for it, because it will make you lose trust in the soil.
I am not telling you to not grow bag seed, like most others would suggest. Bag seed are unknown genetics and therefore unstable. You'd think you're doing something wrong when it's actually just "wild" genetics.
Getting some proper soil will enhance the grow experience, won't have to deal with deficiencies and that stuff as much, but don't blame the soil when comes harvest time.
Just a friendly heads up!
-
Yeah hahah I'm not an expert in anything, infact this thread goes to show just how clueless I am. Trying to find the right answers, though. I'm talking to some people, but trying to find the right people to have the right kinda convo with. I believe some synthetics might have reactions with eachother and even so with some of the organic matter and this might be a problem in some cases.
I don't see any problem doing full ass, would you say that using synthetic nutes in soil is going half ass? I guess that is another big part of the question, using synthetics in soil, do the plants still get fed?
I just can't think why it would be acceptable for big production farms to do it, but for us in pots with a plant for 3/4 months it's frowned upon.
At the end of the day I am the FULL ASS organic kinda guy hahahah!
-
1
-
-
I agree, it definitly depends on how and with what the nutes are made. In terms of using nitrates and sulphates I guess the molecular structure is "organic enough" to allow use at certain amounts, where as with organic nutes you can just give the stuff. Synthetic nutes can become "too much" for the plant very quikly.
The other big difference is the obvious, roots in earth will move a lot further and free where as potted plants are limited, which is the biggest contributing factor in the synthetic nute becomming "too much".
According to practical studies done by boss man, using synthetic nutes in an inert medium (coco) just increases the risk of nutrient build up. In living organic mediums with a healthy symbiote you actually have microbes breaking down those synthetic nutes aswell so you don't have to rely as much on flushing as with inert mediums, although it's still recommended. Which if you think about it makes perfect sense. Anyone who can shed some light on this? I'll probably still do my own practical research, just trying to find external views.
So in conclusion anyone who has ever told me to stay away from synthetic nutes just cause I'm growing in living soil was just being a bit full of themselves? My "research" isn't final and I am not setting my mind on anything, but choosing who to believe is becoming an issue, because some people are real hard up about what their egos make them believe and they'll try to force it on others even though they themselves don't really know and on the other side you have people with masters degrees telling you different. Kinda a no brainer, but giving the benefit of the doubt to the self proclaimed masters and giving their opinions a fighting chance.
With that being said I am fully aware that you still face nute build up and root damage when growing in living soil with synth nutes, but it's actually more so with coco. Which is what we use synth nutes for. I am also fully aware that organic nutes compliment living soils much better and keeps the symbiote healthy, but using your synthetic nutes the right way won't do any harm, with extra emphasis on "USING YOUR NUTES THE RIGHT WAY".
Here'a where things get a bit more complicated, although not really complicated at all. Going off looking, smelling and knowing what's in the soil, how do you know how "alive" it is and if so how "healthy" it is and how much synthetics it will take to cause harm. Some conditions will be able to tolorate more than others. How to simplify? Apply microbial and enzyme rich ammendments in the medium, introduce life and keep it healthy and alive. You can push the microbes till you see mycelium colonising on the soil. This brings life to the party and your synth nutes won't be a problem (obviously you still won't be able to apply it however you like, just stick to the recommendations that come with the product)-
2
-
-
What's the story around using synthetic nutes in a living soil? All information welcome.
Motivation for my question is that they use these "synthetic nutes" in big scale irrigation systems on farms. I currently work on a fynbos farm, but have done my share on cash crop and fruit farms and they all do it. It obviously goes directly into the earth and the plants still gets fed.
My current boss is a multiple masters degree holder in all things agricultural science at the age of 59 and also the owner of Inteligro. They manufacture and distribute their own nutes and distribute brands like Haifa and such, all specializing in water soluble synthetic plant nutrients and all kinds of other crazy shit. We have a consultant that visits our farm once every 3/4 months and gives us the run down of what to do and feed the plants with, this consultant is twice as smart as my boss. I often listen to their discussions, but only understand about half of what they say. I only apply the stuff, but that allows me to know what it is and it's all the exact same stuff you would use in a normal hydroponic setup, just at different ratios.
I know people say to stay away from synthetic nutes when growing in a living soil, but I'm sure it's very much the same as putting synthetic or "hydroponic" nutes on your plants that are growing outside in mother earth. You just have to apply it right.
We have an old school irrigation system on the farm, no pumps, all natural. So where we irrigate from we tap into the irrigation system through a manifold then attach a big metal bucket that gets pumped full of pressure and we throw all the synthetics in there and pump it into the irrigation system. Like I've mentioned, we've done this for everything from lettuce to guava trees to fucking king proteas. Consumables, ornamentals, the whole show. Recently finished a permaculture internship on an all organic farm, toughest but best time of my life.
-
3
-
-
AACT
in DIY Central
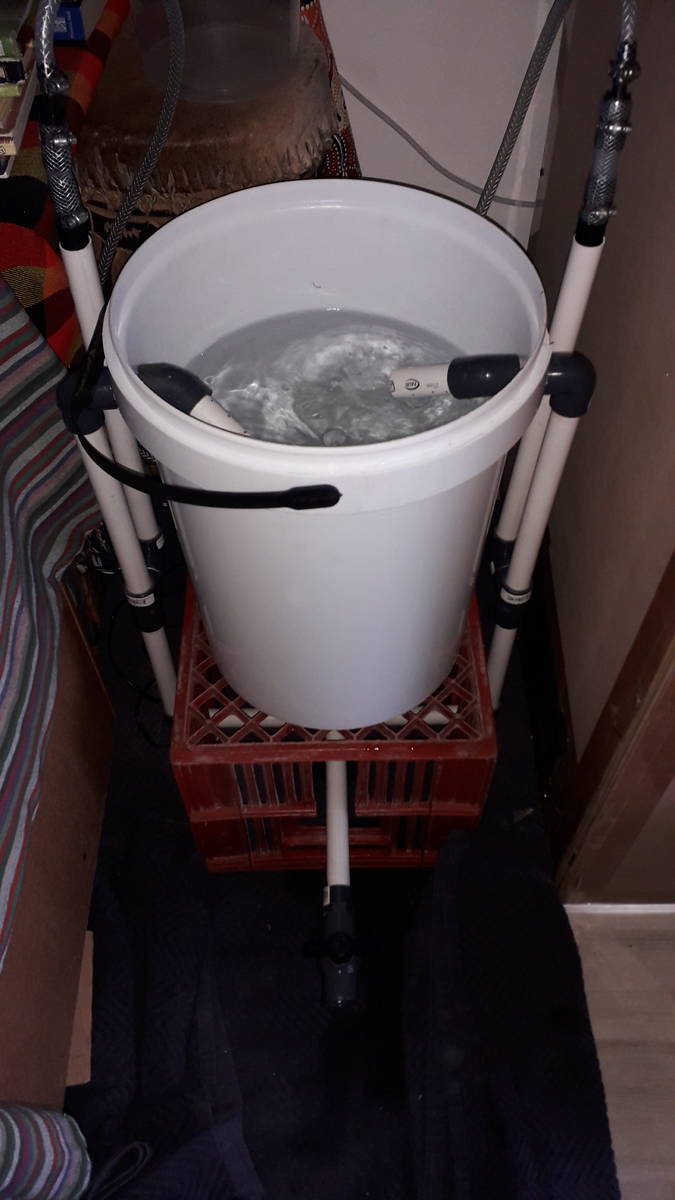
Well, fuck. Had her on a towel the first night cause I couldn't find a bucket / drip tray big enough, but the towel couldn't soak up what leaked out. I'm super fucking glad I have my plugs and all electronics raised off the floor, woke up with a puddle around the thing yesterday. Luckily it was just clean water!!!
Looks like I won't he able to take it apart completely the way I wanted to, because it's the pvc cement you use to secure the pipe fittings that makes it water proof. So for now I will glue her down and just keep the whole thing like that. Atleast I can disconnect the hose from the air pump and the bucket itself it fitted with a threaded drain plug so I can screw that loose if I need to.
-
1
-
-
AACT
in DIY Central
The man, the ledgend himself, posted a link to that thread just a bit earlier in this thread. Will be sure to take full advantage of it!
-
 1
1
-
-
AACT
in DIY Central
I've got ff premium mix here, was thinking of taking some soil from a nice fresh patch in the mountain here, also got liquid vermipure here with so much bacterial colonies inside the bottle and it smells very nice. My plants are going into flower now, any special ingredients you know about for pushing those flowers?
-
1
-
-
So, here she is now.
Things got to a point where I just didn't know what to do anymore, was gona plant her out or put her somewhere else. Didn't think about it twice, had a couple new bags of soil, also ff premium mix, took her old soil out and dumped it on the compost heap, took a hose with a shower head and cleaned the roots completely and replanted her in new soil. Can't even tell now that it was ever a replacement plant, she's even taller than the Super Lemon Haze right next to her.
-
1
-
-
AACT
in DIY Central
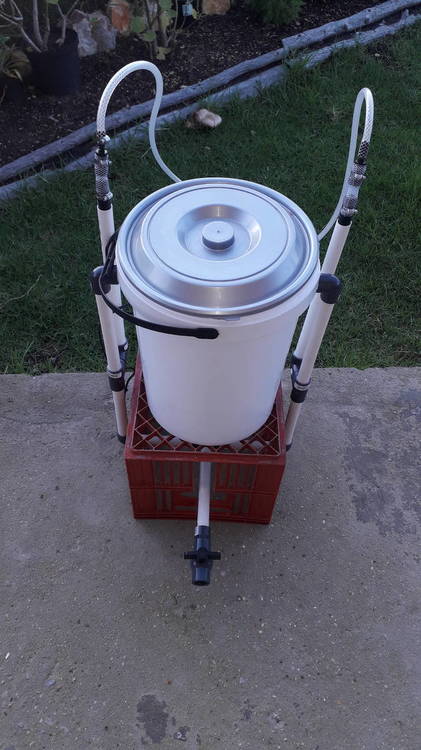
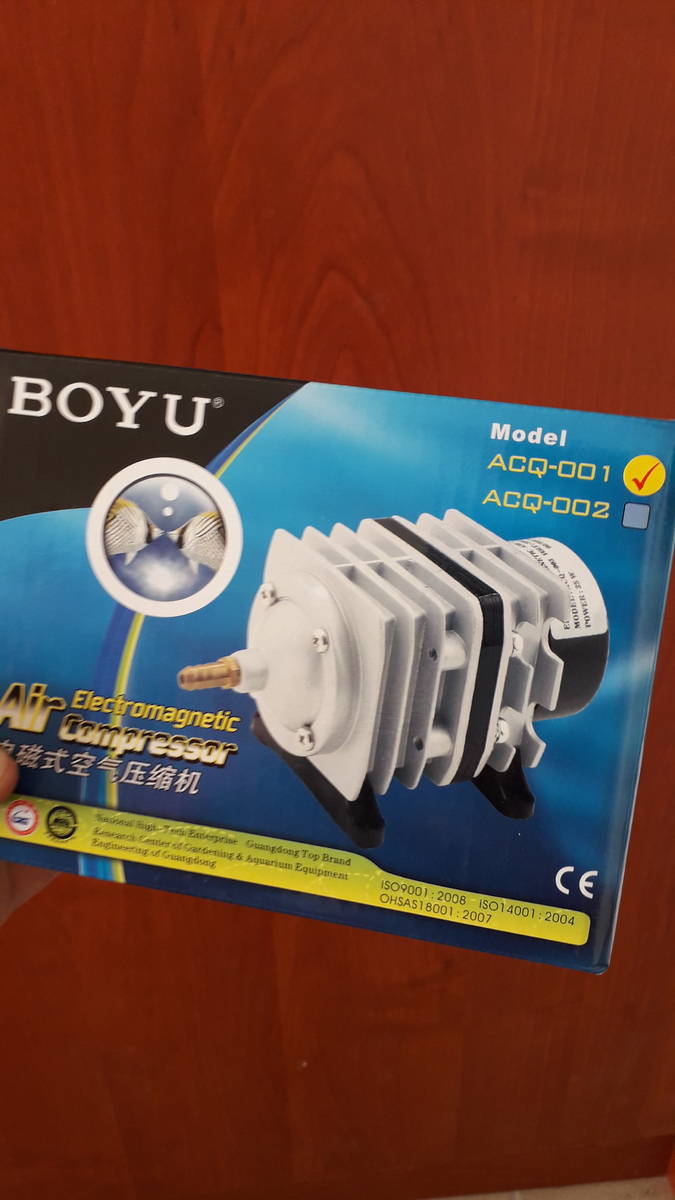
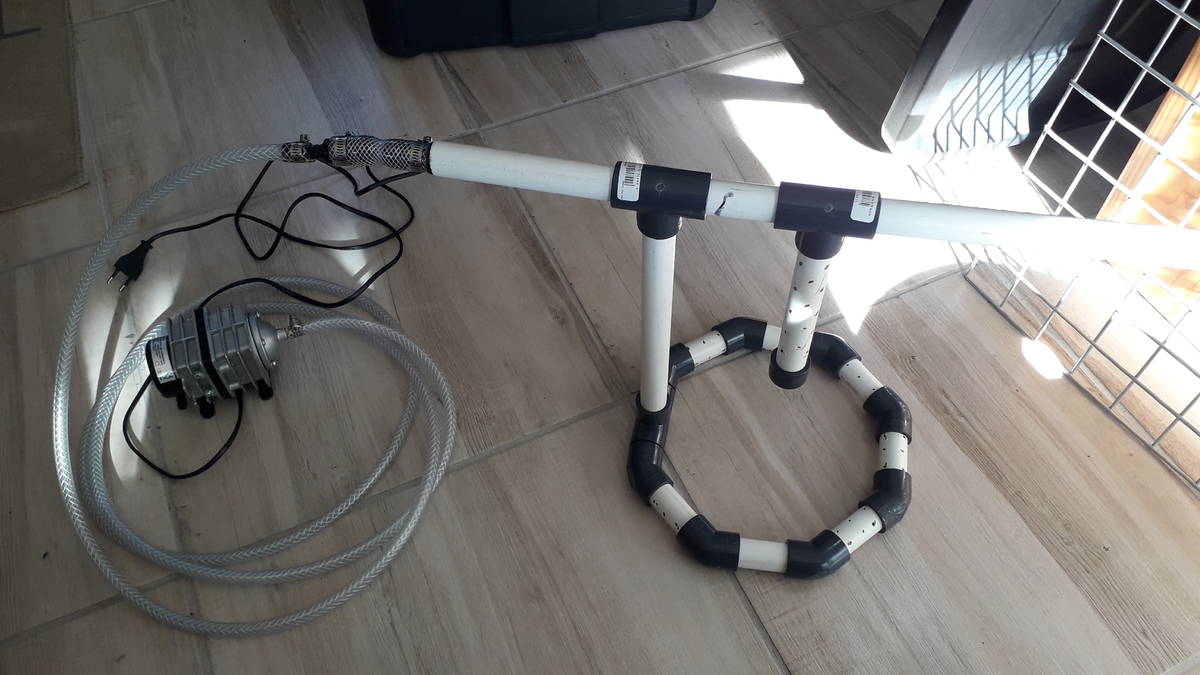
Took a while to get a hold of the pump, but finally got it!
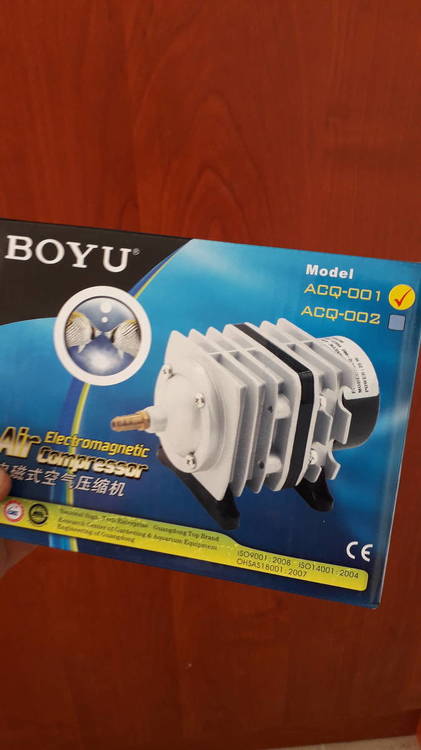
I had my mind on the air lift tech, but made this configuration, because it looked cool and I had extra pipe and fittings are cheap and I had a lot of fun doing it. It's basically all submerged except for the pipes that exit the bucket on the sides and that also helps keep the piping down and in the water, also allows me to close the bucket to reduce noise and spillage. All the pipes disconnect so can easily pack it away and keep it in the box of extras.

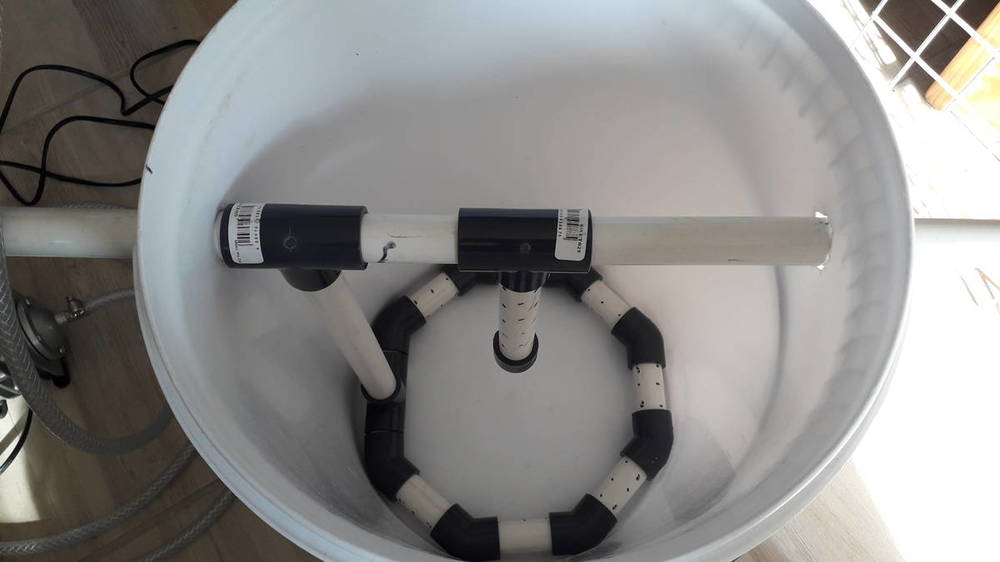
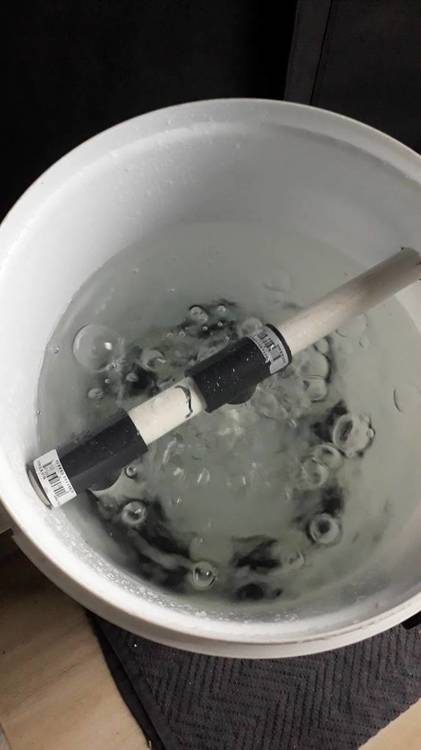
As I had my mind made up already, I also made a vortex, but by cutting the hole for the drain plug made the bucket single purpose only, so will have to get another bucket if I ever wanted to use the bubbler, but used the same two holes on the side of this bucked and just made a 25mm hole in the bottom. Whole project took me about 45min, but stretched out over like a period of a month! Mostly because water proofing all the connections, but still allowing it to be taken a part for cleaning was a real hassle and then the wait for the pump. Probably gona still do a bunch of "upgrades", but for now I'm happy!

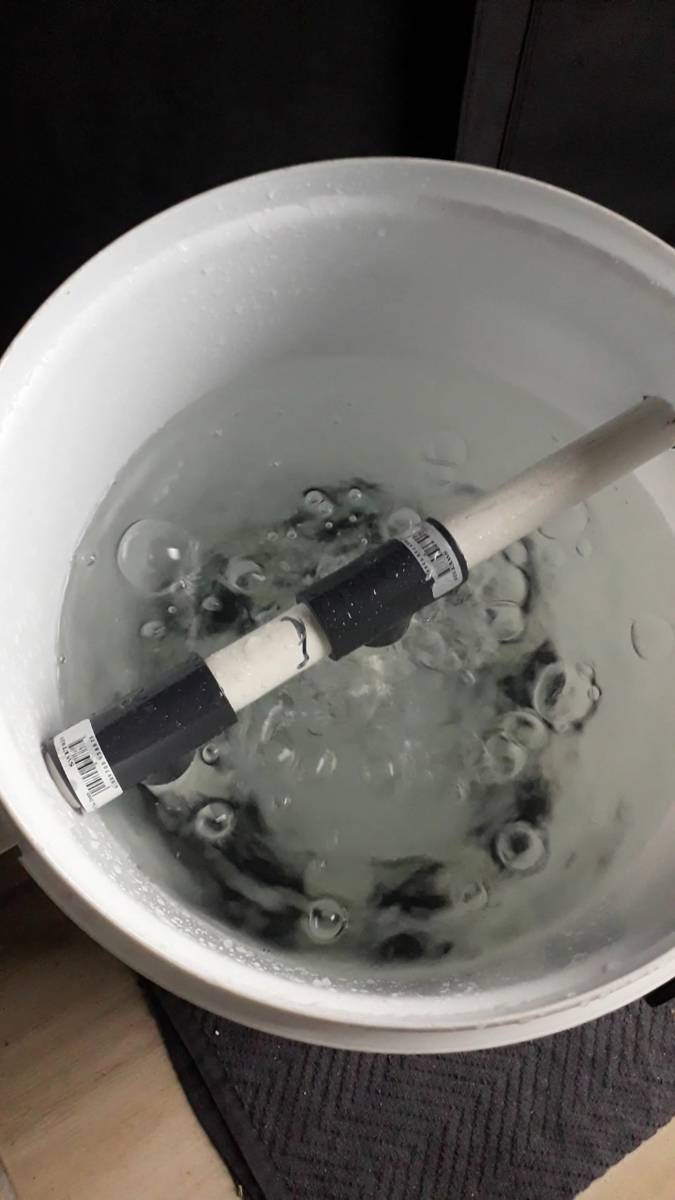
Gona give 24h to get rid of chloramine, then add ingredients.
-
8
-
-
Update
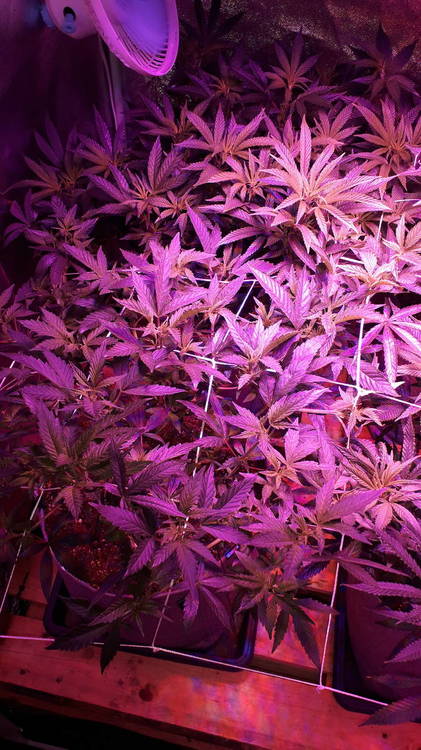
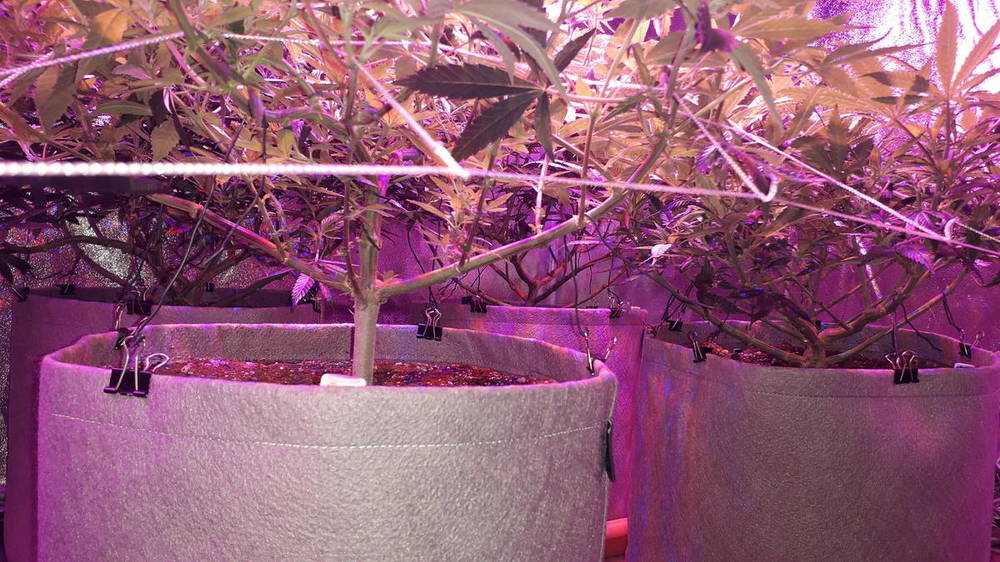
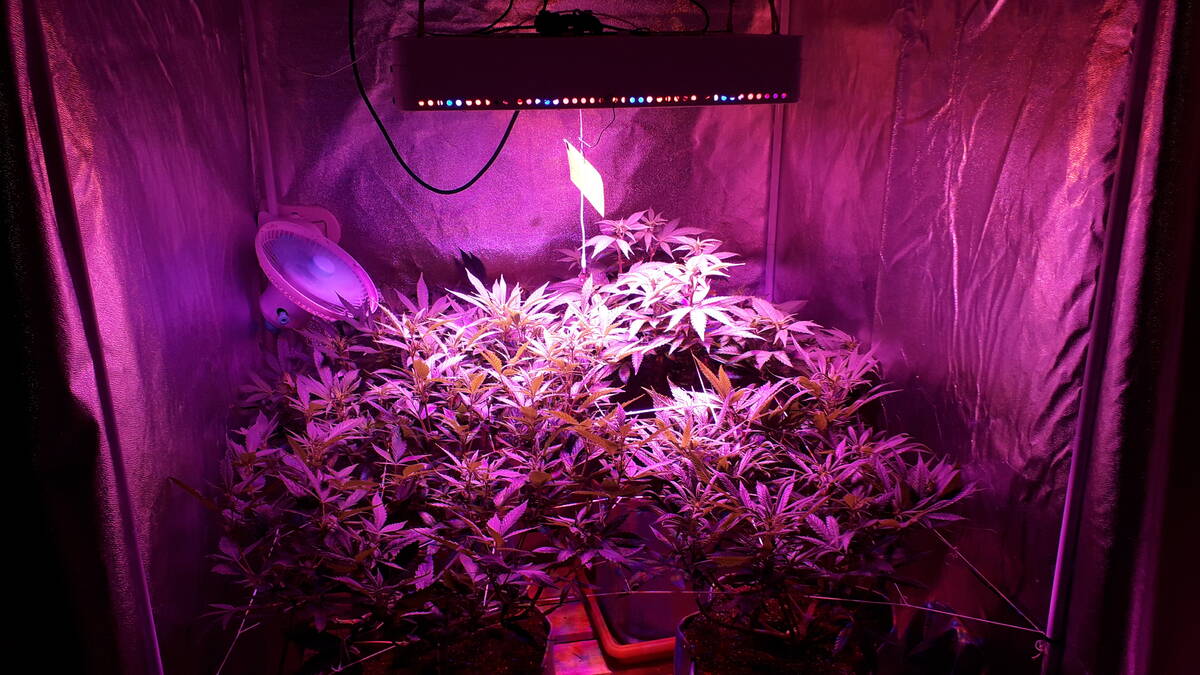
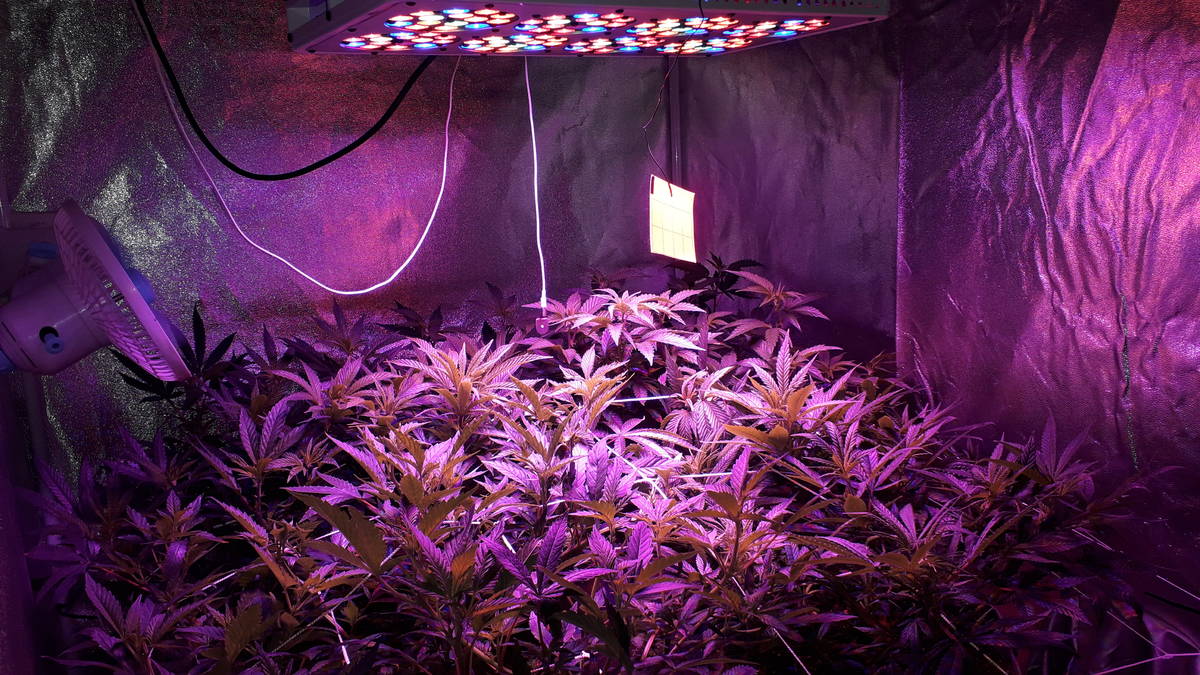
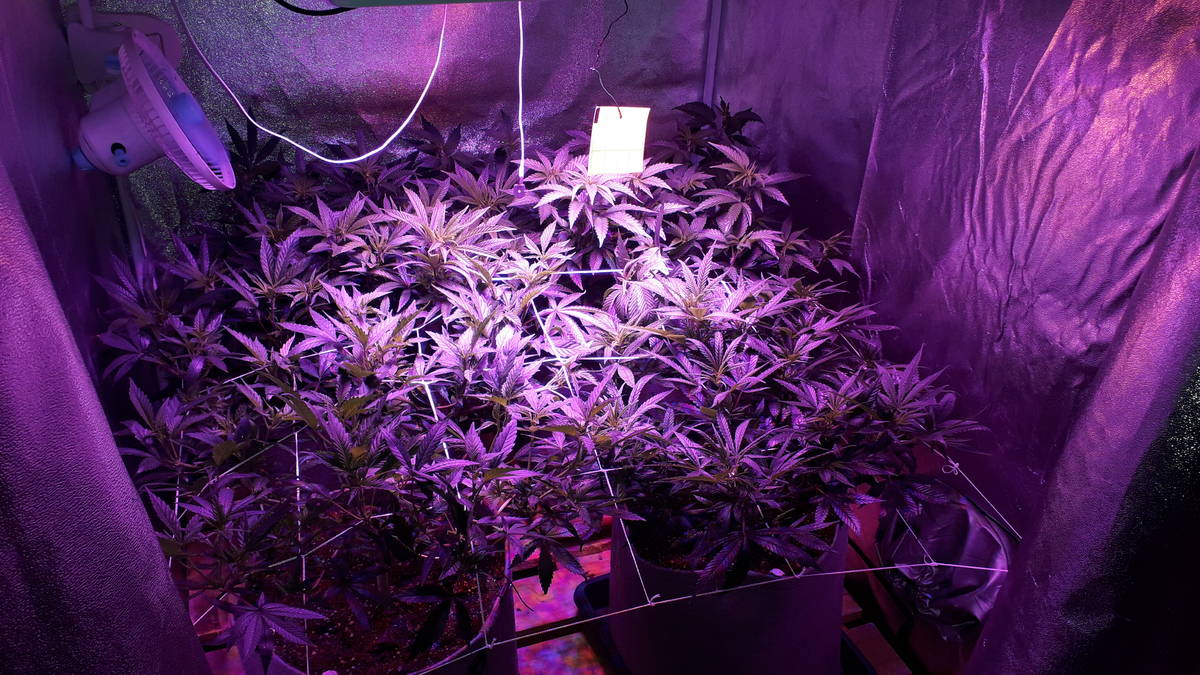
I forget to mention in my previous update, but I am sure it is very obvious from the picture aswell, one of the blueberry plants got removed from the tent as space was running out. So here we have the other Blueberry right in front on the left, next to her is the Super Lemon Haze, behind her is Banana Hammock and in the left back corner is Cheeeeeese.
A week later and it looks like they exploded into the new pots, was hoping for a lot more stretch, but will do a complete defo, raise the lights and give them another week before flip and see how they react.
I just add a little liquid vermi pure and some molasses to the water and ph it to 6.7 to 7.3. Foliar feed with Phyta from Biogrow. Got mycoroot and richoderma mixed in the soil for some activity, will be giving AACT once I get the first batch done. Got my pump a few days ago, so the bitch is a brewin'!
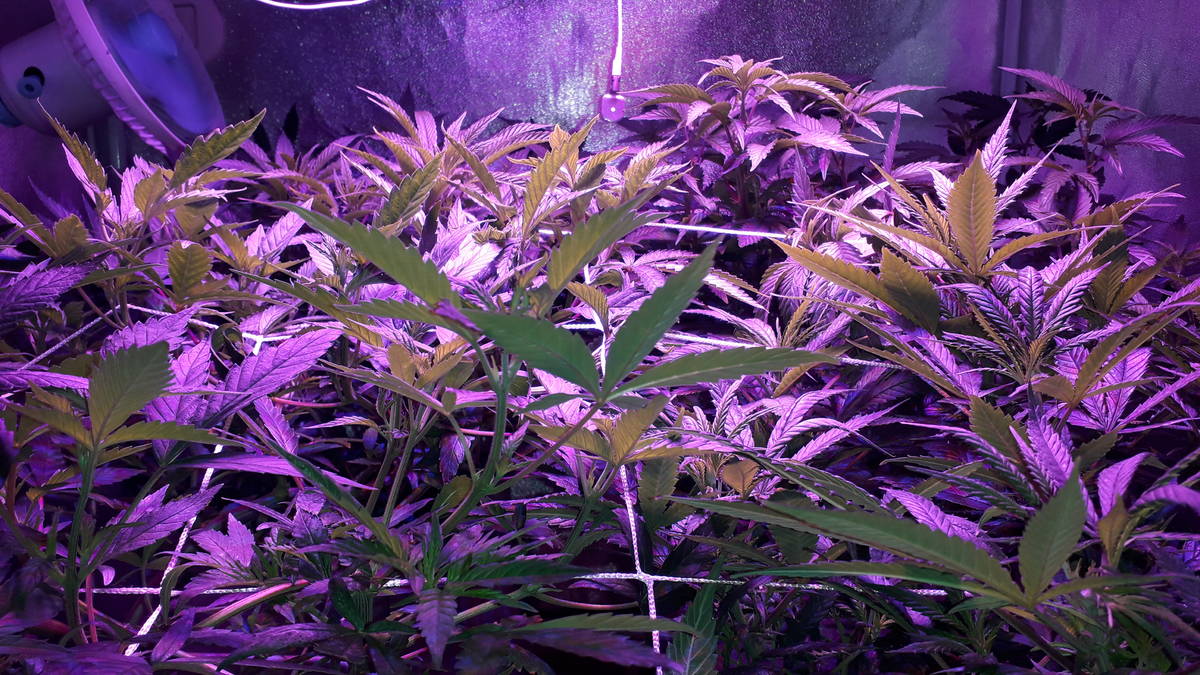
I always like this 'under canopy' shot

-
2
-
-
Thanks man! I also found a samsung specific data sheet on the digikey website, getting all the answers now!!! Once things are in motion I'll show you all how I'm putting it all together.
-
1
-
-
14 minutes ago, CoolJ said:
The link seems to be broken,
Try this: https://www.digikey.com/catalog/en/partgroup/f-series-gen3/67179 under the data sheet section.
Almost got it, I am looking for the wattage, unless there's a way to calculate it?
-
1 hour ago, SkunkPharm said:
This is exactly what I needed!!!! Thank you kindly good Sir!!

I am looking at those F series strips with the 144 diodes. Fucking crazy. For some reason I can't open or download any of the data sheets from the Samsung strips on that website. I got the pdf downloaded for the data sheet on the Bridgelux strips, but I need to cram as much W in and it seems my alu frame will be too small to get 300w of the bridgelux strips on there.
Could I possibly ask one of the forum members who has access to the data sheet of the F series strips to take a screen grab of the wattage on those F series strips, and post it here? The link to the data sheet is given on the LEDgardener website in the link @SkunkPharm provided in the post above.
-
Thanks a ton man, the LM301B's it is then. Any guidance as to what strips to go for? Have been looking at digikey, but even when I put in key words such as "samsung LM301B 3000k strips" it comes up with nothing, when I just use either "samsung" or "LM301B" it comes up with hundereds of things that don't really mean anything to me because it's a bunch of random letters and numbers. If I click on a strip to see the specs I can't find any info on the wattage or the type of diode used on the strips....
-
1
-
-
I have looked at those, the only reason I would wana go the DIY route instead of buying a fixed board would be because I can build a frame to my liking and mount the LEDs all the way in the corner of the grow space, where as with a qb you have to raise the light to get better coverage and by raising the light you decrease intensity, or am I mistaken?
Another reason would be because of the whole 1 qb just a tad to small for a 1m square and 2 qb would be to much, like you've mentioned. So I would rather build something to my specific needs and the whole project will give some DIY perspective and I seriously need to gain some knowledge on LEDs.
Definitly did help! Thanks man!! I am leaning towards the samsung LM301H diodes for now, but how do I check on digikey which of the strips use those diodes? If I got the strips I'm going with then I can work out how many I need to make 300w and from there I'll be able to calculate how much alu I'll need.
-
1
-
-
What's up all, any LED gurus enthusiastic about sharing some of that juicy info?
To best understand my needs I will try make things as clear as possible as I am not just "looking for a light".
I am trying a DIY, this will be my first so I had a look at the DIY section, thought I might go with something similar to what Mr. @greenkush created.
Regarding all that, heres my first question, keeping the best diodes for flower cycle in mind, what strips do I get?? I've been about on digikey, but can't figure out what to go with?
Second question, for a flower space of 1mx1m how much LED can I throw in there? I am thinking of covering the area by making a 80cm square frame out of aluminium and will need to know how many strips to mount to get my desired wattage, but I guess first I need to know what strips I'm gona go with!
Hope you all having a blessed Friday! -
Time for an update
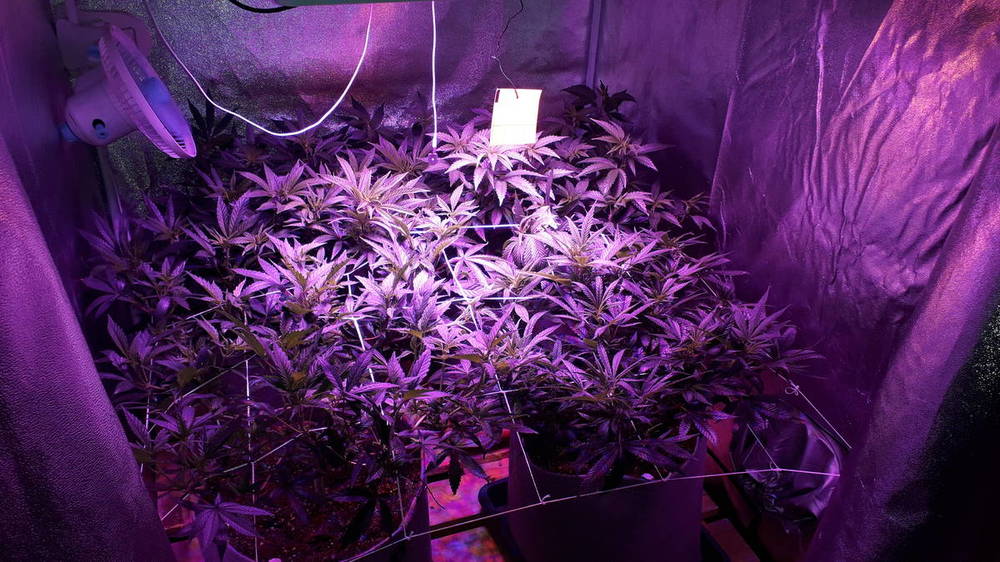
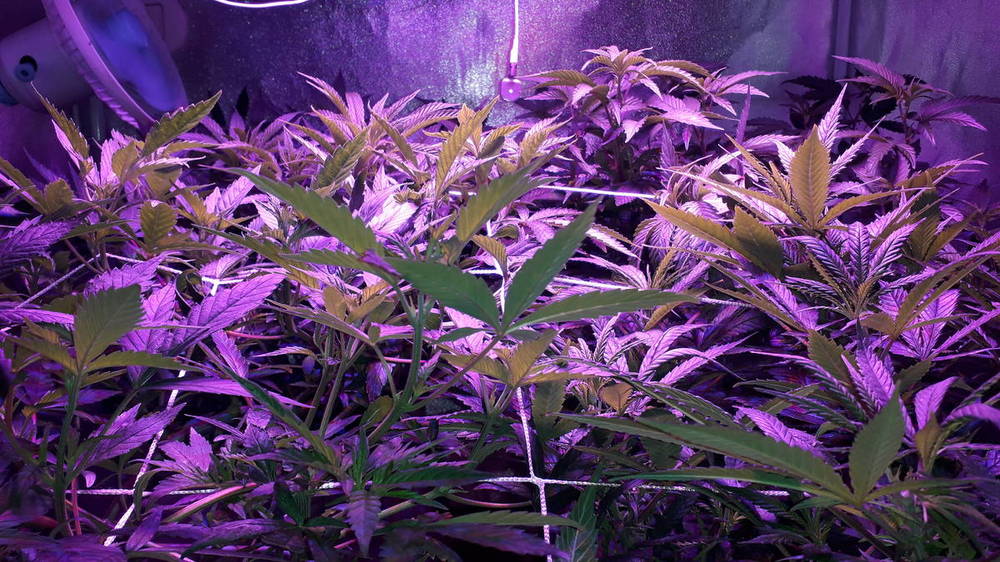
Not much has happened, as I had major problems with the Blueberry plant I kept all the rest of the girls steady just giving water and kept them all in 10L pots till I could save the Blueberry. I managed and so here we have al 4 girls in their final 20L pots, pulled a scrog net over them and shoved a pallet under them to help with the cold temps at floor level.
Trying to save the Blueberry set me back a good three weeks, so they are only on the 6th week of the feeding schedule right now and thinking I'm gona push them till about 9/10 weeks. Wana get some serious strech so I can clear out the under canopy.
Other than that, the 5th plant that was also a Blueberry problem plant moved over to intensive care, plus there was never meant to be 5 plants in this space.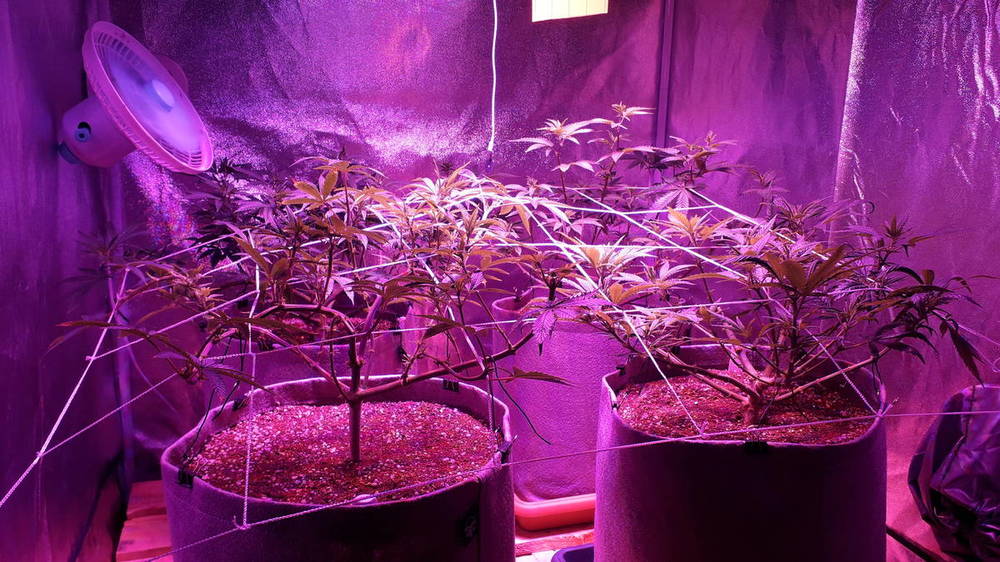
-
3
-
-
14 hours ago, StickyD420 said:
Hey, out of curiosity and pure understanding, you put the seeds in the fridge? Should I or everyone be following such a practice? Ethos seem to be good dank and will definitely try soon.
What's good my dude.
In this thread, following that statement I made, we kinda debate it a little. It's certainly not written in stone, have a look at what the other guys said and how we all brought up different points and opinions, from there it's all your own decision.
For me, to a certain extent, it's just about a little thing called "biometics" or "biomimicry". Basically mimicing the systems and elements of nature, I don't mean seeds being put in the fridge, but rather the fact that seeds when dropped from the plant does not sprout immediately, they lay dormant in through a cold period (winter time) and only sprout when the heat comes back around (spring time).
I've read about fresh seeds, as in straight from the living plant, are less viable than seeds that have been through a cold shock or a dry period, but I read that shit on the internet and I haven't done my own experiments to back those statements as facts, so I don't, but it makes sense to me.-
3
-
-
Don't waste your money like that my dude. Save up and buy a nice light. I spent 5k on a 240W blurple and not satisfied, feeling like an idiot, now have to save up again to buy something better. Buying that cfl, even for one plant, will be the biggest waste of time money and energy. Stand back, give it some time, save up some more money. Learn from others' mistakes, being in a hurry and forcing things will not get you far.
Saw the ones @Master_G and would highly recommend that if you wana start off on the right foot and save yourself some head and heartache.
Blessed!
-
 1
1
-


AACT
in DIY Central
Posted
I'll definitly try that, before the rebuild.
I might even attach the bubbler I made to the pump and bubble the water with the tea bag in it for a few hours before then do the strain and pour that into the vortex.
Thanks for the tip!