


Candyman
-
Posts
34 -
Joined
-
Last visited
-
Days Won
1
1 Follower
Recent Profile Visitors
2,054 profile views


Candyman's Achievements
")


-
I've trimmed most of the old flowering growth away from the test plant and tightened her ropes a bit. We have had a lot of rain the last few weeks. I'm thankful for fabric pots as I would most certainly have had issues with root rot and overwatering during this rainy period, were it not the fabric pots. As such, I have not watered any of my outdoor plants, but I have continue to apply KFPE in foliar applications. I have planted some swazi hybrids a while ago from my bag seed for further testing purposes as well as for harvesting of substrate material for the fermented extracts. I've tested a 1:30 dilution of KFPE on 2 week old seedlings. After 3 days of daily applications I started seeing yellowing of leaves and burning of the tips of all the leaves. This was in contrast to the seedlings that did not get treated. I haven't notice any indication of nutrient excesses or nutrient burn on the mature test plant at these ratios of application, but her new growth appears very green and lush and seeing as most articles on fermented plant juice (FPJ) extracts recommends dilution rates of 1:100 - 1:500 for mature plants in soil drench and foliar application and 1:500 - 1:1000 ratios for seedlings. For the purpose of this research work and the results witnessed of nutrient burn on young seedlings I will mark down 1:30 as maximum strength for short periods of application to remedy or address particular situations, but not for long term maintenance application. For a full strength application for my research and testing purposes, I'm going to keep to a ratio of 1:40 (25ml / liter), but alter the foliar application frequencies to 1 application every other day. I'm not going to apply this mixture to seedlings younger than 3 weeks. I'll start testing the same ratios on some seedlings as and when they mature a bit. The fermentations have kept me quite busy. I'm just going to highlight a few aspects here. Anyone reading this that are interested in more detail as to what I'm doing are welcome to post any questions here and I'll gladly answer if I can. I'm currently building a toolbox of cultures, with kombucha culture as the main star team of the show, but it's far from the only tool in the toolbox and there are quite a few quick and easy cultures that anyone can make at home that will make a big difference in their organic gardening. Once such tool in the toolbox, is lactic acid bacteria. Their are a multitude of articles written on the subject of Lactobacillus and Agriculture. Reference example To make a serum of lactic acid bacteria is cheap and easy. I'm not going into the method. YouTube has hundreds of videos if you search on how to make lactic acid bacteria serum (LABS or LAB). I've been using LABS now as an added inoculant in all my open ferments. I've already started cultivation of a kombucha scoby on molasses, which should yield a lactobacillus dominant culture, but just to help things along in the right direction, I make sure I add some labs to all the ferments, with the obvious exception when making rum or whiskey washes. After a lot of reading on studies done with various substrates used with Kombucha, I realize how much potential there is and how much we still don't know. The kombucha culture, called a scoby, changes structure on microbial level according to the mix of substrates given. The substrates needs to be a source of carbon, like sugar or molasses or even milk and a source of nitrogen, like black or green tea leaves, or any soft and green plant matter. Anything that you would normally think of using in a FPJ, you can use as a substrate for kombucha. The extraction of the plant material is much quicker and much more effective than a FPJ or any lacto-fermented FPJ, because there are a much greater variety of organisms, including yeasts and fungi, that work together in symbiosis to break down organic matter. The plant matter used plays an important role in the composition and effectiveness of the final product. Plants and herbs that shows promise in using as substrates for KFPE include, but are not limited to: cannabis leaves and flowers, malted sorghum and barley, lucerne, stinging nettle, peppermint, basil, moringa, comfrey, chamomile, lemongrass and others similar. Fruits and fruit peels can be added for some enzymes and nutritional value. Molasses seems to be the most effective option for the purpose to use as a carbon source as it inhibits the growth of acetobacter and thus encourages the growth of lactobacilli on the lactic acid rich molasses. In the process of making a sour mash with sorghum and or barley malt it is heated and kept at amylase operating temperatures for required duration, allowing it to convert any complex carbs into simple sugars and thus adding to the total sugar of the added molasses. Any plant material that is fermented this way, will have been heated to and kept at a maximum temperature of 78 degrees C for about an hour, allowing the amylase to convert starches and nutrients to be extracted from the plant material into the water. The plant material is kept in the mash for the first ferment, which is extended for 14 days. Thereafter it is strained from the mash. This fermented plant material is perfect to add to the compost heap or worm bin. The liquid will be added to the mother culture of KFPE for further fermentation and aging. This process can be a couple of weeks or as longs as a couple of months. Growth and health of the forming culture layer or biofilm will determine the next steps. The KFPE is in phase 1 at this point, but can already be applied in soil drench or foliar application with 1:40 ratio. As the mother culture matures and a greater variety of substrates are being used in the fermentations, it should get closer to a point where you can suspend it in sugar or molasses for long term storage. At this point, it will be combined with some photosynthetic bacteria, which is cultivated separately from the KFPE.
-
While we are on the subject of microbes and fermentation, I would like to raise an important issue that I see is a real problem. There are countless articles and videos on the internet on organic gardening advising people to leave tap water in a container standing overnight to supposedly get rid of the chorine in the tap water. As anyone that keeps freshwater fish will know, this is a big mistake that many organic gardeners keep on making. The first problem is knowing if chlorine is really the only issue or if chloramines are present in the water. Chlorine is a very volatile gas and hence why people are advising to just let the water stand to get rid of the volatile gasses. This is called off-gassing the chlorine. Let's assume for a moment that chlorine is the only problem and you are trying to get rid of it by letting the water stand overnight. 2 ppm of Chlorine can take up to 5 days to evaporate from 50 liters of standing water. Ultraviolet light, water circulation and aeration, temperature and the area of the surface of the water exposed to the air will speed up the off-gassing process. None the less, it's very unlikely that you will get rid of even half the chlorine in a container by just letting in stand overnight. Due to this volatility and rather instability of chlorine, local authorities and governing bodies today are switching to using chloramines instead. Chloramines give off much less of that familiar chlorine odor and the water tastes much better as well. Unlike chlorine, chloramine does not evaporate so easily from water. Chances are pretty big if you are using municipal tap water, that it has been treated with chloramines, rather than, or in conjunction with chlorine instead of chlorine only. You can get rid of chlorine and chloramine by boiling. It takes a considerable amount of boiling to get rid of chloramine though. 1 ppm of chloramine in 40 liters of water will need to be boiled for at least 1 hour to get rid of all the chloramines. Not really a practical option. My advise is to use a chemical option to neutralize any chlorine and chloramines present. My favorite two options are ascorbic acid and sodium ascorbate. Ascorbic acid will lower the Ph of the water, while sodium ascorbate is Ph neutral and will not change the Ph. Very little is required of either ascorbic acid or sodium ascorbate to neutralize the chlorine and chloramine in water and these are easy to come by and rather cheap as well. If you buy 500mg ascorbic acid tablets from the pharmacy, you can use 1/4 tablet (125mg) per liter of water. Theoretically, you can use even quite a bit less than that, but I've been using this ratio for a very long time with success. Note: A water quality report from Tshwane June 2020 (my local gov) shows Monochloramine levels at average rate of 1.24mg per liter and free chlorine at 0.09mg per liter. This shows a rather big inclination to treat water with chloramine.
-
I'm a systems engineer by profession, so my interest in the microcosm is purely as a result of it's direct interaction and involvement in the plant world and my love for plants has inevitably led me to the microcosmos. I don't have any formal background or education in microbiology, so it's a whole new world to me. As a systems engineer though, it is truly fascinating for me to see the amount of engineering and design that nature has put into the microcosmos and the rabbit hole hasn't stop for me since. I came across this YT channel, called Journey to the Microcosmos. It features over 70 videos of microbial organisms and the image quality of their microscope work is very good. I'm listing the channel here as a resource for the subject. Meet the Microcosmos
-
Thanks bud. Trying to share the love
-

Teaming with Microbes - Jeff Lowenfels
Candyman replied to ORGANinc.'s topic in Organic Growing - Growing in soil
Happy days if you have a greenhouse with big no-till beds. With such a setup I can fully grasp the integration with the soil food web. My feeling is that this is beyond most backyard home growers. By the time I harvest a 7-8 month old plant that has spend most of it's life in a 20l fabric pot, its just one big root mass left in the soil. So, what do you do? Leave the stub in the ground and plant a new young plant right next to it? Has someone done something like this in small containers? For me, it's unfortunate, but I have to somehow start every time with new fresh soil coming from somewhere. Now, one might have a couple of big tubs where one would mature soil mixes with fungal and bacterial amendments and utilize this as source for your pots, but you will inevitable start every year with virgin soil with regards to the food soil web. If I had to practically visualize the soil food web, I would compare it to the network system of a big factory. There are many workers and many different roles in a factory. There are also many machines and departments in such a factory. The network system integrates and links it all together in symbiosis so that efficiency and efficacy is maximized on every level and front. When the network goes out, some people in the factory stop working. They are fully dependent on the network for their day to day operations and without it they cannot continue. Some other workers and machines in the factory however are less influenced by the network going down and although they may experience time delays and some drop in efficiency, they can pretty much continue their day to day operations without the network. It's the same in soil with microbes and the soil food web. -
Teaming with Microbes - Jeff Lowenfels
Candyman replied to ORGANinc.'s topic in Organic Growing - Growing in soil
I find this topic extremely interesting. I've also read quite a bit of Jeff's writings and watched some of his talks on YT. Always a facinating topic with so much new stuff to learn. My current biggest frustration is taking all this scientific knowledge, which is based on nature out there in some natural habitat with a ecosystem where most life forms have pretty much been allowed to operate without any human or outside influence and applying it in a practical manner to my situation. Lets put it this way. Taking the science of the soil food web where the soil in a forrest have been left undisturbed by humans for many years, and applying that science to potting soil from the nursery in small fabric pots using very poor quality municipal water is not a straight forward thing. The symbiosis in the soil food web can take a very long time to establish. Hardly something that can be truly maximized of it's worth with "new" soil from the nursery sitting inside a container of sorts for maximum about a year before being disturbed on all layers again. So growing with small containers where you will disturb the layers of the soil after harvesting the plant, cannot really benefit from the soil food web or am I missing something? -
Just a quick update on the cannabis leaves and papaya peel Kombucha Fermented Plant Extract (think I'm going to start calling it KFPE?) The scoby culture continues to grow and thicken. It behaves very similar to a normal kombucha scoby, even though it looks alien. The smell is also getting stronger, still very fruity and sour and you can smell some familiar kombucha notes as well. I've started to apply the 1:40 diluted foliar application to some mint, basil and marigold plants as well and they also seem to respond positively. The swazi female that I'm using as a test subject shows very green and healthy new growth with increased praying leave angles. So far it looks very promising. One thing that I want to add to my KFPE foliar application, is some photosynthetic bacteria. That is still one type of bacteria that is very beneficial, but won't get cultivated with kombucha. Luckily, there are other ways. So, next mission is to cultivate some purple bacteria...
-
Daggafontein Gardener's Delight Mix - Living Soil Experiment
Candyman replied to Candyman's topic in Local Genetics
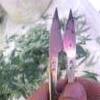
Decided this morning to transplant all the seedlings to slightly bigger pots with a better medium. I'm not happy with the BO Hemp soil as a medium for seedlings. It's too hot with too much compost and "barky" material and too little coco and perlite to use for seedlings. Maybe this will save someone else from going through the same frustration. The nursery, one of the biggest names in Pretoria, sold it to me as a germination mix. It's not. It's a good compost, amended with some coco, vermiculite, perlite and worm castings. Good for mature plants that can handle rich organic matter, not for seedlings. Bought some Gorilla Mix and transplanted all the DG seedlings to this medium. From Left to Right: 4 x DG African Buddha 4 x DG Candy IV 6 x DG Gardeners Delight- 24 replies
-
- 3
-

-
- living soil organic
- local genetics
- (and 1 more)
-
Here is a very interesting study that was done with Kombucha fermentation of 6 different medicinal herbs. Winter savory, peppermint, stinging nettle, wild thyme, elderberry and quince. The results showed a favorable increase in preferred organic acids, higher antioxidant activity and higher phenolic and flavonoids contents as well as an increase in yeast metabolism over the traditional substrates of black and green tea.
-
Some further research gave me the composition info on rum stillage from sugar cane molasses, which is averaged out at NPK values in mg/l of 1230 : 188 : 5124, thus roughly a NPK ratio of 6 : 1 : 27. Also high in sulfur at 3478 mg/l Adding the rum wash at a ratio of 1:20 to your foliar feeding application when adding fermented plant extract will up the amount of available nutrients. It will also add some ethanol in the mix. Starting with 10% abv in the rum wash, diluting further at a rate of 1:20 should leave you at 0.5% abv in your foliar application. The ratio can possibly be increased, but be cautious of high amounts of potassium and sulfur. For further reading and studies on ethanol as a foliar application spray, see Effects of foliar and root applications of methanol or ethanol on the growth of tomato plant See also: FOLIAR SPRAY OF ETHANOL AFFECTED FRUIT GROWTH, YIELD AND POSTHARVEST PERFORMANCE OF 'SAHIL' TOMATO
-
My first experiments with kombucha fermented plant extracts involved taking a kombucha scoby from my scoby hotel and cultivate it on a sweet tea made from 30% black and 70% green tea and molasses. After two generations of fermentation I deemed the molasses kombucha ready for use in phase 2. Separately from this, I also made a rum wash from molasses. This rum wash is identical in the way I would make a rum wash for distilling rum, with the only exception being that I did not distill it. I capped it to use as an ethanol containing nutrient source. Based on my experience making these washes and the yeast that I used, I estimate the rum wash to be in the region of 10% ABV. This will be used in small quantities to assist in plant fermentation and extraction. The use of ethanol in this process is basic, but care should be taken as most microbes cannot handle ethanol in high quantities, so use sparingly for this purpose. After I had the kombucha cultivated on molasses and the rum wash fermentation completed, I started the kombucha fermented plant extract. For this, I had the peels and seeds of 2 papayas and about a cup full of chopped young cannabis leaves I wanted to use. Cannabis leaves will probably be a base substrate for all my kombucha ferments. To this I also added 1/2 cup of sorghum malt. I made a fresh batch of sweet tea for my kombucha using the base ingredients of molasses and black and green tea. I then placed the plant material into a fermenting vessel and filled it with half of my new batch of sweet molasses tea and half of a well fermented molasses kombucha. I topped it off with 25ml of the rum wash at 10% abv. and covered with a paper towel. The fermentation was closely monitored and all went well. The right notes of sour fermented fruits formed and after fermentation was completed, I strained the liquid from the solid matter and bottled in a mason jar. After 2 days of standing, the kombucha "scoby" formed on the surface layer as expected, but what was not expected, was the structure of this scoby. I have seen some weird shit in my life and brewed up some weird shit as well, but nothing ever came close to looking like this. The smell quite the opposite of how it looks. It smells quite wonderful actually. You can definitely smell the kombucha signature notes, but it's much more pungent, sourly and fruity than normal kombucha. Here is the molasses kombucha and it's scoby for comparison. I started to use this plant extract at a ratio of 1:100 as a foliar application on a test female plant. After no initial detrimental effects were witnessed for the first few days, I upped the ratio. For the last week did a foliar application at a ratio of 1:40 every morning at 05:00 and every evening at 19:00. The test subject is a female swazi from my selection of bag seed. She is about 14 weeks old and is in a 20L pot using soil. Initially, I thought she was an auto, seeing as all her siblings were autos. She went into flower just a little bit later that the rest of them, but whereas they completed their flowering cycle, she started to re-veg again... So, she is now the subject of testing and experimentations... Any advise on how to care for her addionally will be welcomed. I cannot let her get huge as she has to stay hidden behind a wall, hence the training going on here... This was her this morning after a week of twice daily foliar feeding on my experimental kombucha fermented plant extract. I must say, I looks promising. She isn't getting any other food or special treatment. I'm going to keep to a ratio of 1:40 for adding to water in the soil and start doing this for the next week when watering. We had a lot of rain recently, so I haven't watered her in about 10 days time. I will continue to post my progress and findings here. For my next recipe, I delved a bit deeper into proper sour mashes, like when making whiskey, using sorghum malt and banana peels. This one is currently busy fermenting and will replace the papaya and cannabis leaves extract when it is done.
-
I'm starting this topic to share some of research and findings on cultivating your own microbes and nutrients for those interested. This is truly a vast field and new scientific knowledge and findings are coming at us at a tremendous rate and the benefits and symbiotic processes involving microorganisms and plants are well proven scientifically. Reference for example Endophytes and the Rhizophagy Cycle A lot of my ideas and experiments will tie back to Korean Natural Farming (KNF). At it's core, KNF is mostly taught to poor and illiterate farmers across Asia who cannot afford to buy expensive fertilizers and amendments for their crops. Thus, almost all methods of KNF implementation are designed and structured with them in mind. I'm rather interested in customizing and perfecting the already proven systems, methods and applications for my own situation as someone who lives in the city with a small garden and grow in fabric pots. Feel free to share any info on the subject. I'm learning new stuff everyday and I thought it might benefit others by putting it down here as well, not only in my notebook where it's only me that benefits. I'm going to start off with fermentations, because this is where a lot of my previous knowledge and experience comes from. Although I'm not into it anymore, I used to be a hobbyist distiller, mainly making my own rum and whiskey from a copper pot still. I managed to turn out quite a few decent batches over the years and friends and family never seemed to complain. Now, to see if my lady plants will appreciate the brews as much. Another thing I have been brewing continuously for the last 6 years, is kombucha. Me and the missus drink on average a liter of the stuff everyday. Also, some friends and family have their permanent orders put in, so I make about 60 liters of booch per month. Anyone familiar with kombucha, will understand that this leaves me with quite a bit of wastage. I also keep a 11 liter scoby hotel going, which gives me a lot of kombucha vinegar. So, I already have access to unlimited quantities of this probiotic rich drink. I had the idea of a Lactobacillus based Kombucha after reading some scientific research material and also found references to studies that used kombucha cultures on a variety of substrates and this is where my interest peaked. After proper research, it became clear to me that kombucha, which is a naturally formed symbiotic culture of beneficial yeasts and bacteria, is already doing the job that products like EM-1 and LABS are trying to do by isolating certain or limited strains of specific bacteria. Kombucha cultures changes composition and structure on a microbial level, based on the substrates, nitrogen and carbon sources provided. It's as if nature already knows exactly what the optimal blend of yeasts and bacteria should be, given any specific blend of substrates. This is why I believe that kombucha fermented plant extracts created by cultivating kombucha microbes and selecting exact and specific substrates, are superior to anything that EM-1 or LABS are trying to accomplish. I would like to be proven wrong on this account. For those familiar with the YT channel Future Cannabis Project, here is a very good piece on someone who implements KNF on large scale Hemp farms. Later in the video he also mentions using kombucha to further extract the leftover plant material after doing a fermented plant juice extract (FPJ). Put two and two together... Wildcrafting for FPJ, JHS, JLF I'm going to list a basic composition of kombucha, but take into account that this data is based on averages across multiple scientific studies, ONLY looking at using white refined sugar as sucrose and black tea. Changing the substrate from white sugar to molasses for example, will drastically change the microbial and chemical composition and so would changing out the black tea with for other sources of plant matter. So keep in mind that this list should be a baseline for what microbes you should expect to find in your booch, but it is by no means an exhaustive list when experimenting with different substrates. SCOBY (Medusomyces gisevii) - Symbiotic Culture Of Beneficial Yeast and Bacteria Organic Acid Bacteria A. xylium, A. pasteurianus, A. aceti, and Gluconobacter oxydans Gluconacetobacter sp. A4 - Key functional bacterial species Acetobacter. intermedius sp. nov - Novel nitrogen fixing Acetobacter nitrogenifigens sp. nov., and the nitrogen fixing, cellulose producing Gluconacetobacter kombuchae sp. nov., from kombucha tea. Dominant Bacteria in Kombucha - Gluconacetobacter @ 85% of Kombucha samples; Lactobacillus @ 30% of samples; Acetobacter only @ 2% Yeasts A broad spectrum of yeasts has been reported including species of: Saccharomyces, Saccharomycodes, Schizosaccharomyces, Zygosaccharomyces, Brettanomyces/Dekkera, Candida, Torulospora, Koleckera, Pichia, Mycotorula, and Mycoderma. Yeasts of Saccharomyces species: Saccharomyces sp, Saccharomyces cerevisiae, Saccharomyces bisporus, Saccharomycoides ludwigii, Schizosaccharomyces pombe, Zygosaccharomyces sp., Zygosaccharomyces rouxii, Zygosaccharomyces bailii Brettanomyces: Brettanomyces intermedius, Brettanomyces bruxellensis, B. claussenii Predominant yeasts in most samples: Brettanomyces, Zygosaccharomyces, and Saccharomyces spp Ascosporogenous yeast, Zygosaccharomyces kombuchaensis sp. n. Candida sp: Candida famata, Candida guilliermondii, Candida obutsa, Candida stellata, Candida colleculosa, Candida kefyr, and Candida krusei. Torula, Torulopsis, Torulaspora delbrueckii, Mycotorula, Mycoderma, Pichia, Pichia membranefaciens, Kloeckera apiculata, Kluyveromyces africanus Organic Acids Acetic, gluconic, glucuronic, citric, L‐lactic, malic, tartaric, malonic, oxalic, succinic, pyruvic, usnic Sugars Sucrose, glucose, and fructose Vitamins B1, B2, B6, B12 and C Other 14 amino acids, biogenic amines, purines, pigments, lipids, proteins, some hydrolytic enzymes, ethanol, antibiotically active matter, carbon dioxide, phenol, as well as some tea polyphenols, minerals, anions, DSL, as well as insufficiently known products of yeast and bacterial metabolites. As a side note, the high concentration of yeasts found in kombucha, results in large quantities of dead yeast cells, which in turn provides a rich nutrient source high in B vitamins for other microbes.
-
Daggafontein Gardener's Delight Mix - Living Soil Experiment
Candyman replied to Candyman's topic in Local Genetics
Yes, I agree. That medium isn't the greatest for seedlings. School fees... I'm getting something better to replace it with. -
Daggafontein Gardener's Delight Mix - Living Soil Experiment
Candyman replied to Candyman's topic in Local Genetics
I was super stoked this morning when my package arrived from @Daggafontein Genetics. Not only did they resend me a pack of Gardener's Delight seeds, they also send me a pack of African Buddha seeds and some coir pots as well! That is 5 star customer service right there! Thank you Bob and Daggafontein Genetics. You guys rock! To top it off, all 4 Gardeners Delight seeds that I have planted on Sunday 15th have germinated and are going along happy and strong. No action from the 4 Diesoline seeds that I planted the same day. I also planted 4 Candy IV seeds from Daggafontein on the 16th and 2 of them have germinated and are breaking through the soil. I've made some extra space and the African Buddha will make a very welcome appearance as well... DG-GD #1-5 DG-GD #6 DG-CANDY IV #1-2 DG - African Buddha - Planted 2020/11/20 6 Swazi I decided to keep from the 13th- 24 replies
-
- 5
-
-
- living soil organic
- local genetics
- (and 1 more)
-
Daggafontein Gardener's Delight Mix - Living Soil Experiment
Candyman replied to Candyman's topic in Local Genetics
I misted the soil just before taking the photos. I only use a fine misting spray to water in those pots and then it depends on how hot it is. Today was very hot and those small pots can dry out very quickly. I try and give them enough dry time before watering again and keep an eye on them. If they start wilting or drooping in the heat and the soil looks somewhat dry, I mist the surface again. Luckily in a few days time I'll move them into 7l fabrics pots to start off with. Watering should be less of an issue then.- 24 replies
-
- 1
-
-
- living soil organic
- local genetics
- (and 1 more)

