

The Grass Baas
-
Posts
184 -
Joined
-
Last visited
-
Days Won
2
Content Type
Profiles
Forums
Calendar
Gallery
Articles
420 Directory
Classifieds
Posts posted by The Grass Baas
-
-
9 minutes ago, GGG said:
Thx @Grassbaas , scrog is great but can take time with the veg part.
I typically will take 1-2 plants that's been vegging in veg room for awhile or il take several smaller clones per tote , that way veg is between 4-6 weeks before I flip. Usually the plants have been topped 2-4 times also while they in veg room . So many ways to do it .
Mostly I like to do 6-8 clones of the same strain in one tote.
Sent from my Hisense Infinity H50 using Tapatalk
Thanks dude. That's some good info. I have taken 4x plants that have had about 6 weeks of veg in Coco/perlite topped twice. So far they've been impressing me. I initially had 9 clones. 4x living soil and 5x coco (same strain). The Coco is absolutely madness. They will be used as the guinea pigs for my scrog/coco adventure. Once again, thanks for all the Info and epic pics. Helps alot.
-
 1
1
-
 1
1
-
-
Great grow man. I read back abit and saw you get roughly 650 a m2. That is incredible. I'm trying the scrog thing out with 4 plants that are growing in Coco. It will be my first scrog aswell as my first coco grow. Seeing your plants react so well to the scrog is atleast helping with the expectations. This is honestly a goal for most growers to achieve. Well done

-
1
-
-
To be honest.....I wouldn't even flip yet. They're on a roll now.. let them grow. You have plenty more space to fill there. Top the one at the back and only worry about cleaning them when there are alot more leaves. Leave them for another week.....or two. Promise you won't regret it.
-
3
-
 3
3
-
-
Nice man. Welcome. This forum has helped me alot with making up my mind with my setup. You'll learn alot. Any questions anytime.

-
3
-
-
Duuuuuude. These are some really good looking mains. Please post your dry weights when done. Would love to know what yield you guys got from those scrogs.
Excellent work

-
2
-
-
Hey man.
With sonoff, the person that created the link to the sonoff sensor is able to view logs under the options menu when viewing the device. I see when it goes on and off.
-
2
-
-
What's up dude.
Great idea man. I'm also super into the whole remote control thing. I'm still abit of a noob but I manage a few simple things using sonoff switches. They're great. Have had really good success with them. I could be 300km away working and I could monitor some of the basic elements of a perpetual grow.
1) I use a sonoff switch and temp gauge to monitor the temp in my propagation chamber. It switches a heating pad on and off. I keep it at 20 - 24 Celsius. All the little clones love it. Helps alot in the cold winters.
2) I use a sonoff switch, humidity gauge and an extractor fan to control my humidity in both my flowering and vegging tents. Each having their own switch, humidity sensor and extractor. I use a humidifier in the vegetative/mother tent to keep humidity nice and high and then the sonoff will switch the extractor on and off, keeping it at about 65% humidity. The flowering tent has no humidifier and the switch puts the extractor on and off keeping the humidity at 45-55% humidity. Depending on where in the cycle the flowers are.
And all these sonoff switches are pretty smart. Known as smart switches. They keep logs of when they switch on and off. You can also remotely change parameters. It's really great.
-
4
-
1
-
-
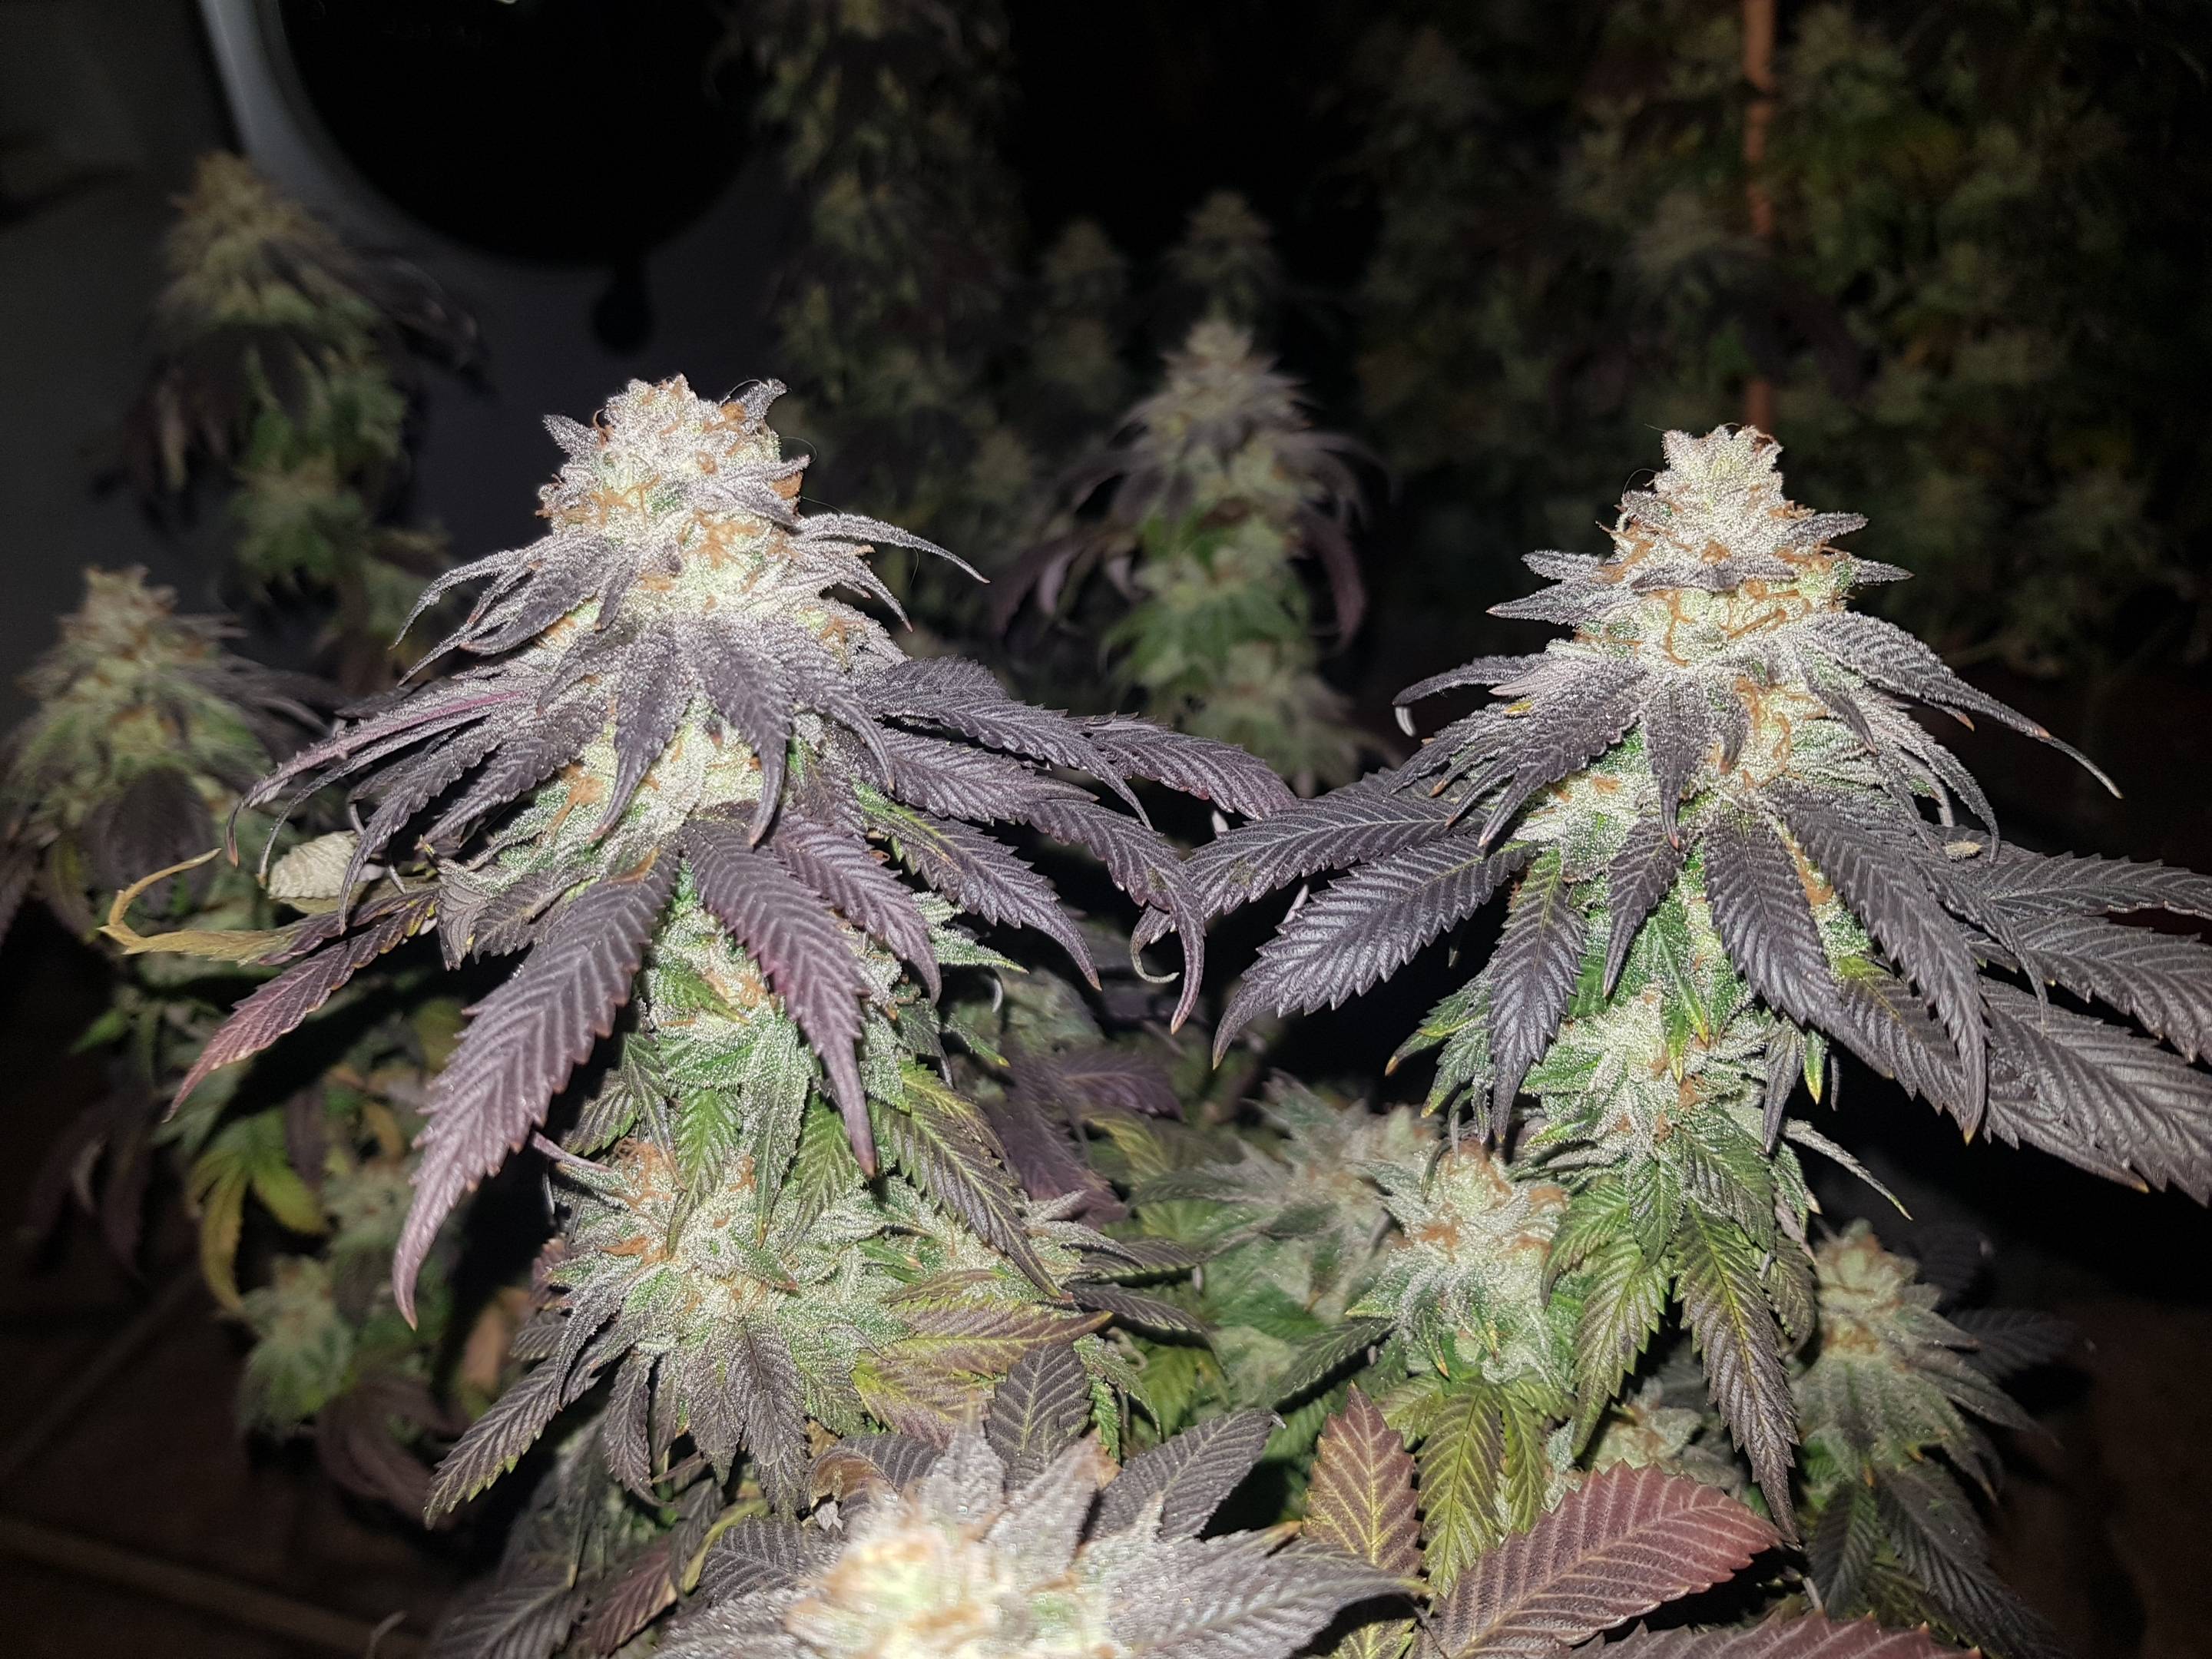
Those flowers look frooooooosty!!
-
 1
1
-
1
-
-
What's up!!!
Welcome. This is a great place for learning, and also for sharing. Please feel free to drop some knowledge anytime. I'll be sure to check it out.
-
1
-
-
Holy shit. This post goes from scrawny little plants to Bam!!!!!!!!!! Plants on steroids.
This is honestly a spectacular sight.
I am on my first adventure to try scrog 4 plants exactly the same way you have just displayed. I have them in a coco/perlite mix with GHE tri part nutes. So far I am having an explosion of growth through the vegetative state. I am honestly amazed at how perfect you kept both canopies and perfectly flat. I would've love to see the progression of the grows. Still amazed.
Quick question. The strain I'm using is quite the stretcher once flipped. How long after flip do you tuck nodes? Did you fill the entire canopy 100% before flipping or do you flip at 80% and fill the gaps as the plant stretches?
-
2
-
-
Awesome man. I once made the mistake to not water after I transplanted and didn't do the plants any good. Usually a good watering after the transplant helps alot with the shock. But otherwise they look great. They'll explode the next few weeks. Will be watching this closely.
-
3
-
1
-
-
*looks at Mic on floor, sits quietly waiting for the show to begin*
Fuck this is great. Skip the veg straight to the good stuff. Super excited. I'll be here for a while...
-
1
-
1
-
 1
1
-
-
Welcome dude. You'll get plenty of advice on this forum. I totally love growing my outdoors and am also excited for the new season around the corner. On the other hand I absolutely can't stand autos. But that's just me. Enjoy your time around here
-
1
-
1
-
-
6 hours ago, Adansonia digitata said:
Holy shit!

Holy shit. Not to joke....yesterday I checked and he was on like 60k and when I checked as it was announced he was on like 5k. Crazy good fight for his publicity even though I still think it was an early stoppage, he was getting badly out performed.
-
2
-
-
5 minutes ago, Green Leaf Organics said:
You need to saturate the entire medium ,roots won't like spreading to dry soil and dry soil micro life will almost completely stop producing nutrients for your plant.
It's also good to bare in mind that soil can become hydrophobic if let to dry out to much. This means that when you water you may get runoff but are you actually not saturating the medium and water is just running through your soil.
What you need to do wet the medium across the entire pot not just around the root ball , only apply enough water to wet the entire top. Then wait 10 min and apply the same amount of water again , wait 5 minutes and you should get runoff . If at this stage you not getting runoff repeat and take not how much water your medium can optimly hold.
If you find your plant then wilts its a sign of an underdeveloped root system and the plant is not utilizing the entire pot . The wilting is caused by the water cutting off oxygen supply . In Organics your entire medium needs to stay damp for soil health , dry medium is a dead medium
I have gone weeks between watering in bigger pots and small plants. This is why the correct ratio of perlite is also required in your soil because perlite is a key to prevent overwatering. This is also why I hate vermiculite as its the number one cause of beginners killing plants with overwatering
Hey dudes.
Sorry to jump in abit late but this is great info. I once also had major issues with over watering and underwatering. Never knew what to do.
The one thing I realised is that I now prefer to increase my pot sizes as my plants grow. Makes it so much easier to water. For e.g.. if I water a brand new clone that has developed roots and just been transplanted into a pot, I make sure to saturate the entire pot. Just like @Green Leaf Organics mentioned about waiting a few minutes between watering, as it allows all the water to disperse through the medium, then your runoff will be from no more space for absorption rather than being hydrophobic.
So usually just after a transplant the young plants take about 5-7 days to get the medium dry enough for the next watering. About 3 to 4 weeks after the transplant they usually start to get drier in about 1-2 days between watering. Then I know the plants are getting big enough to be transplanted and then I start again by saturation and waiting a couple days etc etc.
Either Way, so far it's looking really good. Keep up the good work

-
1
-
1
-
-
Excellent job man. This before and after of the scrog is great. It shows you how much it can help with some extra light on that canopy.
Very nice. Great diary
-
1
-
-
Aaaaah. Sorry to just drop in on this discussion but God damn I love the UFC. I stopped watching SA sports as it started becoming too political.
Just my 2 cents on the fighters this weekend.
If I had to choose top 3 fighters ever for me the Sugar show is right in there. That kid is on fire.....and smokes plenty of weed.
Poirier is a champ and is going to face the toughest fight of his life. Connor is a seriously good Mixed martial artist but over the years the unsportsman like conduct got to me. He has been in so many court cases regarding his behaviour outside the octogan. I really hope Dustin humbles him and if not I really hope Nate would be able to in the trilogy.
Tai tuivasa is also going to be an interesting one.
And finally Dricus. Hope he gets this one. Have to support the local homie.
I'm also going to try watch it live. Abit early/late but have to do it.
-
4
-
-
I saw those lights before this thread started. Having one look at it I realized they weren't even better than any recommended flood light. I would stay clear.
Sent from my SM-G955F using Tapatalk-
2
-
-
Uppercut

Sent from my SM-G955F using Tapatalk-
2
-
-
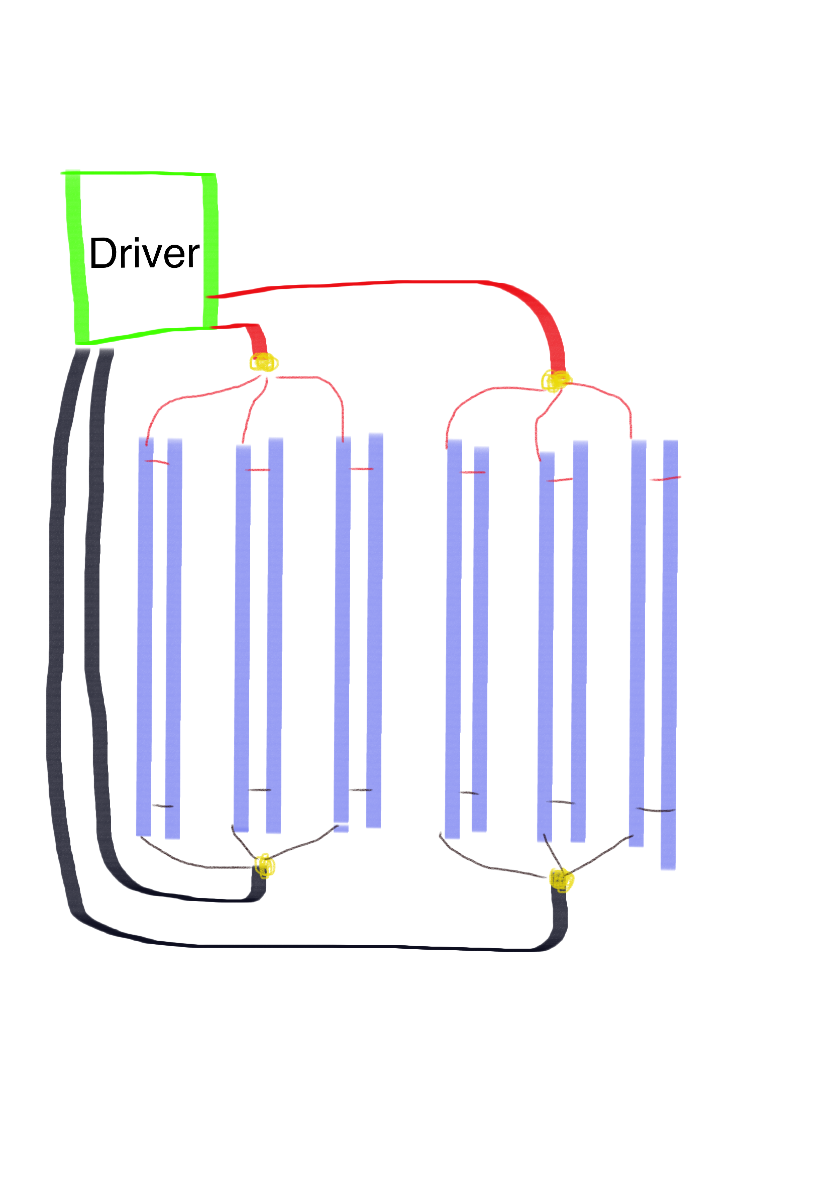
Hey man.How long is each strip? I’m interested in this design and may use it as a blueprint for me one day.
I was thinking if you ran the lights in this configuration (my picture below) then it can be neatly wired and Daisy chained.
I left a big gap in between left and right side merely for illustration purposes. The driver can sit on the two mounting beams in which the wire can neatly run without too much exposure
Also I think you mentioned you have two dimmers on the driver so this way you’ll be able to dim one side of the light if you running different strains or plants at different stages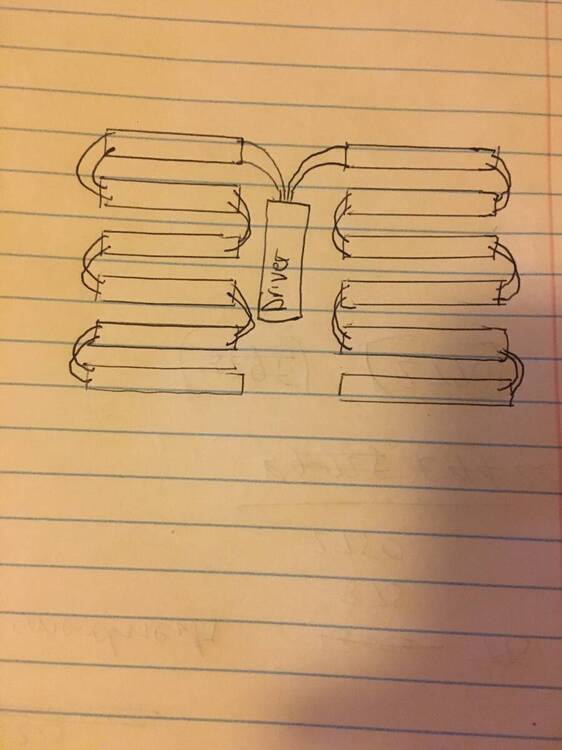
Thanks for the input. I'm sure this will help me alot.
Each strip is 1120mm long. This specific model comes in 4ft, 2ft and 1ft strips. Obviously I have the 4ft.
I don't know if those two potentiometers actually adjust each output. If I'm not mistaken; one does constant voltage and the other constant current. Not left and right output.
The idea of splitting the way you did in your perfectly drawn diagram is definitely an option. I've had to look around and ask some electricians about this as I'm not 100% sure which options I have. Still trying to figure out what impacts what when wiring up different ways.
This build so far is working out great. Still trying to source some good aluminium heatsink. I've settled for aluminium flat bar but have gone abit thicker than normal. Hopefully this helps with the heat dissipation...
If you're interested in builds like these, head over to a website called LEDgardener.com. It's great and helps alot. I would suggest starting off with going to the "Builds" tab and on the next page (you can go to older posts at the bottom of the page) you will find at the bottom of the page an article on strip builds. It has all the info you need there once you know how to navigate.
Good luck
Sent from my SM-G955F using Tapatalk
-
1
-
-
Dude Yes!!!!!!!!! Totally on the same page. That is exactly how I understand it. I think it is a safety thing since you won't be sending one load down one wire. Lol. Agreed on the potentiometers aswell.I see, anything below 48v has the dual outputs. Never used any Meanwell LED drivers below 48v, only their LRS range at 36v.
Does it not state the output on the driver itself?
I think you are right though, that they are dual output but both outputs are capable of delivering the full current - that would make the most sense to me.
I see Meanwell use 1mm cable, so they may have added two output for one to split the load between the cables for safety. The lower the voltage, the higher the current for the same watts therefore the dual outputs on the lower voltage versions.
The two built in potentiometers are likely io (Current adjustment) and vo (Voltage adjustment) - this is normal on the A and AB Meanwell HLG drivers.
So now I'm trying to figure out what would be the best way to wire them up.
Thanks again
Sent from my SM-G955F using Tapatalk
-
Sort of but not quite, typically series would increase the voltage - however when they're being daisy chained the voltage should remain the same. The Meanwell drivers we use are constant voltage and become constant current if you try push them past their limits.
I have not seen a Meanwell HLG driver with dual outputs, can you post a link to your specific driver? Having dual outputs with exact same voltage - in theory you should be able to connect them together and then get the combined current (parallel), I know you can do this with PC ATX power supplies and it is commonly done if you use one to try get a nice 12v power supply to power a car amp or whatever else. The black is typically ground, yellow is +12v
Yea, your drawing skills are a bit better. I do not claim to be an artist of sorts, you do not want to see me try and draw. lol
Figured the image would suffice to help you understand what I was trying to explain.
Hey man.
Here’s the link.
https://www.digikey.com/en/products/detail/mean-well-usa-inc/HLG-480H-42A/7704115
Honestly don’t know if this link is going to work.
As far as I understand the driver has 2 separate outputs so I think it’s recommended to use the two. There’s also 2 adjustment dials. I think they both adjust something different. Lol. I know sooooo much about this shit. I think this driver still puts out 12 amp but in 2 outputs. So it’s still 12 amps each splitting the current but also keeping it at 12amps each and not dividing it to 6amp each .
.
I feel like I understand this...maybe.
If you look at the original diagram which is found on LED gardeners website, it’s puts 6 strips on one out put and 6 strips on the other.
Thanks again for the help
Sent from my iPad using Tapatalk -
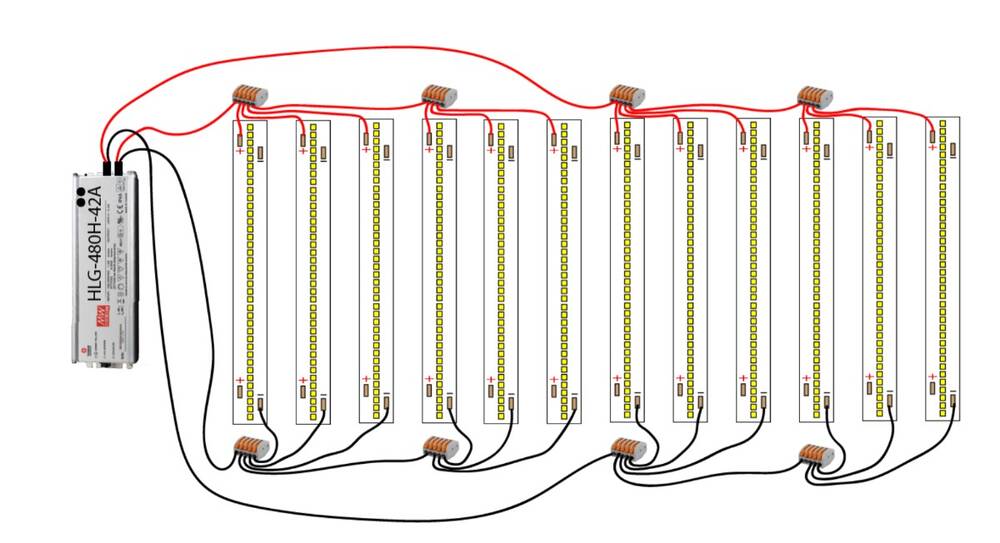
I'd personally prefer to wire it up in the below picture with the Meanwell drivers and waco connectors.
However if the LED strips allow you to "daisy chain" them, then I'd say do that if you want it to be neat.
EDIT: In the first picture you're going to have to fit 2x wires inside the connector which will be a bit challenging if you are using 1mm or 1.5mm cable.
EDIT 2: This is the daisy chain type of wiring I am talking about.
I am not a fan of it, but if the strips allow it, then it will be the neater way to wire them. I have wired up multiple Quantum Boards like this before when I needed to get them installed and working quickly and by using as little cable as possible.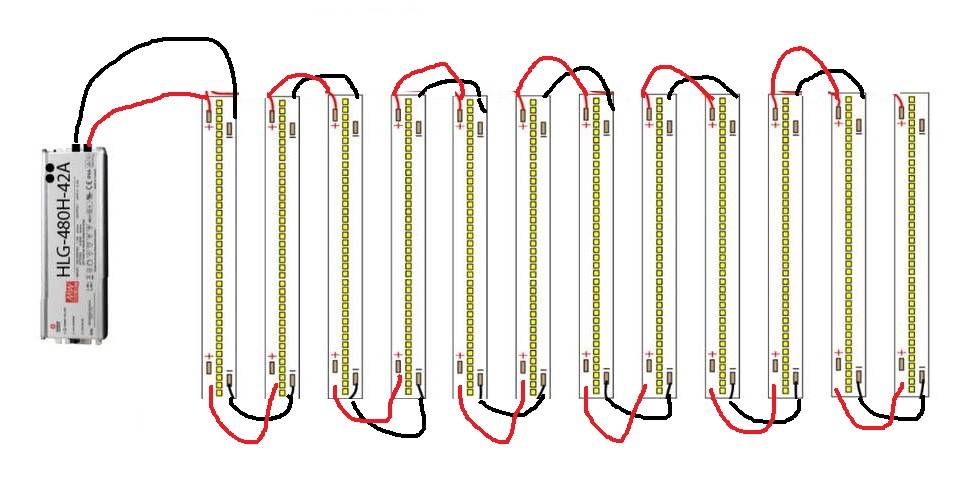
Hey man.
Thanks for the response. Daisy chain is the word I think I was looking for. Isn’t that pretty much what they call a series. Have a careful look, you’ll see the driver has 2 outputs. This allows for more amps if I’m not mistaken. Therefore I can use smaller wires. I think.
PS. My drawing skills are still better than yours
Sent from my iPad using Tapatalk -
Hello there grow bro’s and ladies (could’ve used the word rhyming with bros but a bit rude)
I sat here typing out a massive questionnaire on how I would go about wiring a setup etc etc.
Basically I’m in need of a better wiring setup than the one that is currently being recommended.
Long story short, I’ve decided to build my own 480 watt led light with bridgelux EB gen 2 strips. The driver that is recommended in the build is one of those that splits its power into 2. So.....basically the build is of 12 strips. I’m wondering if anyone knows of any better wiring options than this. It seems as if there would be way too many wires involved. I’ve decided to take the 12 strips and mount them in pairs of 2 next to one another giving me 6 bars in total. (This is a build I found on LED gardener). So if I have 6 sets of strips am I able to join the pairs together via a series network or does each one have to be done individually as shown in the picture I will attach?
So I am not the best artist or electrician, as you can see. I’ve made a drawing of what I have in mind. Since the strips will be in sets of 2, am I able to join those sets together instead of having its own line from the driver but rather from the buddy just next to him on the same bar? Literally a small wire connecting each pair ( in my exceptional sketch it’s the little red and black wires connecting the pairs of strips).Hope I’ve made some sense.
Any other recommendations will be appreciated. I’m basically looking for the most economic wiring (not financially but space wise)
Dankie

-
1
-


Soil Grow
in Grow Diaries
Posted
Thanks John. Will definitely start a grow diary soon, and keep a lookout at the DIY section. Might show you a thing or two