


Green Leaf Organics
-
Posts
1,078 -
Joined
-
Last visited
-
Days Won
20
Content Type
Profiles
Forums
Calendar
Gallery
Articles
420 Directory
Classifieds
Posts posted by Green Leaf Organics
-
-
Cut her down! No question in my mind , why risk a plant almost finishing flower with one that's only 2 weeks in.
More hermie action from green house seeds , I did seed testing for them and man are those some crap genetics. You will get one or 2 good ones but with all the other superb breeders out there I personally will never grow there rushed genetics again.
Cheers
Reaf
-
You guys should try get some Jaws Gear , he is a really good breeder with some very interisting strains. I am getting some new strains for breeder testing , I will put some pics up once the seeds arrive.
Cheers
Reaf
-
Hi bud and welcome to the forums.
I am organic so can't really help on the nutes and things sorry
Haha the seedlings look a little pink to me... any chance of a pic under proper lighting?
Cheers
Reaf
-
Keep your environment clean and treat problems as they arise but this is my way of doing it... then again I also think neem makes the buds taste like fresh turds......lol
Most vacuum cleaners these days use hepa filters so look around for replacement vacuum filters.
Cheers
Reaf
-
You should think about putting a hepa filter or some type of filter over the inlet , it will save u in the long run.
Cheers
Reaf
-
I don't really agree with the 100% humidity .... but I use a bubble cloner. In my case I find 2 much humidity slows down cloning , i haven't used a dome in years. I mist my plants for the first 2 days 3 times a day and then just leave them. You also have way to much light , you are aiming for a lux level of between 1500 lux and 2500 lux. No more and no less , I find a 18w 6400k tube works the best with a 24/0 light cycle.
You may also be getting air locks in your clones.. it is when u cut them they get a tiny air bubble in the stem that stops moisture uptake. I know a few growers that actually cut there clones under water to prevent this.
Also as mentioned there is no need for feeding unless there are roots. It's a balance u have to keep between giving the plant to much and slowing down rooting and not enough and the clone dying .
It takes practice but you will get it , but really a clone bubbler made it MUCH easier and quicker , I can go from a cutting to a rooted clone growing in 8 days now with some strains.
Cheers
Reaf
-
2 words..... bubble cloner !
 you will never look back . Roots in a week with minimal transplant shock
 -
It's awesome stuff. I think your ratio is a bit of with the nutes. I am not saying what I do is the only way I just like to share my experiences and ypu can take it from there.
My soil is a fairly rich mix so I like to start of the first 2 weeks of flower with a 1g and 1f per litre (grow and flower) at three weeks in I will up the flower to 1g 2f per litre , week 4 1g 3f per litre and week 5 and 6 1g 4f per litre.
As I said my Base is good so I don't need to be adding much grow. Some plants are naturally more hungry so I will up there grow a bit.
To date I haven't seen and burn on any strains at those ratios.
Cheers
Reaf
-
Looking good bud. Try get some biobizz grow and bloom. You can pump that stuff in and the ladies absolutely love it. I have used most ferts and that's all I now use.
Cheers
Reaf
-
If it's organic soil there is no need to flush it. Just start watering with plain water and molasses .
Cheers
Reaf
-
What size pots are those?
-
Haha the bug has bitten

Google "vertical scrog""cylinder scrog"
-
Remember to never put your wet bud on newspaper guys , the ink transfers to the bud and isn't very good for you.
Cheers
Reaf
-
I give Grow Guru 11 out of 10. There service is the best in SA hands down and they got great products to back them up. I am a fussy bastard and keep going back. I have been using them for over a year now and if they don't have something they can make a plan.
Cheers
Reaf
-
Looking forward to the grow bud. Hope you have long arms as a 1m2 scrog is not an easy thing to work under as getting right to the back is back breaking work:-rasta
Cheers
Reaf
-
Molasses is the backbone of all organic grows. It is food for the soil and if you are growing organicly it's a must. If you chemicals it's effects are very debatable.
Cheers
Reaf
-
 1
1
-
-
Personally my ladies live in 3 different size home. Clones go into 1l pots to settle,, then 10l pots for veg and finally 35l pots a week before flower.
Cheers
Reaf
-
Did you co.e right with this bud?
-
Hi bud
This gas lantern style of growing had been around for years. How long have you been using it? Have you done any comparitive grows with the same strains?
I personally have tried it once and it was an utter failure, I am not trying to bash you with the next questions I just want to ask a few questions to a person that actually grows with this method.. Knowledge is power and I like to learn from people using the techniques not all the Internet cowboys.
It starts off by saying that you must mimic outdoor growing with your indoor cycle,, makes perfect sense,, but then the article goes on to say that I must use a 12/1 cycle...... It contradicts its self as nowhere in nature do you get cycles like that. Another thing to remember about indoor strains is that they have actually been breede under 12/12 for many years now and haven't seen a natural cycle in many generations.
Corvallis has come out since then and said that this cycle only works on some strains and causes huge amount of hermies in others. Have you ever had a hermie problem?
While I have no doubt that it saves electricity I think a claim off a 30-40% increase in yield is a hyper inflated number. If you getting an increase in yield like that over 12/12 commertial farmers would be using it.
Please,, I am not bashing you or this technique.. You are the first person I have ever met in many years of growing that has used it more than once. Did it take a few grows to get right?
Cheers
Reaf
-
One 16 hour period won't hurt them but make sure they not consistently getting 16 hours or less. Or change your time to a 20/4 and then the odd bit of load shedding really won't matter.
Cheers
Reaf
-
I like to keep the legs in the 400mm mark , but it really isn't important. You must just leave enough room to work below the net.
Cheers
Reaf
-
Hi bud.
Sorry time has sped by and I still haven't managed to take that pic for you. I will try remember tonight when I am there.
The ladies are looking really happy . One thing that does worry me a little is all those electrics right there... I know many people would say I am petty for even mentioning it but you should really try get all those plugs and things a bit further away from your grow , do you keep your ballast in the same area?
The part that counts is looking really happy though , keep it up and you will be rewarded .
Cheers
Reaf
Ps....I am just super fussy over electrics lol , sorry
-
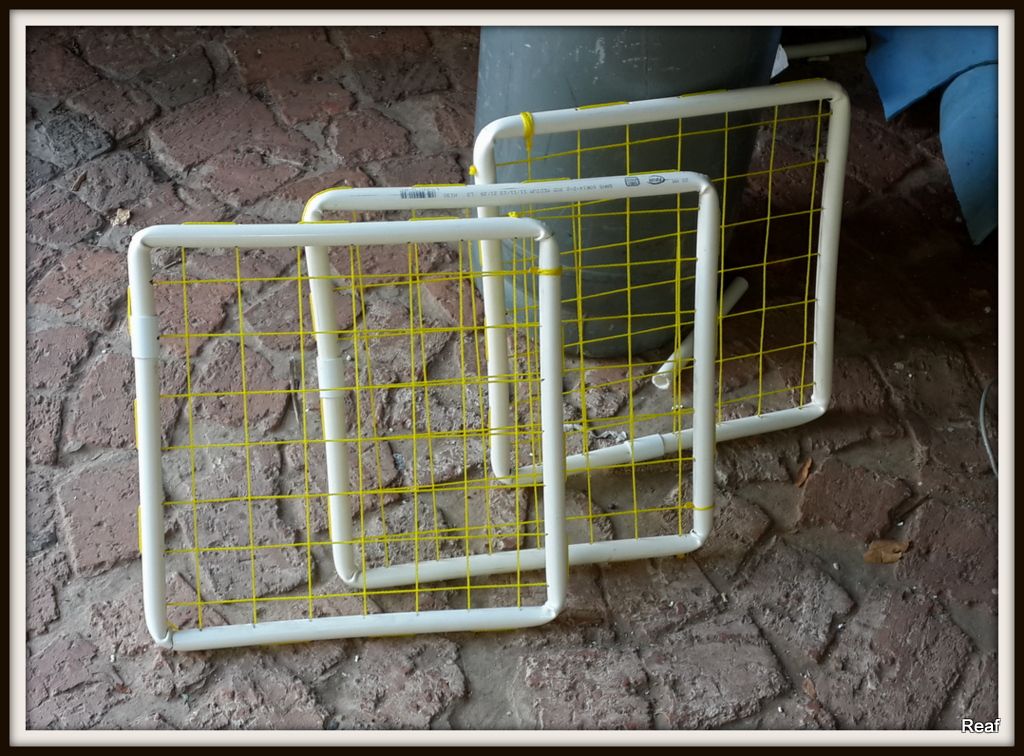
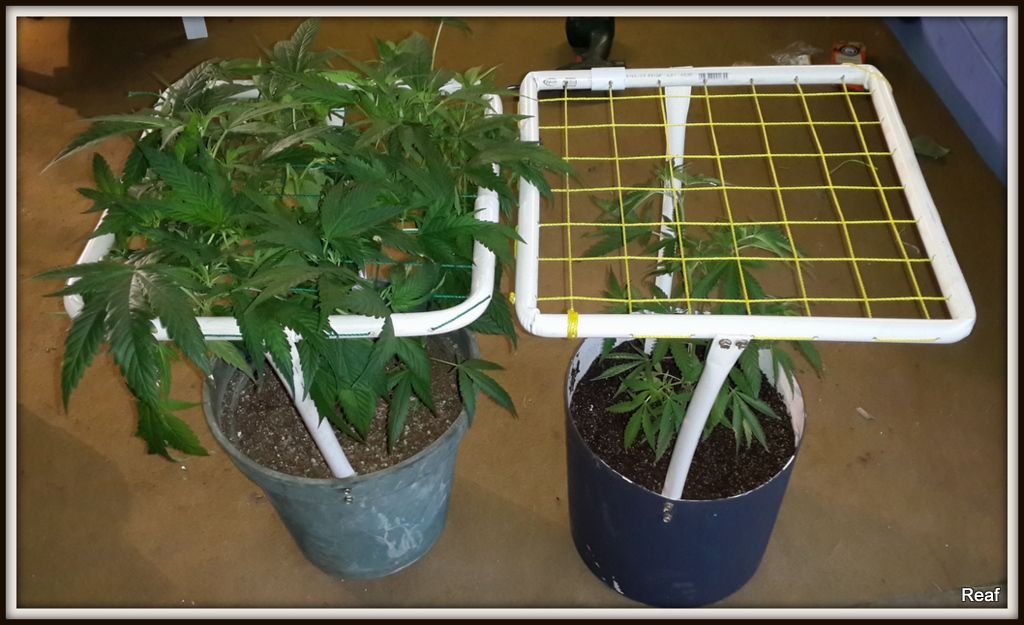
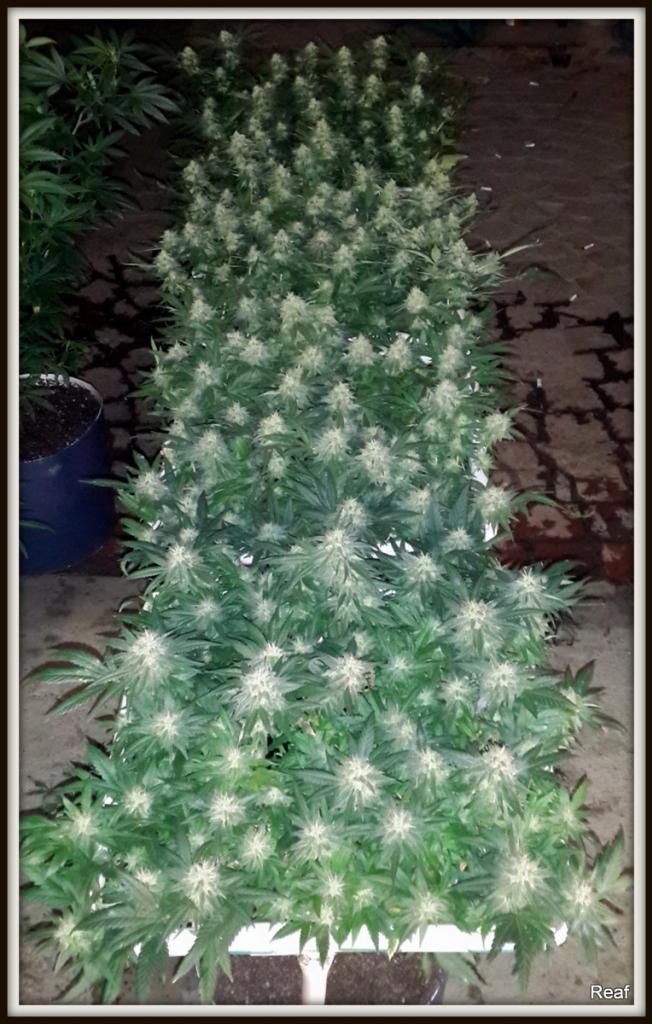
Hi Everyone

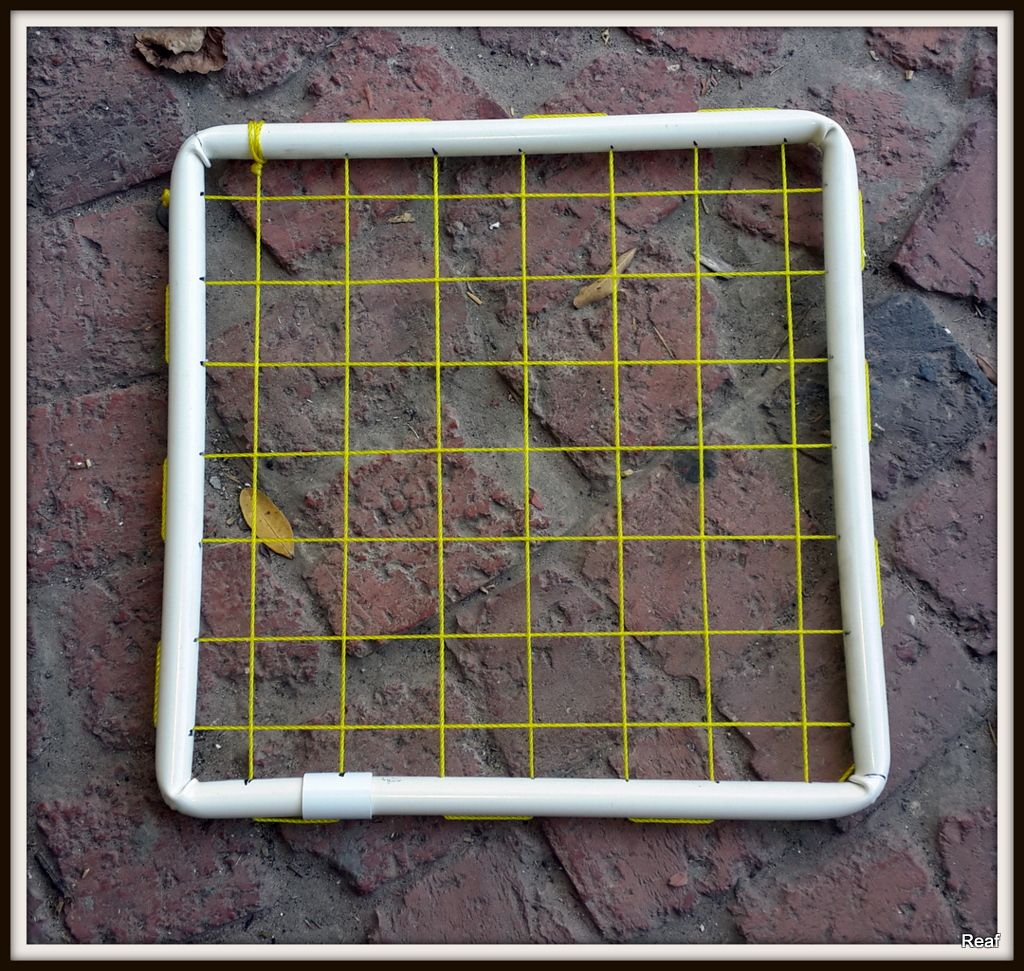
Some of you may know this post i did a while back for strainhunters , i thought i would add it here since the diy sections needs a few more posts. I will not go into measurements as they can be adjusted to suit anyones needs , i personally have 420 x 420 screens lol
They say necessity is the mother of all good ideas , i am limited for height were i flower and limited in working area so i always though i would not be able to scrog as i need to move my pots around . i also grow perpetually and like to grow many different strains.
All of these things were a roadblock in my quest to scrog . I had to come up with a design that was cheap easy to make , durable and could be moved around. Wood was out as it attacks mould and fungi unless really well sealed. I also didnt like the idea of a steel mesh as it wouldnt last and may rust.
I started to play around with pvc pipe and this is where i got to i hope you guys enjoy
Tools Needed:
Drill
4mm Drill Bit
20m 2.5mm Lacing Twine
Saw
20mm straight pvc joints
pvc pipe bender
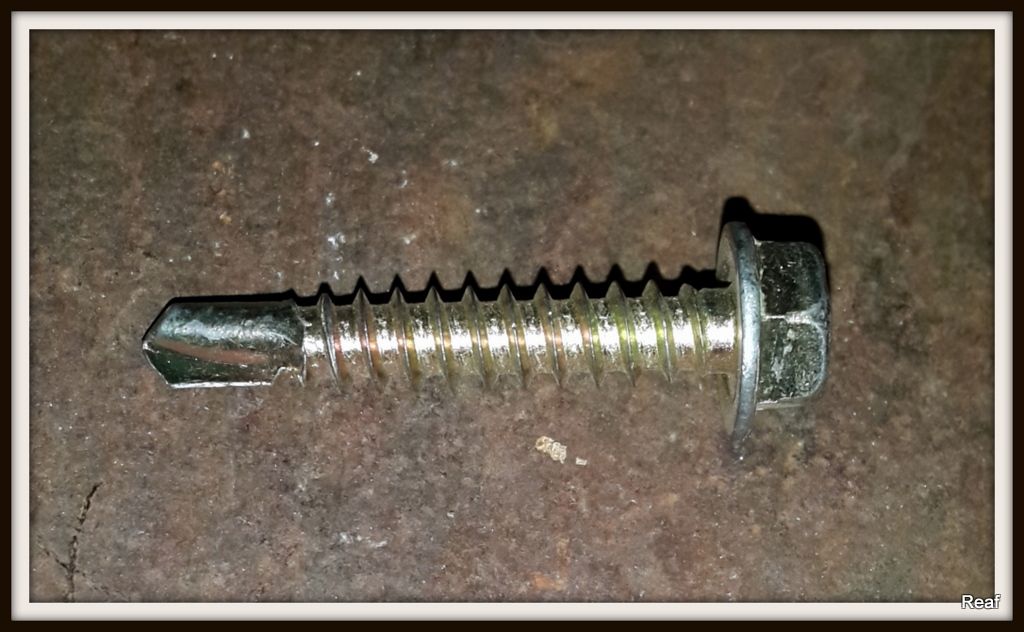
screws
2 x 20mm lengths pvc pipe
measuring tape
if you do not have a pipe bender you can substitute the bends with store bought 90 degree elbows
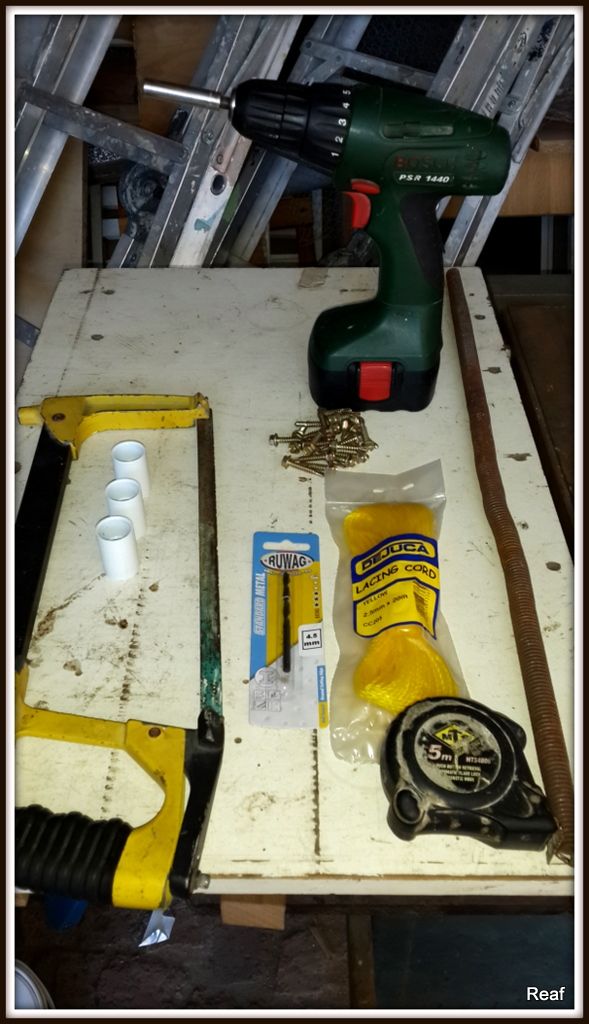
I like to use this type of screw as it works well
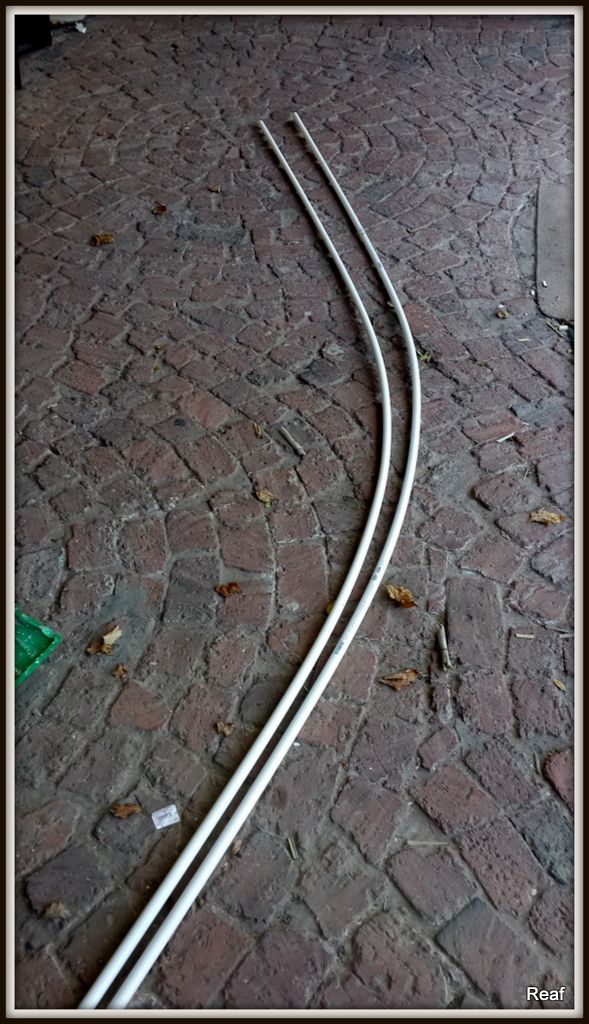
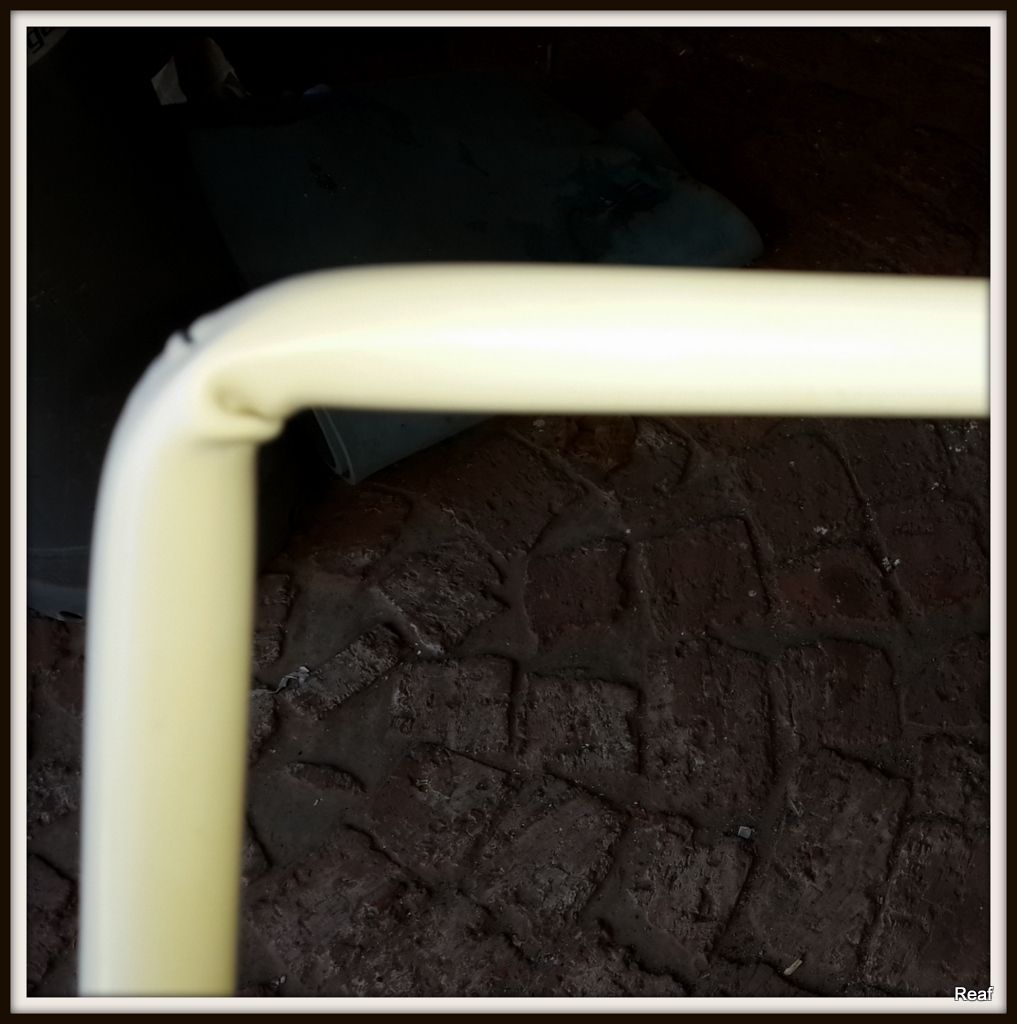
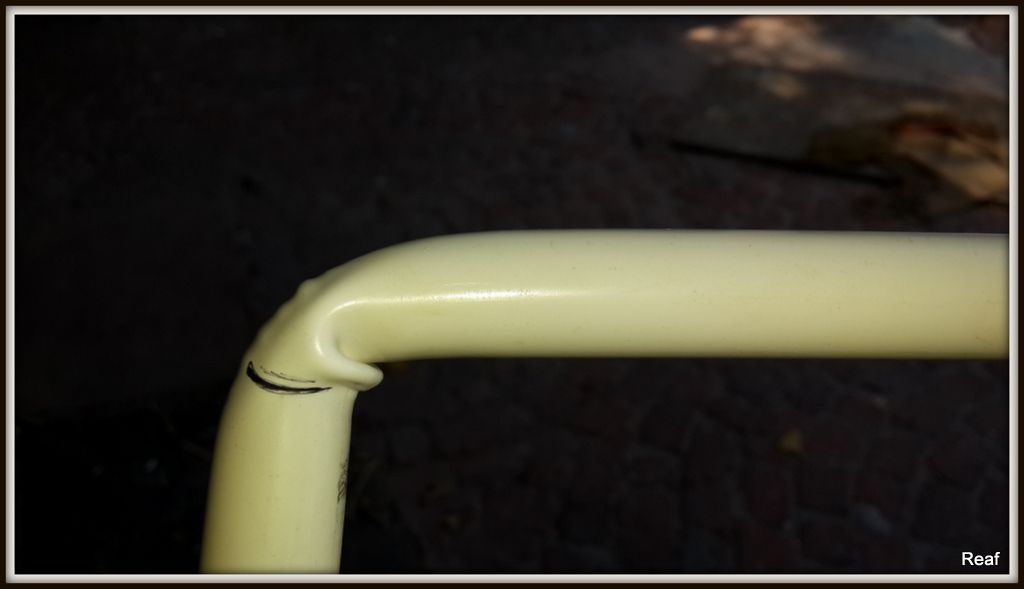
Step 1:
-Cut the desired length of pipe eg. if i want a 420 x 420 screen you would want to cut the length to 1.8m
-mark the middle and make your first bend
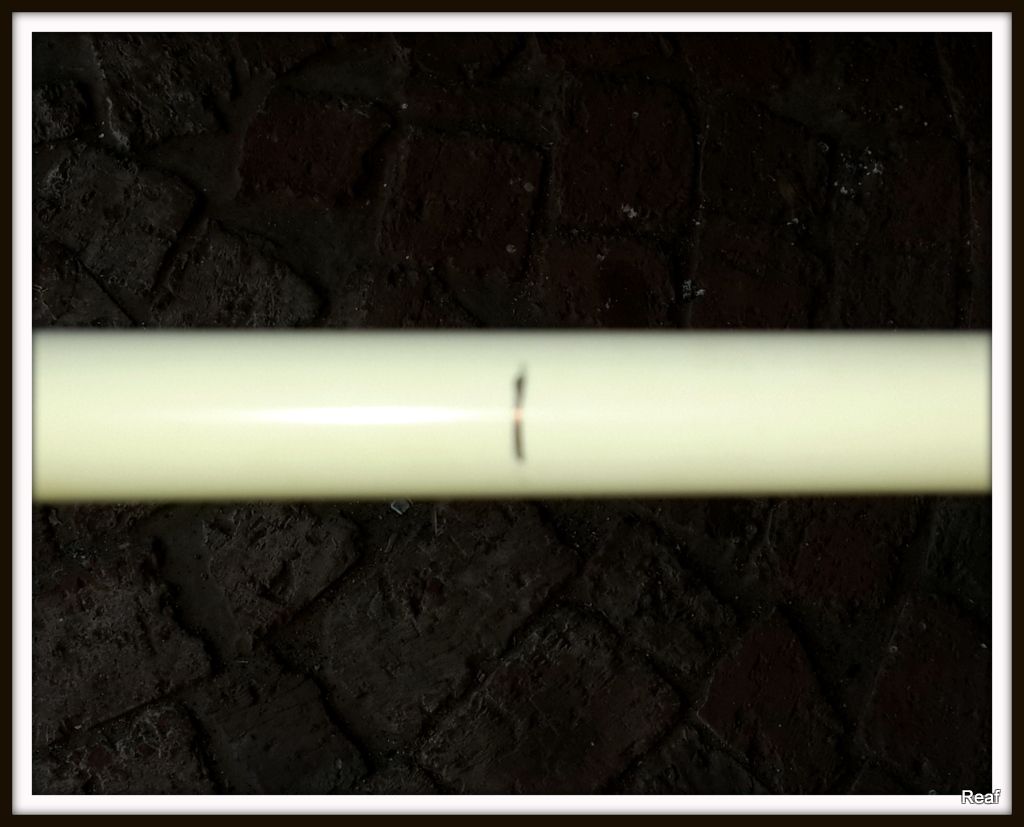
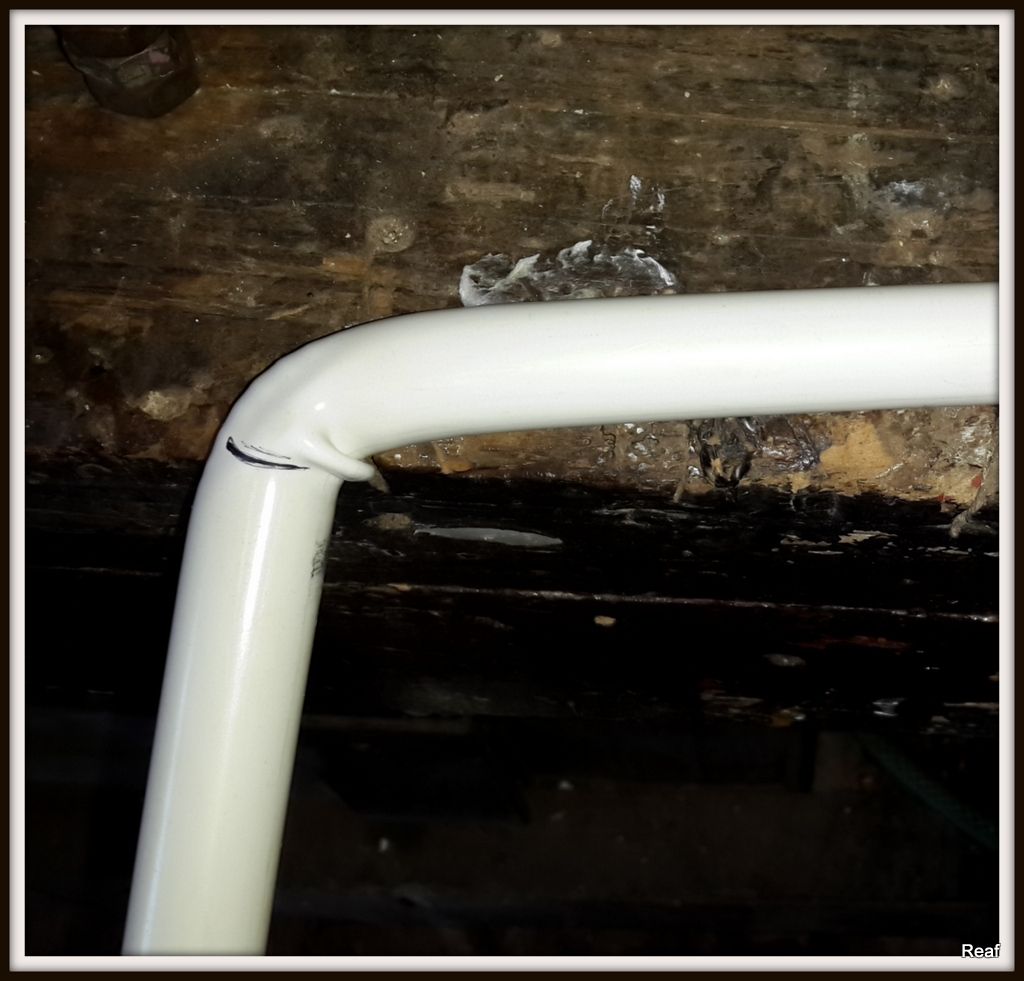
Step 2:
-Mark the desired length for next bend eg for me i want it 420mm , i would measure 400mm taking into account the extra 20mm from the width of the pipe
-Make the bend
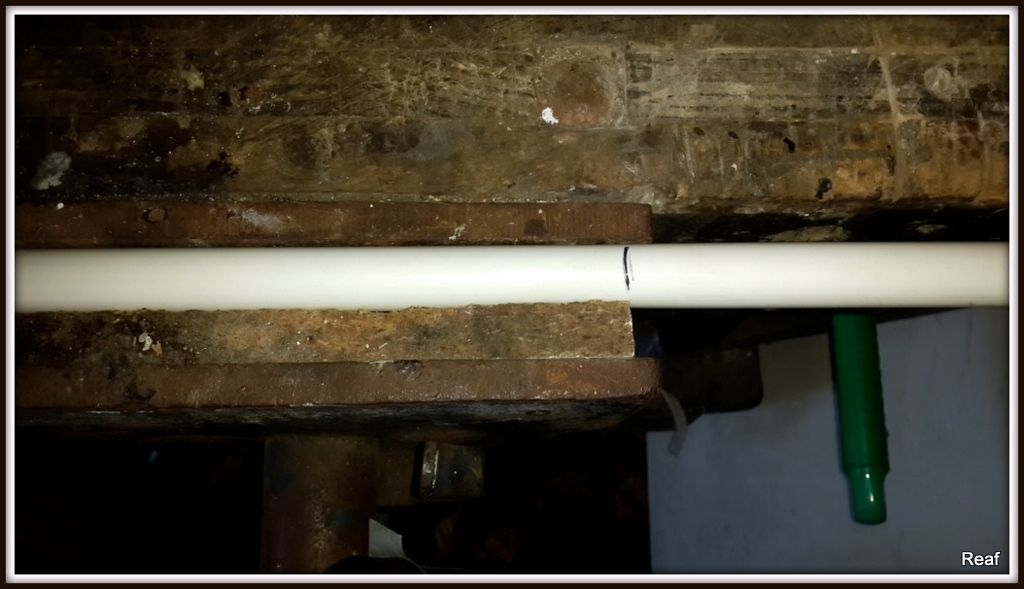

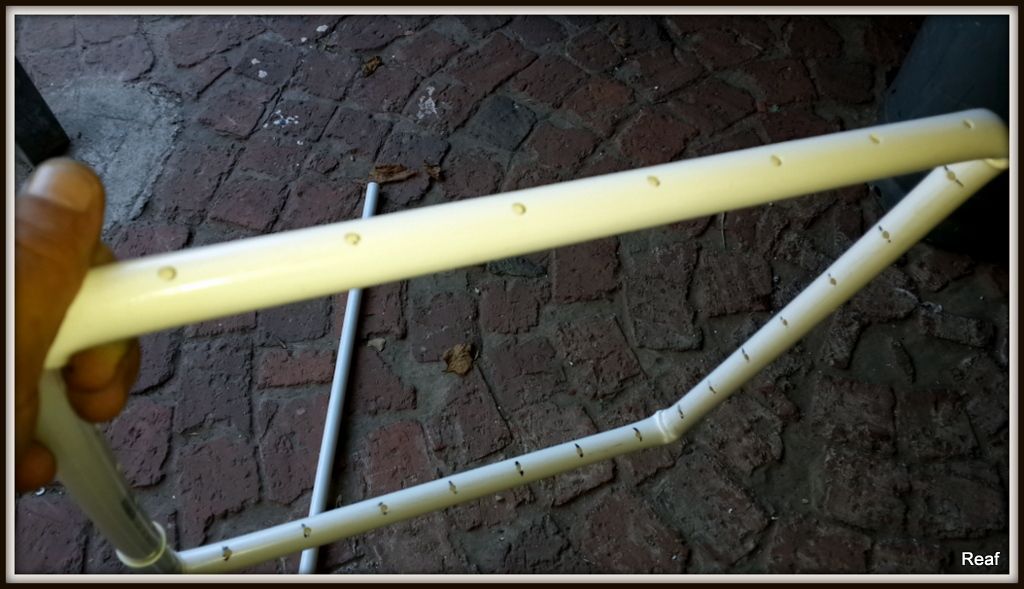
Step 3:
By this point your pipe should be looking like this
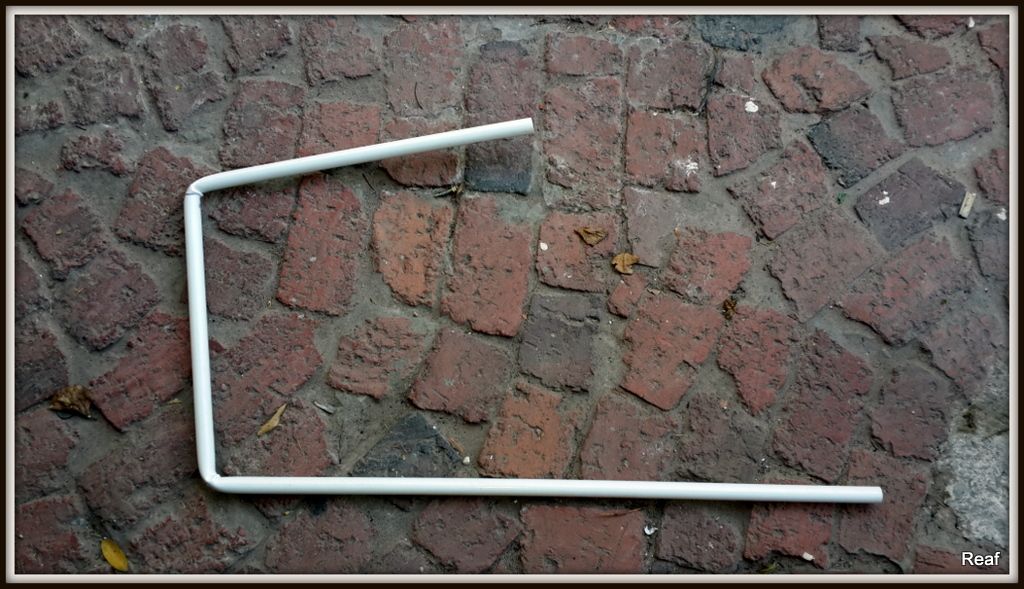
-Repeat step 2 to create your next bend
Step 4:
Your pipe should now be looking like this
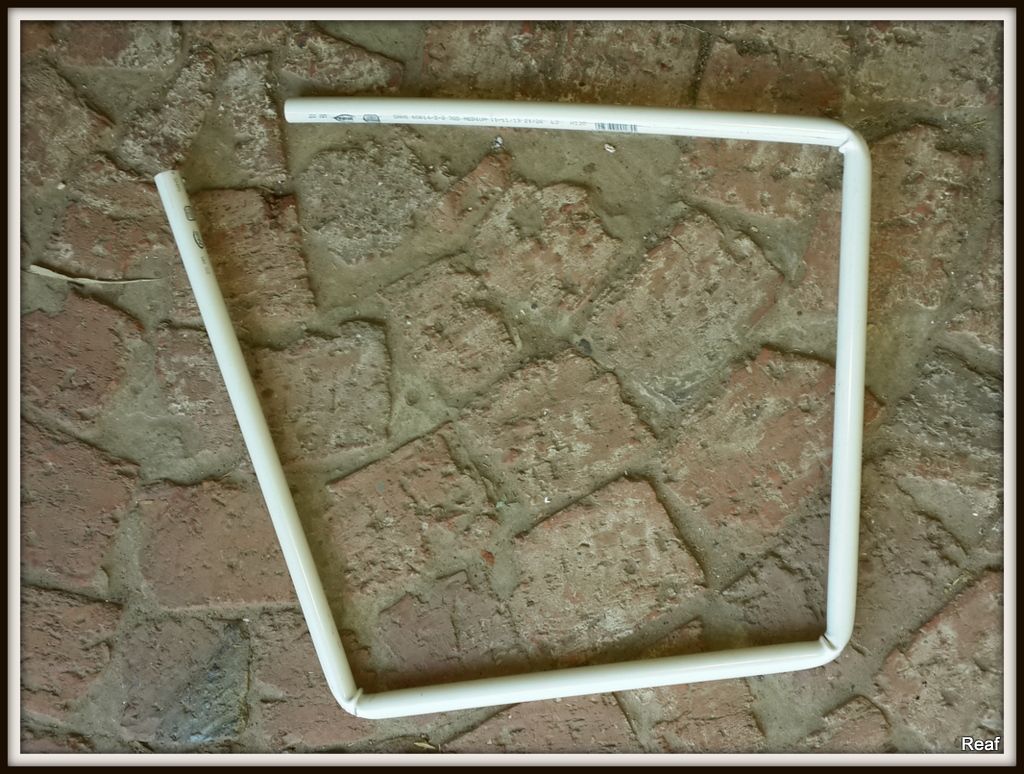
-Once again repeat step 2 to create the last bend
Step 5:
Your pipe should now be looking like this

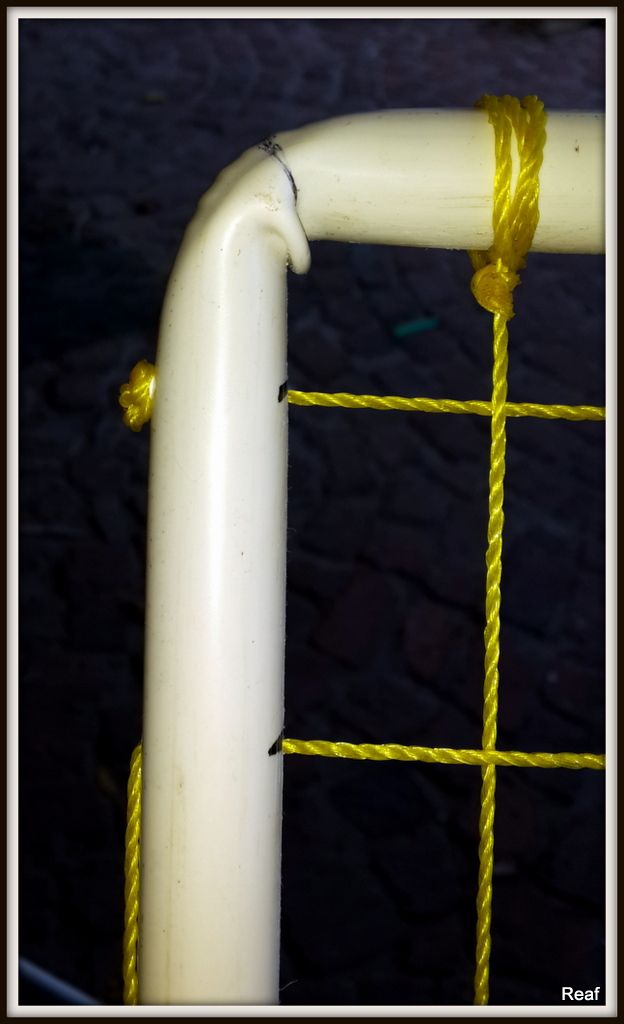
-Cut pipe down to correct size and use a coupler to connect the 2 sides

Step 6:
-Mark a piece of wood to create a template to make the holes
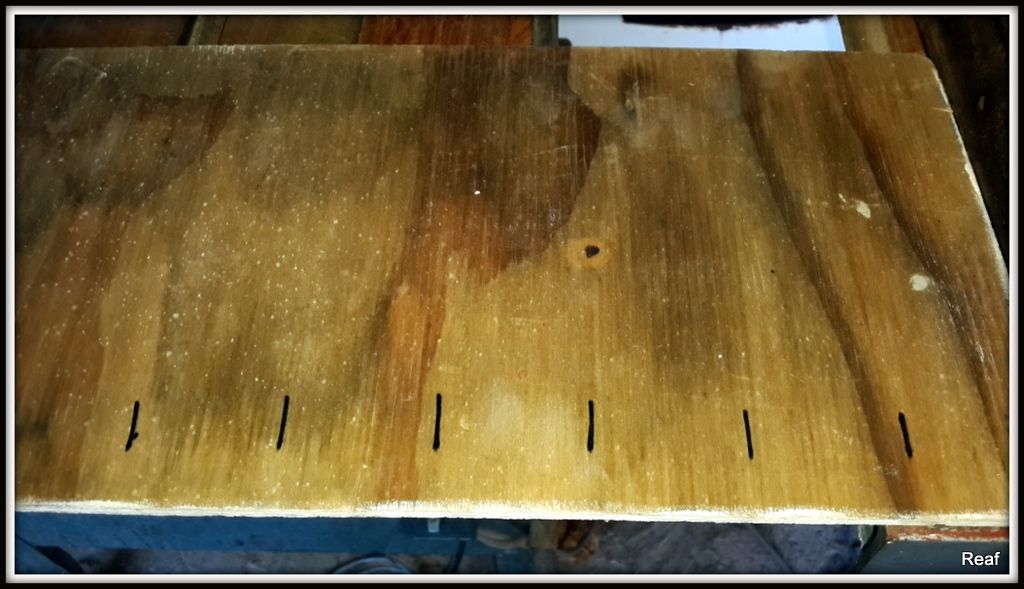
-Place the frame on the template and mark the holes
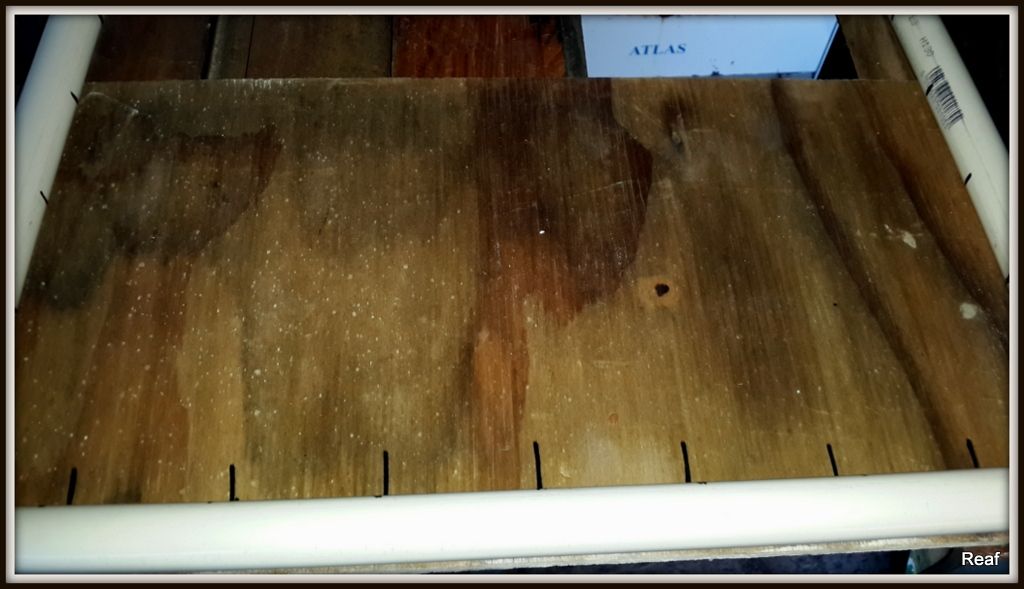
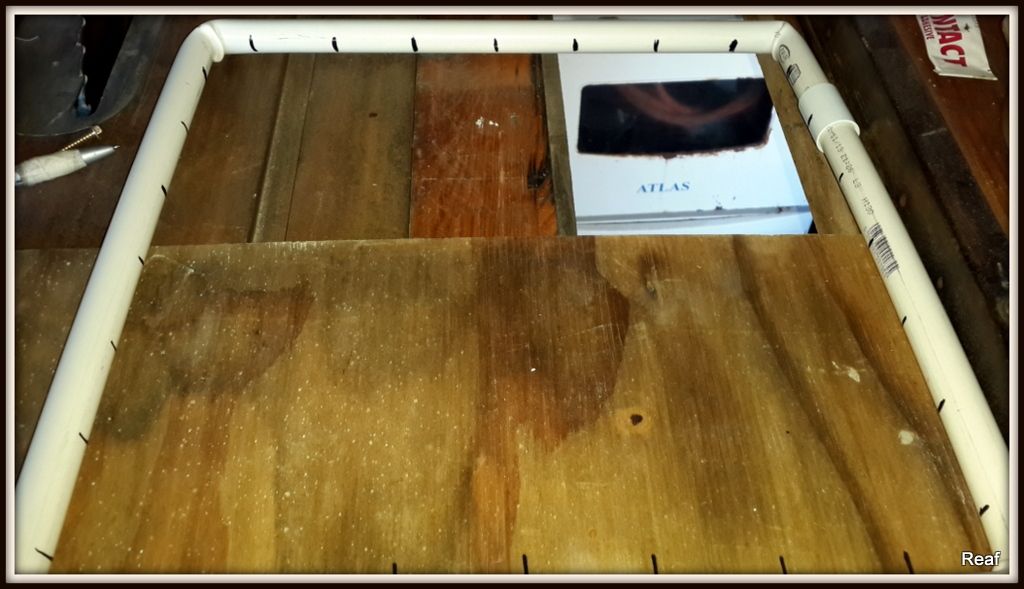
Step 7:
-Drill Holes
Step 8:
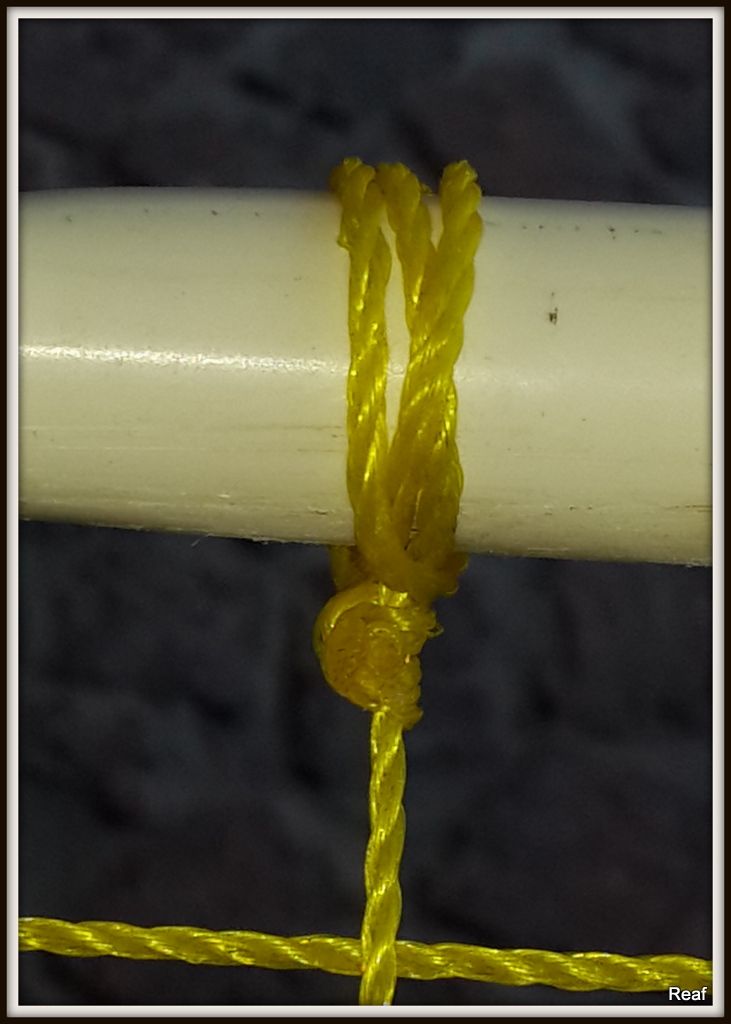
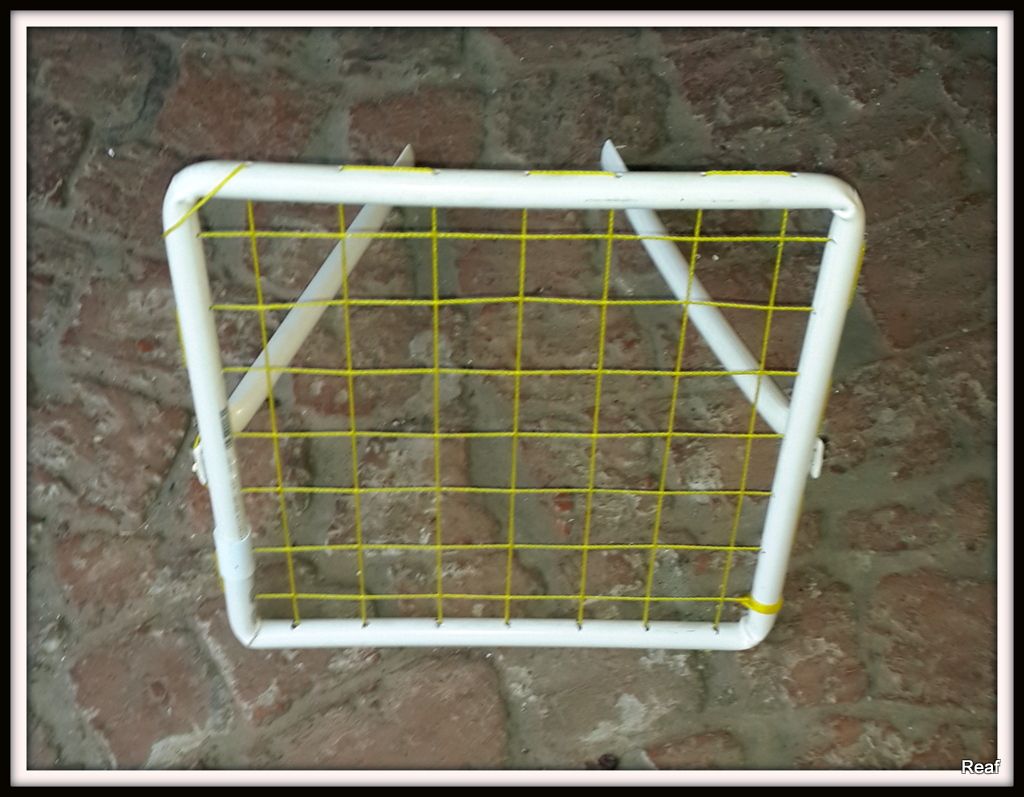
-Thread the twine through the holes
dont cut the twine, start by threading through on one end and just unroll as you need , we will cut at the end to not waste any
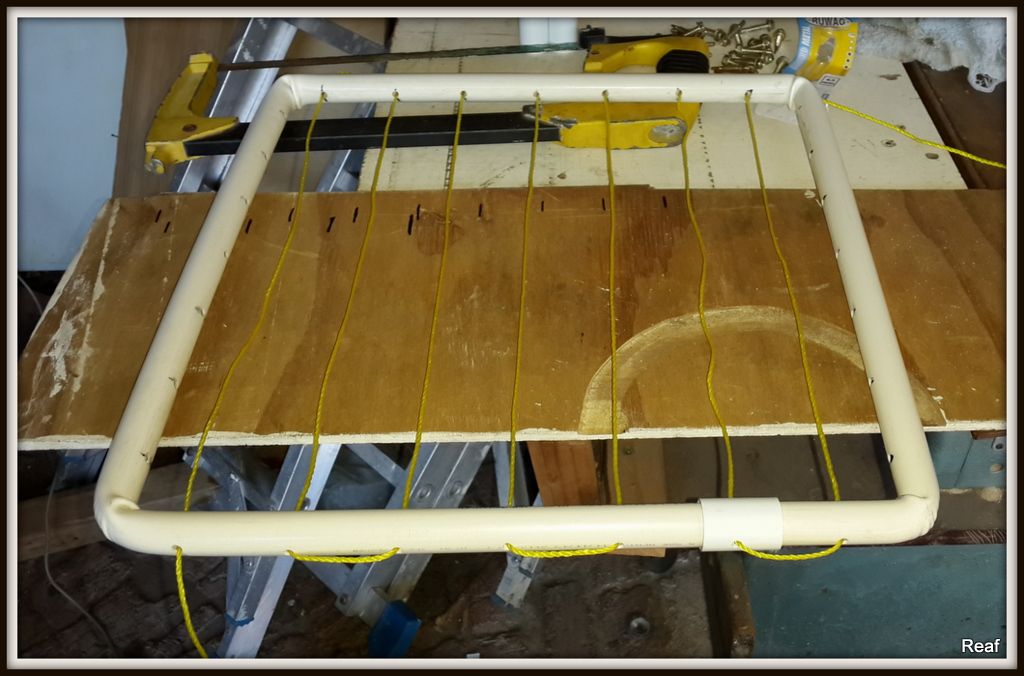
-the twine must be in an under over configuration as it holds together better

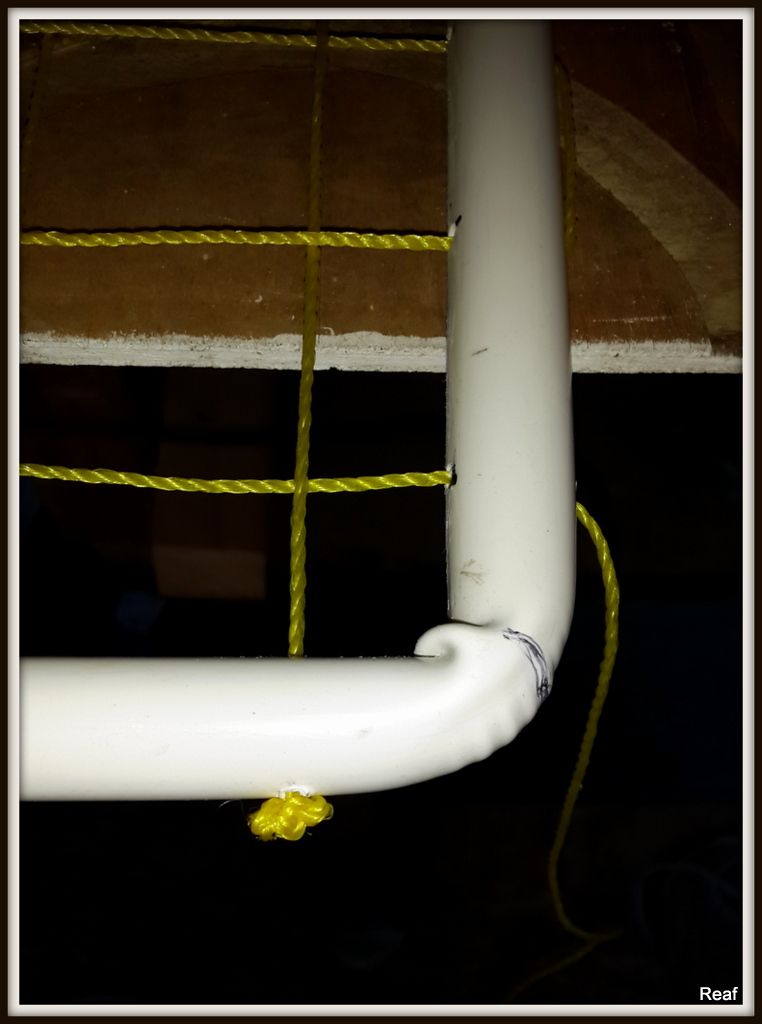
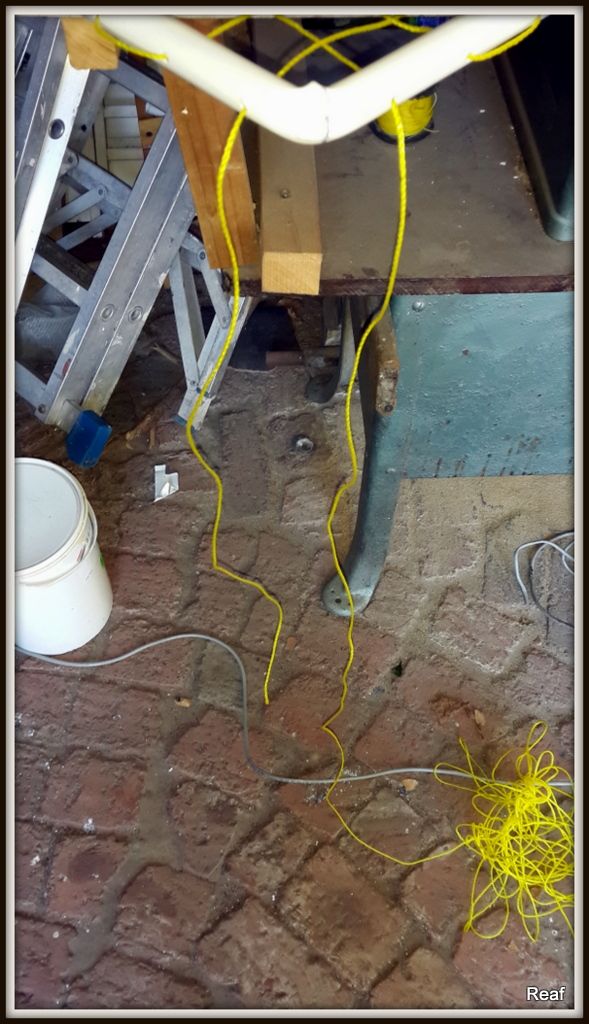
-Tighten up the screen and tie off
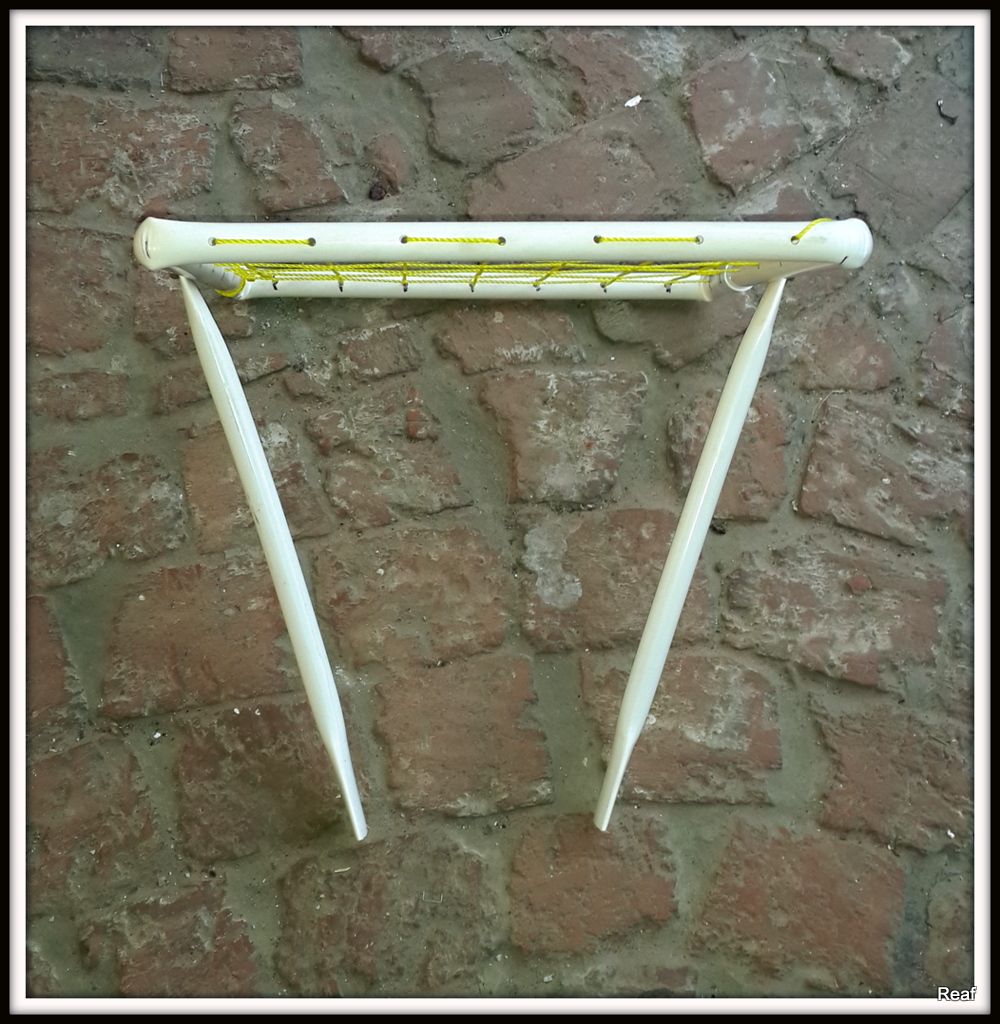
Step 9:
I keep all my screens at the same height but pot height differs so my leg sizes differ
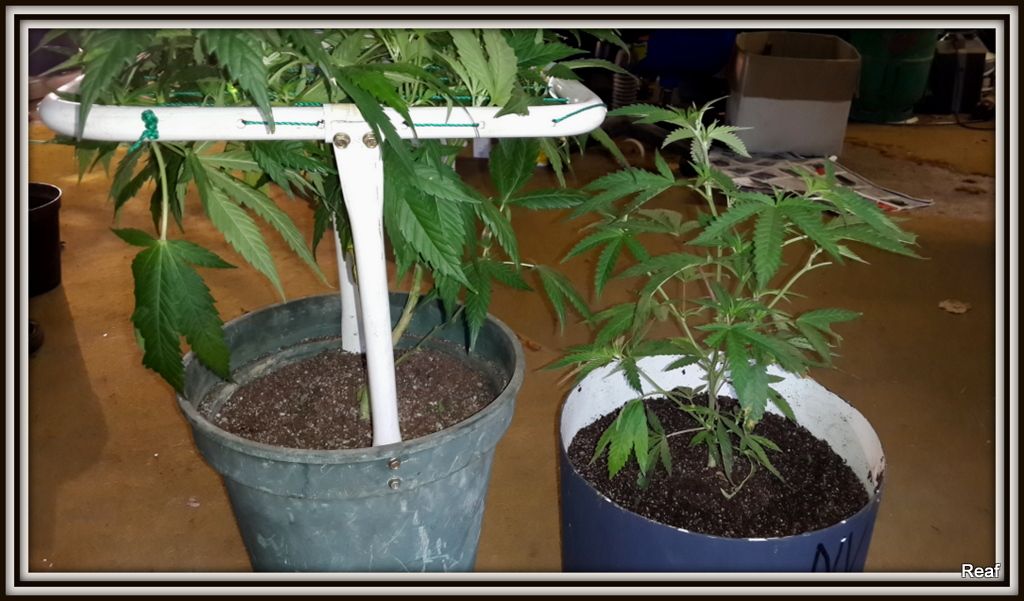
-measure and cut legs

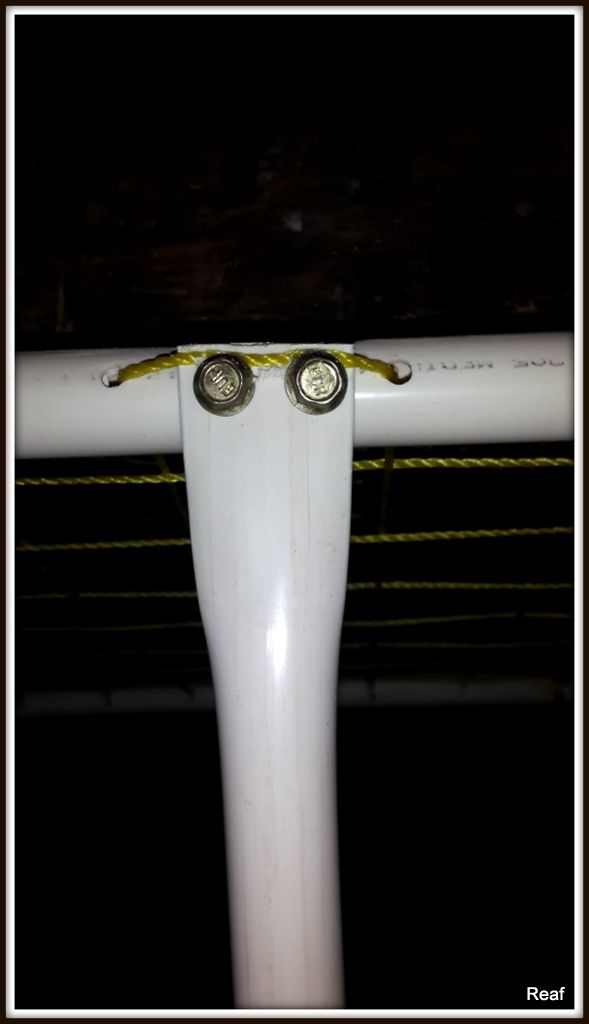
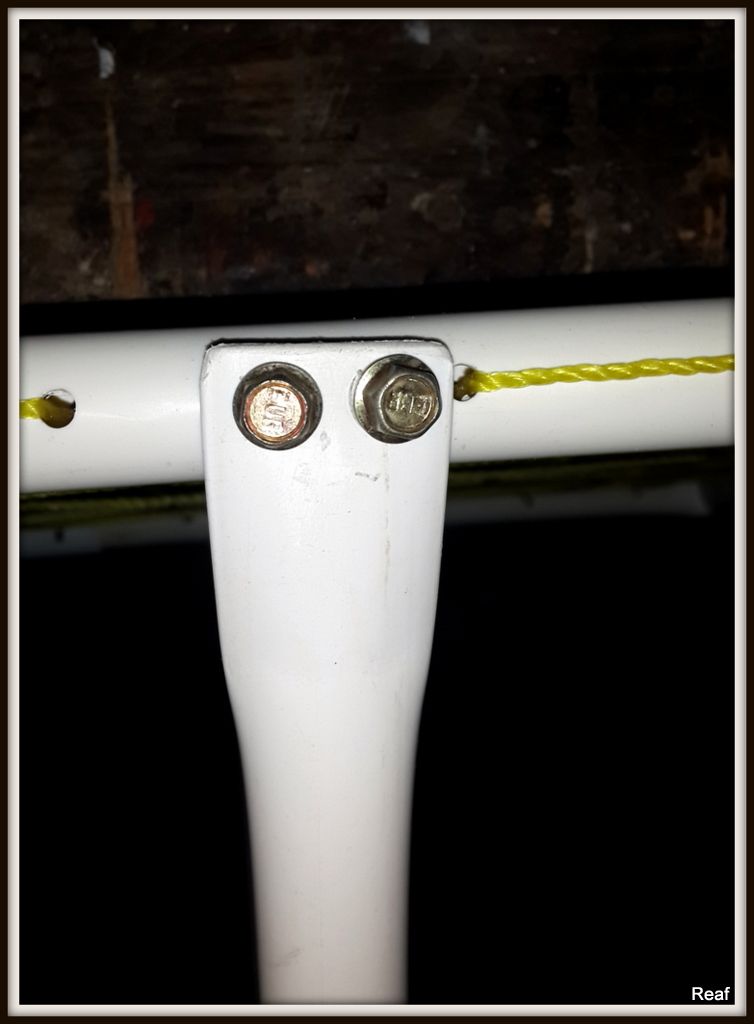
-squash the ends of the pipe in a vice or heat up and flatten
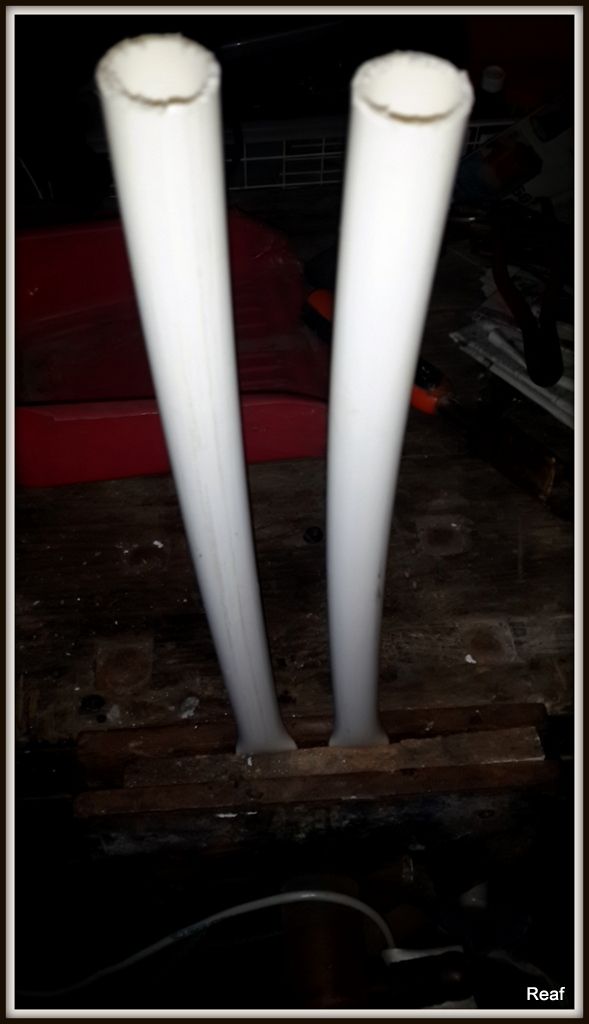

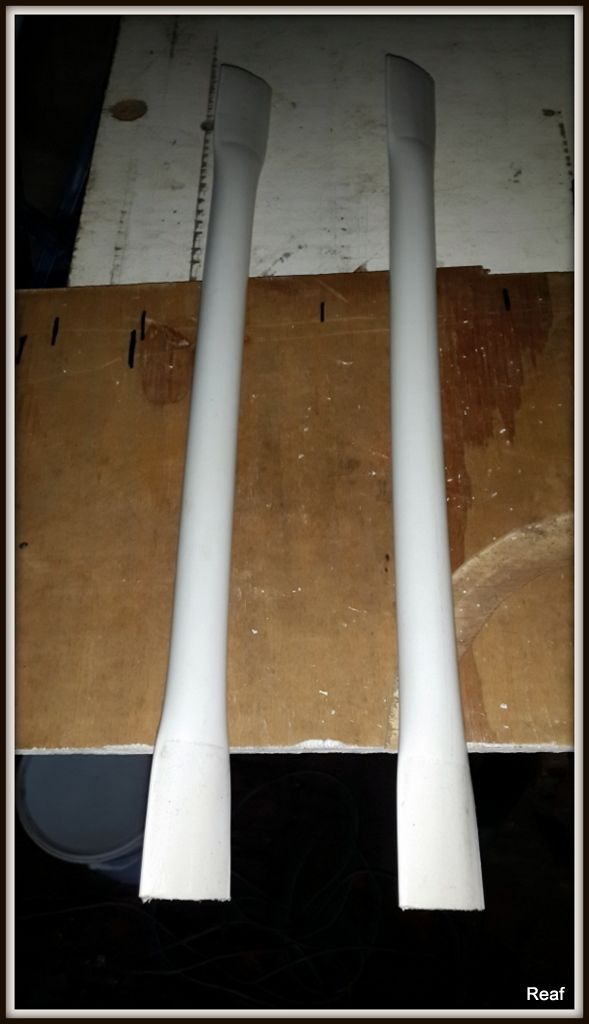
Step 10:
-Screw legs onto frame

Step 11
-Fasten frame to pot
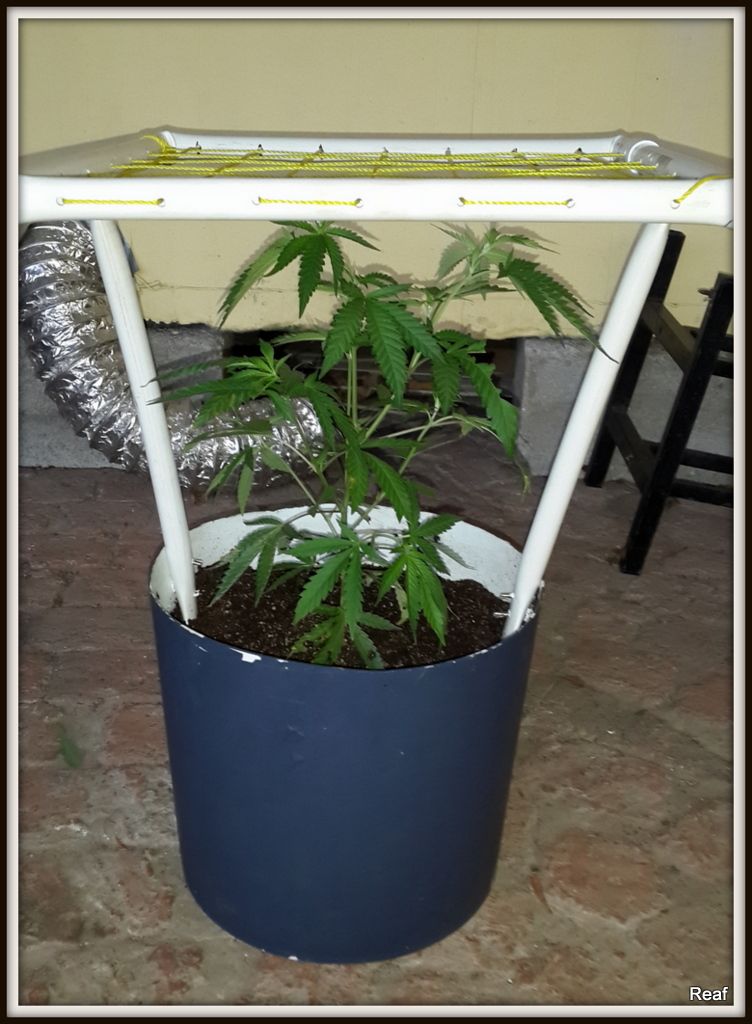
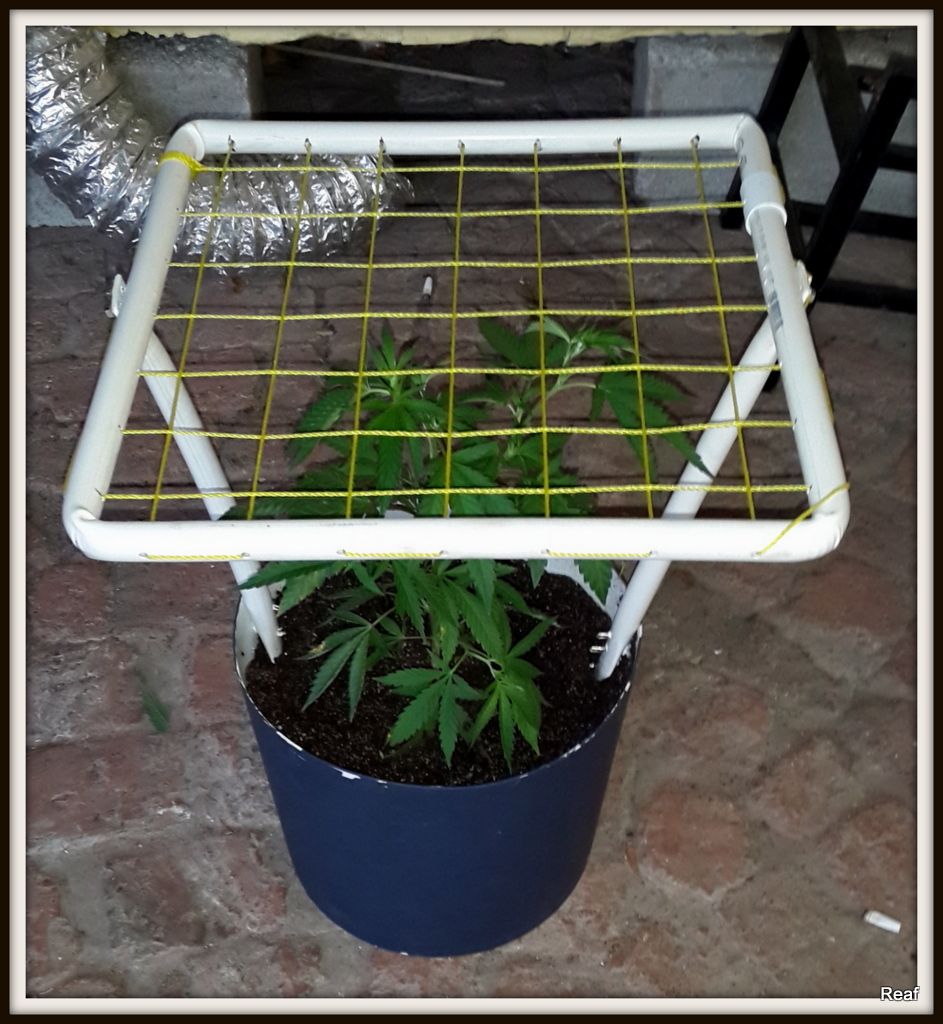
DONE
Hope you guys enjoyed it and if i can make one persons life easier i am happy .
Some inspiration to help with the build
Cheers
Reaf
-
Looking perfect bud.
That sweet earthy smell is exactly what you are wanting. The next step is to start collecting microbe samples and creating inoculation serums . Personally I like the lactose bacteria serum in winter as it helps prevent pm in the colder months
Cheers
Reaf
-
 1
1
-


Is GreenSMokeRoom Legit
in Indoor Growing
Posted
I just don't see why you would give someone local your details... if they get bust they will have all your details and where do you think the police will go knocking next...
Just my 2 cents
Reaf