
Leaderboard
.thumb.jpeg.cefd2335cb22f790b4f2d3171e4d2c7d.jpeg)
Popular Content
Showing content with the highest reputation on 10/07/2021 in all areas
-
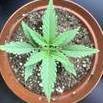
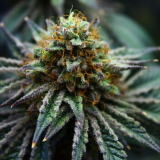
Whookay, no going back now. So as per the last bit of information the 4 plants in the tent now are the ones i'm most happy about in-terms of structure. The others didn't really make the cut. Crazy Hazey looks more like crazy indica. Anyways both Apple Jax phenos looking very similar and prominent, Nice and tight nodes but also grabbing some height for now. Starting to push out quite a few leaflets. Ginger tea doing the same, took her a while to get happy but she doing okay. Then the sugar cookies, this plant is growing exactly like the delux sugarcane, only plant showing magnesium deficiencies just like sugarcane, also very similar leaf and plant structure. They will live out the rest of their life in this 65gallon bed, its on the second round now and been re-amended via a very careful and calculated thumb suck. Here is Crazy Indica The Jack Herers and Bubalicious regulars received some water and must face the great outdoors now until I can sex them. This is the furthest i've gotten with any other plants other than cannabis so don't laugh lol, Roma Jam tomatos, Cherry tomatoes, Long Cayenne peppers and baby peppers.6 points
-
So I thought many of the members would have some good books to mention here for people to look into and learn more. If you have read something that you thought had really valuable gardening information, please share. Here are some of the my best reads I've come across. - Foundations of natural farming (Harold Willis) - The Intelligent Gardener (Steve Solomons) - The Regenerative Growers guide to garden amendments (Nigel Palmer, John Kempf) - A Soil Owners Manuel (Jon Stika) - Paramagnetism (Phillip Callahan) - Biological transmutation (Louis Cevran) Not really gardening but outlines assimilation possibilities - Quality Agriculture (John Kempf) - How Plants Work (Linda Chalker) - Grow your Soil (Dianne Miesslar, Elaine R Ingham) - The Ideal Soil (Michael Astera) And lastly obviously Teaming with microbes, fungi and nutrients (Jeff Lowenfels) There are quite a few really dense reads like Soil micro-organism and higher plants (N a Krasil nikov) and Mineral nutrition and Higher plants (Horst Marshner), Which are widely considered more academics reads, I'm halfway through the first one. Then 2 books I'm dying to read - Science in agriculture (Arden Anderson), Life and energy in agriculture (Arden Anderson)5 points
-
Welcome welcome. Hope you’re not here to … [emoji12] Sent from my iPhone using Tapatalk5 points
-
Just another little update! I did a major defoliation(1st) on the 30th(I felt that I removed too many leaved and branches) but by the time 5th October (2nd Pic) I changed to 12/12 for Flower on the 5th and added an extra 90w light to maximize light penatration and coverage. Got 570W for Flower hoping to beat my previous grow but time will tell.4 points
-
Very cool thread. So the book I have is not about gardening but more like an academic read on cannabis and health.. Haven't started reading it yet but it is quite dense with a lot of information...3 points
-
The first book I read was True Living Organics by The Rev. It helped me a great deal developing my soil mix.3 points
-
Yeah man Organic is wayyyyy cheaper, Like alot alot cheaper. I cant remember the last time I spent money on amendments, and when I finally do have to buy the odd kelp meal, lime etc. its like 50-100 buck a litre... This is why I really cant understand people saying doing full no till organics is more expensive than the bottle nutes. I can understand not wanting to stress over mixing soil and yadiya, but now with all our soil brands that offer high quality soils from the bag and re-amendment packages, it really is a win over-all, in-terms of the budget.3 points
-
Good day to everyone!! So stoked to be part of this platform. I have recently found my new love and that is growing, Been growing for a couple months now and keeps on getting better. Will be definitely learning a lot from this platform.2 points
-
Vpd also in range. Really loving that I can track this now Sent from my iPhone using Tapatalk2 points
-
Welcome! Freedom Farms green bag soil is very popular for indoor use, as well as a few other soils. As for using nutes with the soil, I personally prefer to (when I was using soil) and many growers make use of nutes with their soil but some prefer to use just plain water, some make teas - it varies a bit and personal preference comes into play here. You could add a few extra amendments, but I do not feel it is really necessary. Perhaps start simple and do not add any additional amendments and see how it goes. Later on once you're comfortable you can look at tweaking it a bit or look at moving to a different medium for indoor. If I was in your situation, I would go with plain soil and feed nutes. Depending on which nutes you plan to use, you can go lower or if it has a soil chart (Like GHE / Terra Aquatica nutes) then follow that. When I was using soil I was giving nutes with every feed. If you have any additives or foliars, you can continue to use those as per normal.2 points
-
JADAM Organic Farming: The way to Ultra-Low-Cost agriculture, Make all-natural fertilizer, pesticide and microorganism inputs yourself by Youngsang Cho (goodreads.com) edit: I know the topic is about books but if you keen you can also check out Agricultural Solutions - Eco Farming - Soil Treatment | Chris Trump.2 points
-
The Intelligent Gardener was a good one2 points
-
Welcome you have arrived at your final destination...2 points
-
Coming along nicely and they looking good and healthy. Sorry bout the ones you lost but that’s nature. Sometimes they just aren’t meant for this world Sent from my iPhone using Tapatalk2 points
-
I finished my soil mix and also added 2 new ingredients to my mix. Bloodmeal and Bonemeal My soil mux consists of the following : 50/50 Coco - Perlite 70/30 Coco - Perlite Potting Soil Compost Bonemeal Bloodmeal Rock Phosphate Mycoroot upon transplanting I made the drainage holes bigger and added some more for better drainage with a 20mm paddle bit. Then I washed them and hung them out to dry The Potting Soil was quite wet and clumpy so I whipped out some black plastic and layed it out and let it dry out a bit while I was busy mixing the soil I also started up the airpump to get the water Declorinenated for when I'm done. I finished the mix, topped it of with a nice mulch layer of compost and watered in all down. Now its just waiting to see who sexes female and then transplant... So thats it for now, have a great evening and chat again soon...2 points
-
We're about 1 month into the grow now so here's a proper update on each plant: Dinamed 1: Growth has been slow for the past few weeks, likely because I planted to early, but it seems she's really kicked into gear over the last week (but she's still tiny). For the past two waterings I have included some Bio-Grow at (1.25ml per 2l), and she seems to be appreciating it. As you can see I've also kicked off LST today but I don't really know what I'm doing so I'm taking it super slow. Coincidently I noticed the first tiny pistol earlier so she's starting to flower - right on schedule, though I hoped she'd be a bit bigger by now. Think I'll start adding Bio-Bloom in a week or so. Dinamed 2: This seedling was planted at the same time as the one above, but had an issue with the first two leaves growing deformed. They eventually fell off and since then a bunch of little leaves have tried to grow. It's really hard to see in this photo but all the leaves are tiny and deformed. My current theory is that this plant has some kind of detrimental mutation preventing proper leaf development. Sad to say it but I've given up on her and already have a replacement germinating. Cheese 1: This plant is coming along similarly well to the Dinamed 1, but is just a little smaller. I have her on the same feeding schedule which includes Bio-Grow (at 1.25ml per 2l) for the last two waterings. LST was also started today - taking it very slow. Unlike Dinamed 1, this one shows no signs of flowering yet. Cheese 2: The initial seed didn't germinate, so this replacement was planted about a week after the others. Seems to be coming along well. I suspect she'll start growing more vigorously like the others shortly. I haven't given any fertiliser yet but will start with a low concentration at next watering. In other news, I've purchased a Wedryer XL to hopefully make the drying process as pain (and smell) free as possible. Also bought some Bio-Bizz Top Max which I'll add to feeding regime for plants in flowering phase. Oh, and two more FF 10l fabric pots.. It's quite crazy how slow the soil in plastic pots dries out compared to fabric.2 points
-
Adding these photoperiod regs to the garden as well x5 Stormtrooper CJ F1 x5 Strawberry Cuda F1 x5 Strawberry Jedi F1 x5 Pepe le pew F11 point
-
Dude, check out this thread, I asked the same-ish question a while ago, it might help a little:1 point
-
Im not an indoor grower but from what i've seen, coco/perlite medium and a nute regime. Just make bloody sure to stay on top of watering/feeding to avoid the medium to dry out too much due to its relatively low water holding capacity. Synthetic or organic. Your choice. With outdoor you can experiment a bit more. Bugs will be had outdoors. Part of the fun.1 point
-
All the soils have their pros and cons. freedom farms need to feed toward the end of Flower orgasoilux is a bit stinky and also contains peat so you cannot dry out the soil completely. Organics matter seems like a good all rounder. I don’t think much is needed. what I am trying to say is you will need to experiment with the soils and see what works for you.1 point
-
Hi i am new to cannabis growing (2 years) and wanted to say Hi to all. Happy to be on this platform. ONE LOVE1 point
-
Btw got the temp on the vpd Calc I am subtracting 2, which seems to be easiest till I can get a lazer temp gun to find the lead temp Sent from my iPhone using Tapatalk1 point
-
You will not make a mistake with freedom farms. I found mixing Diotomatious earth for Phungus Knats and some Super Frass for the basic nutrient need is all you'll need. They do well with nothing at all I have found but they need that bit extra when in flower. Keep it simple with the first run and first focus on getting your environment 100%. I found that soil is the least of your worries with a first indoor grow. Enjoy and good luck..1 point
-
Sent from my iPhone using Tapatalk1 point
-
It's a 30cm pot. I don't know exact volume but I intend to get the others growing outdoor soon and just have her in there. I'll start her scrog soon and probably flip in a 2 or 3 weeks. I'll see what I can do about checking the EC. Should probably invest in an EC pen soon1 point
-
My knowledge of serum is zero to nada. Will get some tips from you. Regarding the P%$^& expensive part. Meant that Organic nutes is P877676 expensive. That's also part of the reason that i switched to No-till living organic soil. If you keep a hand on it with lasagne layering etc it will sustain a good couple of grows without having to start all over. Lekker bra1 point
-
Looks good bru With my mix, i added some additional amendments and also some bat guano pellets not listed. Once a week i will water it down with some Epic 5:2 at 1/4 teaspoon/10L rainwater. Check out my mix: I used Subcool's New Super Soil Mix recipe as reference and added a couple of additional amendments as per recommended ratios. Here follows my recipe and total volume is about 250L or 9 cubic ft: Base Mix: - 3 x 30l compost mix - 3 x 20l potting soil mix (peat moss based) - 1 x 20l sand (mix of mostly sand and fine clay from garden) - 5 x 1kg Coco Coir bricks - 1 x 30l bag Perlite Amendments: - 1kg Bone Meal - 3 x cups Kelp Meal - 3/4 cup Epsom salt - 1 x cup Dolomite lime - 1kg Soft Rock Phosphate - 5L Biochar - 1L Diatomaceous Earth - 1L Insect Frass (BSFL) - 1L Basalt Rock Dust - 1 cup Gypsum - 1 cup sprouting barley seeds for kicks Note: This is the first time that i made my own living organic soil. In the past it was the Biobizz line all the way. Works like a charm but poes (apologies moderators) expensive and the living organic way seems more sustainable and of course cost effective in the long run. Peace brother and will follow along on your growing journey1 point
-
Welcome and enjoy.. You are in the correct setting to up your game for sure..1 point
-
Thank and you and I certainly can't wait for that day.(Meanwhile I wait...)1 point
-
Good question! Actually I will do just that.1 point
-
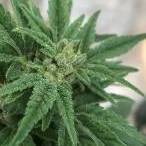
@Batista, thanx for that tip on the EWC top dress. I also gave them a feeding of Seagro and they are looking much better. Here is a few pics of the best looking ones...1 point
-
Welcome.. Enjoy bud. You wil be a master grower in no time..1 point
-
Welcome and enjoy your stay! Why not start a grow diary?1 point
-
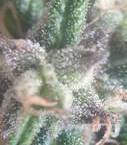
INTRODUCTION: ROSIN 101 The best solventless extractions require the best cannabis for starting material. Whether it’s bubble hash, dry sift, or rosin, premium cannabis concentrates are derived from cannabis flowers of superior genetics grown in the ideal environment, and harvested at peak ripeness. The process of creating cannabis concentrates with solventless extraction methods (without the use of solvents like butane or CO2) amplifies the existing quality of the cannabis from which it’s derived. Solventless extraction isn’t magic, and it won’t transform mediocre cannabis into a remarkable concentrate. The starting material directly determines the end product. Therefore, cultivating, harvesting, and preparing exceptional cannabis is key to making exceptional solventless extractions. The two main categories of solventless cannabis extractions are rosin and hash. The two forms of hash include bubble hash and dry sift hash, both of which are composed mostly of trichome heads with very little plant material. Bubble hash is created using the ice water extraction method, while dry sift is created by sweeping dry cannabis material over a series of mesh screens. Rosin can be made using flower, bubble, or dry sift as starting material, and the resulting rosin is known as either flower rosin, bubble hash rosin (or simply hash rosin), or sift rosin. Flower rosin is the fastest and most straightforward concentrate to produce, while hash rosin is generally considered the highest quality. Making rosin begins with loading cannabis starting material inside nylon filter bags, pre-pressing it with an aluminum mold, enclosing it within a folded piece of parchment paper, and placing it between rosin press plates where heat and pressure can be applied. The press gives us the right amount of pressure needed to extract rosin, while the heated plates provide high temperatures needed to liquefy the cannabis trichomes that contain all of the therapeutic compounds we’re aiming to extract. Several types of presses and rosin press plates are used in a variety of configurations, from hydraulic to pneumatic presses with either caged or uncaged plate set ups. Even a hair straightener will work for pressing rosin! We’ll outline the specific heat and pressure settings applied to each type of starting material in this overview. Pre-press molds are often used to compress the starting material inside the rosin filter bags before extraction. The loaded rosin bags are placed inside a folded sheet of parchment paper, which catches and holds the rosin as it’s extracted between the heated press plates. The rosin is then collected from the parchment paper with a rosin stamp or dab tool. (1) What Equipment You Need To Press Rosin (2) How To Build Your Own Rosin Press (3) Can You Really Press Rosin with a Hair Straightener? (4) Rosin Press Temperature Guide (5) Rosin Press Pressure Guide (6) 3 Reasons Why You Need a Pre Press Mold (7) How To Pack Rosin Bags (8) Hydraulic vs Pneumatic Presses (9) Caged vs Uncaged Rosin Press Plates PLANT GENETICS The quality of cannabis starting material is the predominant influencer of the quality of solventless extract it will produce. Just as the quality of cannabis starting material determines the quality of solventless extractions, genetics play a critical role in the outcome of a cannabis grow. While there are other impactful variables such as garden environment, plant genetics are the foundation of a high quality harvest. Selecting genetics known for producing copious amounts of resin is a good starting point . Specifically, flowers with an abundance of capitate stalked trichomes are what we’re aiming to cultivate, and some cultivars (strains/genetics) tend to produce more than others. Choosing seeds or clones that contain these genetics is the first decision to make when planning your operation. (10) Best Cannabis Strains for Pressing Rosin (11) Which Cannabis Strains Are Best for Washing Bubble Hash? (12) Why Is Pheno-Hunting Important for Rosin? GROWING ENVIRONMENT The right genetics can only express their most spectacular traits if given an optimum environment in which to flourish. Whether it’s an indoor or outdoor grow space, factors like light, temperature, humidity, and nutrients will determine the outcome of the harvest. The best genetics placed in a subpar growing environment will never live up to their potential. Thoughtful design and configuration, intentional selection of equipment, and meticulous attention to detail are components of a quality garden. At the same time, nature knows what’s best. We are facilitating growth, not playing God. The idea is to create the best space for the cannabis plant to do its thing. (13) Cultivating Soil for Maximum Terpene Expression (14) Guide To Pressing Rosin for the Outdoor Grower (15) Do I Need To Grow My Own Cannabis To Press Rosin? HARVEST AT PEAK RIPENESS Good genetics placed in the ideal growing environment will produce resin-packed buds at harvest time. But how can you determine the best time to harvest your flowers? The answer lies in the trichomes. Those tiny translucent globes convey peak levels of ripeness based on their coloration, starting first as completely clear, then moving to milky and finally amber-colored . When the trichome heads are predominantly amber, this signals the peak of resin production and the height of therapeutic compounds within. Using a magnifier like a jeweler’s loupe is the best way to peer into the world of trichomes and gage maximum ripeness. (16) Guide To Trichomes and Solventless Extraction (17) How To Harvest Cannabis at Peak Trichome Ripeness FLOWER ROSIN, SIFT ROSIN, OR BUBBLE HASH ROSIN? Before harvest day it’s important to decide how you intend to use the flowers. Assuming that solventless extraction is the goal, you have a few different options. Flower rosin can be produced using air dried flowers and requires less processing than dry sift or bubble hash rosin. If flower rosin is the aim, you simply need to harvest and dry the flowers, then press them using heated rosin press plates. Flower rosin is a great option if you’re just getting started in rosin and want to learn the mechanics and general workflow, without having to first process the flowers into hash. If hash rosin is your objective, the harvested flowers need to be processed into hash, which is either dry sift or bubble (bubble hash being the more pure of the two types of hash). Dry sift hash is made by sweeping dried, trichome-rich cannabis material over a set of mesh sieving screens, employing the force of gravity to separate trichomes from the rest of the material. Bubble hash involves a bit more complexity than dry sift, and is made using a process called ice water extraction. Ice water extraction uses cold water and a liquid vortex to separate trichomes from the remaining plant material. Both flower rosin and dry sift rosin require dried cannabis flowers as starting material, so hanging cannabis to dry immediately after harvest is the way to go. Although dry sift hash needs to be made with dry cannabis material, bubble hash can be made with either dry or “fresh frozen” cannabis. Fresh frozen cannabis refers to material that’s been frozen immediately after harvest to preserve the best qualities of the living plant, such as terpene content. Fresh frozen material is only used in the production of bubble hash and bubble hash rosin. Rosin filter bags hold the cannabis starting material and provide filtration while heat and pressure are applied in between the rosin press plates. As the rosin is squeezed from the material it passes through the filter bags before oozing out onto the parchment paper. Unwanted material is contained within the rosin bags, while pure rosin flows through. (18) Top 3 Reasons Why Solventless Is Superior (19) Flower Rosin vs Hash Rosin (20) Average Rosin Yields from Various Cannabis Starting Material FLOWER ROSIN Drying Flowers for Flower Rosin If pressing flower rosin is your objective, drying your freshly-harvested crop is the first step . Wet cannabis can’t be pressed into rosin, so hanging the flowers upside down to dry anywhere from several days up to two weeks will bring the material to the proper moisture level. In preparation for rosin production, cannabis flowers should maintain 60-65% relative humidity (RH). The best way to monitor moisture levels is with a digital hygrometer and a glass mason jar. Place the buds and a digital hygrometer within a sealed mason jar, and wait until the reading stabilizes. If the buds are showing RH over 65% then keep drying. If under 60%, you can rehydrate the material in preparation for rosin production . (21) What Is the Best Environment for Hang Drying Cannabis Flowers? (22) How To Rehydrate Cannabis Flowers That Are Too Dry for Pressing Rosin Pressing Flower Rosin Once the buds have achieved optimum moisture content, it’s time to prep them for rosin production. Selecting the correct rosin filter bags and setting the correct temperature and pressure outputs at your rosin press plates are the leading variables of the process. 90-120 micron rosin filter bags provide the ideal filtration power for pressing flower rosin. Whole buds should be broken up into smaller, popcorn-sized pieces by hand, not ground into a powder with a grinder. Regardless of the starting material you’re using, the rosin filter bag should be packed tightly to avoid empty spaces and large gaps within the material. 180-210 degrees Fahrenheit at 650-1000 PSI is the recommended range for pressing flower rosin. Note that pressure readings on your rosin press may not be the amount of pressure that’s actually being applied to your starting material at the bag. Calculating Platen PSI for your specific set up will help ensure accuracy. (23) How To Find the Best Flower for Pressing Rosin (24) What Micron Do I Use? (25) How To Press Flower Rosin Starter Guide (26) Top 5 Rosin Pressing Tips for Flower (27) How To Calculate Platen PSI DRY SIFT ROSIN Making Dry Sift Hash Dry sift is a form of solventless cannabis concentrate that involves separating trichome heads from cannabis plant material and isolating them for collection using a set of mesh sieving screens. Resin-coated cannabis flower or trim leaf is whisked back and forth over a series of stackable screens composed of varying pore sizes. While plant material is contained on the upper screens, trichome heads are small enough to pass through for collection on the lower screens. Dry sift can be made using a steady, sweeping motion of your hands across the surface area of the screens, or with the help of a card (e.g. a credit card) to move and gently agitate the cannabis over the mesh filter. This technique is known as “carding”. (28) What Is Dry Sift? (29) The Ultimate Guide To Dry Sift Cleaning Dry Sift Hash with Static Tech Trichome heads that collect on top of sifting screens are often intermingled with a noticeable amount of tiny plant particles that also made their way through the mesh filter. The most desirable hash contains trichome heads exclusively, without the presence of other plant material. It’s difficult to remove plant material from dry sift hash, but it can be done with a technique known as Static Tech. There are various forms of static tech, but the basic principle involves the use of static electricity to separate trichomes from plant material in such a way that the trichomes can be collected and the remaining material can be discarded. Pressing Sift Rosin While dry sift can be consumed on its own, most extractors prefer to press dry sift into rosin. Hash rosin that’s been pressed from dry sift is called sift rosin, and it’s generally considered a step up in quality from flower rosin. As with pressing flower rosin, selecting the correct micron rosin filter bag plus temperature and pressure settings at the rosin press are the top variables to consider. Smaller micron rosin filter bags can accommodate dry sift, so 37-75 micron bags are generally suited for pressing sift, depending on the purity. In general, the more pure the source material you’re pressing, the smaller the micron size rosin bag you need. Double-bagging is also a good idea with pressing both sift and bubble hash rosin. The volume of rosin outflow from the sift and bubble hash is generally higher than that from flower rosin, and the additional reinforcement of a second bag helps to prevent blowouts. A larger micron such as 120 or 160 is often used as the outer bag, but the recommended 37-75 microns for sift will also work doubled-up. If using different microns, the larger micron should be on the outside. 140-200 degrees Fahrenheit with Platen PSI between 500-1500 are good ranges in which to experiment with sift rosin. BUBBLE HASH ROSIN Washing Bubble Hash Bubble hash is the highest quality of hash, known as bubble hash because of the small bubbles that appear on the surface when exposed to heat . Bubble hash is rated on a scale of one to six stars, 6-star hash being the most pure and highest-quality. 5 and 6-star hash is also known as full melt hash, because it will fully burn away and leave no waxes or residuals behind on a nail or bowl when smoked. Making bubble hash is often referred to as “washing” hash, and involves a process known as Ice Water Extraction . Cannabis material (either flowers or trichome-covered trim leaves) is mixed in a bucket with ice water, stirred together with a circular motion to create a vortex in the water. This vortex, coupled with the ice cold temperature of the water, allows the trichome heads to break away from their stalks. This slurry of ice water, plant material, and trichomes is then poured through a series of filter bags, also called Bubble Wash Bags, through which the trichomes heads are separated from the remaining material. While tap water is probably the most convenient water to obtain, it’s not the best. Use RO water when washing hash for the best results. Each wash bag in the series contains a different size of filter screen, ranging in pore size from 220 to 25 microns. The filters which most closely match the size of full trichome heads will collect the highest grades of hash. Filters larger than trichomes catch and hold plant material that can be removed from the batch, while filters smaller than trichomes catch lesser-qualities of hash containing trichome stalks, broken heads, and tiny pieces of plant material. After the ice hash water slurry is poured through the filters, the wash bags are removed from the work bucket one by one and gently scraped with a cold metal spoon for the hash that’s collected on the screen. 120, 90, 75, and 50 micron wash bags usually collect the purest hash, composed almost exclusively of trichome heads with minimal contamination. (30) The History of Bubble Hash (31) How To Wash Bubble Hash (32) Top 20 Best Tips for Washing Bubble Hash (33) Why Is RO Water Best for Washing Bubble Hash? (34) What Is the Purpose of Using Multiple Bubble Wash Bags? (35) Best Qualities for Bubble Wash Bags Drying Bubble Hash Drying the hash that’s collected from the wash bags is a critical step that can make or break the entire process . Wet hash invites microbial growth like mold, which will completely ruin the product, rendering it unusable. As the wet hash is scraped from the filter screens, the trichome heads stick together in an amorphous glob, somewhat resembling a loose and extremely wet pancake batter. This patty of hash can be dried using various methods, the most effective of which is freeze drying. Freeze drying utilizes the process of sublimation coupled with a vacuum chamber to quickly and thoroughly dry the hash with minimal exposure to oxygen. Freeze dryers are advanced pieces of equipment that are often used by commercial processors. The cost of freeze dryers can be prohibitive to in-home extractors and casual hobbyists. It just depends on your budget! Air drying hash is a fine alternative to freeze drying. To air dry hash, immediately freeze the wet hash patty for 24 hours, or until it’s frozen into a solid block. Then take the frozen blob of hash and rub it back and forth across a kitchen sieve or strainer, which breaks the hash into smaller pieces. The resulting is a coarse powder or sand-like consistency in the hash, allowing it to dry out evenly. Without breaking the hash down into smaller pieces like this, moisture will get stuck inside the middle of the hash patty and harbor microbial growth. Sieve the wet hash over a piece of cardboard lined with parchment paper, and allow it to air dry in a cool, dry, dark space, or inside a refrigerator, until it’s completely dry to the touch. This can take a week or more. Squeeze a piece of the hash and feel for any moisture on your fingertips. When no moisture is present, the bubble hash is ready to go. (36) Best Ways To Dry Bubble Hash (37) How Does a Freeze Dryer Work? Pressing Bubble Hash Rosin 3 and 4-star hash is ideal for pressing into rosin. 1 and 2-star is better suited for edibles, and 5 and 5-star can be dabbed as it is. 25-37 microns is the recommended filter size for rosin bags when pressing bubble hash. Bubble hash is loaded into the rosin bags the same way as sift and flower, packed tightly to eliminate empty pockets within the material, but not so tightly that rosin cannot flow out from the center. It should feel dense and very compressed when squeezed between the fingers. For both flower, sift, and bubble hash, pre-press molds help to further compact and prime the material for extraction. As with dry sift, double-bagging for bubble hash is helpful in preventing blowouts due to the high volume of rosin that flows quickly from the hash under heat and pressure. A larger micron such as 120 or 160 is often used as the outer bag, but the recommended 25-37 microns for sift will also work doubled-up. If using different microns, the larger micron should be on the outside. 160-190 degrees Fahrenheit with Platen PSI between 350-750 are good ranges in which to experiment with bubble hash rosin. And with any type of rosin extraction, be sure to start with a lower PSI and gradually increase to full pressure over time . (38) How Hash Is Rated (39) Top 10 Hash Rosin Pressing Tips CURING ROSIN Rosin is ready to consume immediately after production, but a curing process can help enhance the flavor and stabilize consistency. Curing rosin involves the use of an airtight glass jar, such as a mason jar. This approach to curing rosin is known as Jar Tech, and there are two types of Jar Tech: Warm Curing and Cold Curing. Warm Curing involves exposing the rosin to temperatures anywhere between 90 and 135 degrees Fahrenheit. This can be accomplished in an oven, or even with a heating mat similar to what is used for warming cannabis cuttings. Cold curing is often done at cool room temperatures, in the 60-degree Fahrenheit range. Cold curing often preserves more of the volatile terpenes in rosin than warm curing. With both types of curing, keeping the lid sealed for the duration prevents terpenes from evaporating into the air. The lid can be “burped” intermittently during the cure, and some extractors like to “whip” the rosin as well. Terpenes often separate out naturally during the cure, and whipping helps to reintegrate the liquid terpenes back into the rosin. (40) How To Jar Tech Rosin (41) Cold Curing vs Warm Curing Rosin (42) Top 10 Warm Curing Rosin Tips (43) Top 10 Cold Curing Rosin Tips (44) What Are the Benefits of Whipping Rosin? STORING ROSIN Rosin can be stored for many months in glass containers with an airtight seal. Using glass to store rosin is key, since glass doesn’t interact with terpenes in the way that plastic or silicone does. Both plastic and silicone as susceptible flake away and leach into the rosin over time, as terpenes are actually a natural form of solvents. To preserve the natural state of the rosin, be sure to only store it in glass for the long term. Store rosin in a cool, dark, and dry environment. If storing in the refrigerator or freezer, be sure to allow the jar to come to room temperature when removing for use first before cracking open the lid. And wipe away any condensation that forms inside the glass, in order to prevent moisture from getting into the rosin. Bubble hash and sift can be stored following these same principles. Bubble Hash can also be heated and rolled into a Temple Ball for long term storage and aging. (45) How To Properly Store Rosin (46) What Is a Bubble Hash Temple Ball? (47) What Is the Purpose of Aging Bubble Hash? CONSUMING ROSIN Rosin is most commonly dabbed with a dab rig and heated nail or bowl. To optimize for the most flavorful smoke, use lower temperatures at the nail. If you prefer the ease and convenience of vape pens, rosin can be used to make vape cartridges. This requires extra steps to decrease the viscosity of rosin, but it can be done. Rosin can also be used for making edibles or other infusions, like MCT Oil capsules. You can even add rosin to joints for enhanced flavor and potency. (48) How To dab Rosin (49) How To Make Vape Cartridges with Your Rosin (50) Best Ways to Use Rosin CONCLUSION Unlike cannabis concentrates that utilize solvents for production (e.g. CO2 in closed-loop systems), solventless extracts like bubble hash and rosin are safe and easy to produce right from home, with minimal investment in equipment and starting material. Growing your own cannabis allows you to produce quality starting material and is often the most economical way to create a steady flow of top shelf cannabis concentrates. Solventless concentrates capture the essence of the plants from which they’re produced, delivering a pure, potent, and flavorful experience. Getting started is the hardest part. Once you start gaining some hands-on experience, you’ll quickly learn as you go and improve your process and your results. Take good notes along the way, learning from both your successes and so-called failures. What are you waiting for? Start your solventless journey and start rosin pressing today! Reference1 point
-
1 point
-
Some Update pics..1 point
-
Hey @Nas welcome, welcome! I'm sure you'll find there's a ton of valuable info here and there are many experienced growers that will be able to help you troubleshoot a problem or give advise or whatever you need to up your game. You're at the right place... What are you currently growing? Send us a few pics.. You doing indoor or outdoor?1 point
-
Starting day 20 of 12/12. Want to defol a little just to give some buds more light , will do during the week bit by bit. Sent from my Hisense Infinity H50 using Tapatalk1 point
-
Just a lil update. The ladies are growing like crazy and there a noticeable difference between feeds. Looks like I might flip the switch to flower on Monday.1 point
-
About 3 weeks since germination. Here are the two prize fighters1 point
-
So weekend away and things are running as they should. Temperature stabilizing around 24 gives me hum of 60. Best I can do without a dehumidifier. Plants are a lot happier after a couple of days. In the veg space on top it’s running a bit Cooler and humidity around 70. [emoji20] Sent from my iPhone using Tapatalk1 point
-
Tell me about it, it's kak heavy1 point
-
Update: Both Dinamed Kush seedlings have been planted in their forever homes. Still waiting for the Cheese seeds to breach before I pot them. Humble beginnings1 point
-
I would keep the peat pellets in a dome (if you have one) until they germinate, then I'd fill the pot with just FF soil and put the pellet into a hole with some Mycoroot at the bottom. Don't add any other nutrients and don't overwater. You're going to have to be extra careful because you're in your final pot and it's easy to misjudge the watering, especially when they're babies. Good luck and welcome to the club1 point
-
So here they are. The competitors for the 2021 Outdoor Grow. 3 x still needs to pop up from the soil. Their soil layer has risen so they will be out within a day. Even on this rainy day they are kept warm and snug with a lovely 23C The Slurrican Cheese is also starting to grow into a beautiful little plant. "She" will be big if all goes to plan I will also report back with the Lactobacillus Serum stage. Tomorrow is 7 days but hopefully i can start today...1 point
-
17 out of the 22 seeds cracked and shot taproot. 3 x Bruce Banner 1 x GSC and 1 x BKB is still in the paper towel room. I will add 2 more Bruce Banner seeds to germinate if i dont see anything by Sunday. I finished digging the 40L holes for each plant. Still need to get stakes to brace them for that heavy winds1 point
-
I have a 1,5 x 1,5 BUD Box Pro, a Secret Jardin 160 Lodge and a Mars Hydro 60cmx1,2m. My bud box is amazing especially because it has side windows, so unlike the others, you can partially open and access the inside without unzipping the entire frikkin tent. This is my major gripe about the SJ and Mars. ( in fairness they were cheaper) The Mars was bought just as a drying tent and I must say I’m impressed with the build quality. The bud box was replaced under warranty as the main front zip broke during my first grow. The supplier was very good about it and swapped it for a new one. The replacement is on its second grow and the main front zip on the new one is also a bit iffy so I mostly avoid unzipping it completely. I can’t speak to light leaks since my room is pitch black and I grow auto’s. Overall I really like the bud box pro, love the white interior and the side access windows.1 point
-
So cool to go through all of this, I'm a serious music lover who dabbles in a few instruments. My music taste stretches seriously far, but since there is a real lack of Metal on this thread I'm adding to it with something a little new that blew my mind. (For those not interested in listening to it's entirety, just skip to 05:00 and listen to the last minute )1 point
-
I have a Budbox tent (same as the one you listed) and it is awesome! Overall the best tent I have used to date, not perfect though. A few things do frustrate me but not the end of the world. A friend has a Mars tent and the quality seems good and he really likes it. The GT Hydro tents were not great quality to begin with. Mammoth isn't bad, but I feel they are overpriced for the quality. I was disappointed with mine as it has light leaks via the zip from factory and small, skinny poles which rust easily. Secret Jardin tents I had were not bad either, but there is a difference between the Hydro Shoot series and the Dark Street series. The latter being the better tent and a bit pricier, comes with some nice features but I prefer my Budbox overall. I'd take Secret Jardin over Mammoth if either were a consideration.1 point
-
Zurple Punch All Gas #9 Spumoni (Chopping this weekend) ] Slurricane (also getting chopped) (first time grow, finished 8 weeks, now in 13 weeks. Definitely stunted when trying to fix the soil, but happy how she finished regardless)1 point


This leaderboard is set to Johannesburg/GMT+02:00
